
Introduction of Layout Utilities PowerPoint PPT Presentation
1 / 9
Title: Introduction of Layout Utilities
1
Introduction of Layout Utilities
Free
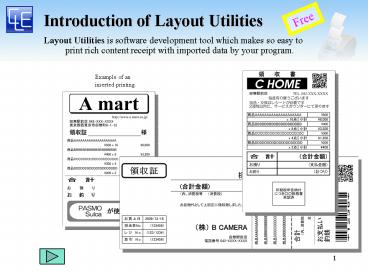
- Layout Utilities is software development tool
which makes so easy to print rich content receipt
with imported data by your program.
Example of an inserted printing.
2
Structure of Layout Utilities
- The Layout Utilities consists of 3 tools around
which the layout file is positioned on the center.
?Layout Editor ? Editting tool
?Layout File Manager ? Management tool
Create and edit printing layout.
Manage completed layout files. Display file list
and thumbnail.
Layout file
The file defines a location and style of inserted
Texts, images and barcode data.
POS application
?Layout Print Engine ? Printing tool
It imports data into completed layout. You can
implement it to your program. Only external
application interface, no GUI.
3
Advantage of Layout Utilities(1/3)
A receipt or others
- Satisfying your customers request more easily.
Conventional case
POS Application
A Corp
Essential to cording for each customer.
Different layout requests
B Corp
C Corp
Layout Utilitiess case
No need to change. Only prepare for importing
data.
Layout Print Engine
As image data like logo is included in the layout
file, there is no need to copy image data files
to POS terminals. Data source file management is
much easier.
Layout files
Only by replacing layout files, it is possible
to meet your customers request.
4
Advantage of Layout Utilities (2/3)
- Easier to create printing programs.
Eliminate your coding job dramatically.
You can print nice layout receipt from your
program by leaning/implementing ONLY 10 methods
(commands) of Layout Utilities. No need of
learning huge number of printer commands or high
level knowledge about complicated printing on
Windows.
For your reference CT-S310II has more than 100
commands
Note unique functions of each printer cannot
be utilized by the Layout Utilities. Refer to
your user's guide for the detail of
commands(methods).
5
Advantage of Layout Utilities(3/3)
- Easy to print diversely
Use it like MS-Office software. No need of
engineering support.
You can use the various fonts available on your
Windows PC.
Vertical layout and horizontal layout can be
mixed on one receipt..
You can put diagrams, some barcodes and images on
the screen. The data on the screen is printed as
it is shown.
Layout Editors screen
6
Development with Layout Utilities
- 1. Divide the printed data structure.
2. Create layout file.
Expected Receipt image
3. Use it form a program
7
Layout Utilities Programing Sample(details)
- Print from a program ex) From VB6 code, revise
one point and print.-
' ------------------------------------------------
------------------------------------- Set comObj
CreateObject("Citizen.LayoutUtilities.Printing.C
ontroller") result comObj.Open(Layout files
name) Call comObj.BeginPrint '
--------------------------------------------------
----------------------------------- frameIndex
comObj.InitFrame("Frame2") partsIndex
comObj.GetParts(frameIndex, "Text1") result
comObj.SetPartsData(frameIndex, partsIndex,
Changed characters line) result
comObj.AddFrame(frameIndex) ' -------------------
--------------------------------------------------
---------------- result comObj.DoPrint(printer
s name) ' -------------------------------------
------------------------------------------------ C
all comObj.EndPrint Call comObj.Close
--- Preparation --- 01 Create an object. 02
Open a designated layout file. 03 Initialize
an object. --- Amend Text 1 of Frame2, add it to
a printing area. --- 04 Copy an designated
frame in the work area in the object. Get
index. 05 Get an index of a an designated part
in the designated frame. 06 Change the work
area in the object. 07 Copy the work area in
the object to the printing area. --- Print data
in the printing area --- 08 Start printing with
the designated printer. In case a
printers name is blank, OS default printer is
displayed. --- completed --- 09 Discard the
work area in the object. 10 Clear all the area
in the object..
10 methods (commandes)
DoPreview for the preview display
8
Layout Utilities Operation Environment
OS Windows XP Windows Vista Windows 7 Windows
8 Windows 8.1 ?PC CPU Pentium 1.0 GHz or
faster, higher than the spec required by your
OS. Memory More than 1GB, more than the spec
required by your OS. HDD Installed HDD, more
than 10MB of free disk space. Monitor
Resolution more than 1024x768e, High Color more
than (16bit) Software .NET Framework
2.0(SP1/SP2)?3.0(SP1/SP2)?3.5(No SP /SP1)
9
Introduction of Layout Utilities
- Xin c?m on!
Recommended
