
The Exposure Triangle With Acknowledgement to an article at the Digital Photography School http://digital-photography-school.com - PowerPoint PPT Presentation
1 / 19
Title:
The Exposure Triangle With Acknowledgement to an article at the Digital Photography School http://digital-photography-school.com
Description:
The Exposure Triangle With Acknowledgement to an article at the Digital Photography School http://digital-photography-school.com ISO (International Standards ... – PowerPoint PPT presentation
Number of Views:344
Avg rating:3.0/5.0
Title: The Exposure Triangle With Acknowledgement to an article at the Digital Photography School http://digital-photography-school.com
1
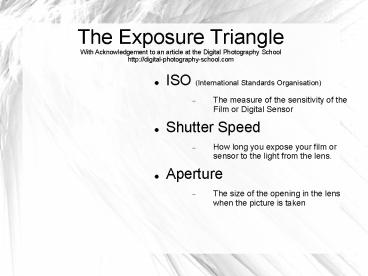
The Exposure TriangleWith Acknowledgement to an
article at the Digital Photography
Schoolhttp//digital-photography-school.com
- ISO (International Standards Organisation)
- The measure of the sensitivity of the Film or
Digital Sensor - Shutter Speed
- How long you expose your film or sensor to the
light from the lens. - Aperture
- The size of the opening in the lens when the
picture is taken
2
The Exposure Triangle
- Understanding the digital photography exposure
triangle - Many people describe the relationship between
ISO, Aperture and Shutter Speed using different
metaphors to help us get our heads around it.
Here are two.. - The Window Imagine your camera is like a
window with shutters that open and close. - Aperture is the size of the window. If its
bigger more light gets through and the room is
brighter. - Shutter Speed is the amount of time that the
shutters of the window are open. The longer you
leave them open the more that comes in. - Now imagine that youre inside the room and are
wearing sunglasses (hopefully this isnt too much
of a stretch). Your eyes become desensitized to
the light that comes in (its like a low ISO). - There are a number of ways of increasing the
amount of light in the room (or at least how much
it seems that there is. You could increase the
time that the shutters are open (decrease shutter
speed), you could increase the size of the window
(increase aperture) or you could take off your
sunglasses (make the ISO larger). Its not the
perfect illustration but you get the idea?
3
The Exposure Triangle
- Another Metaphor.......Sunbaking
- You could think about digital camera exposure as
being like getting a sun tan. - In a sense, your skin type is like an ISO rating.
Some people are more sensitive to the sun than
others. - Shutter speed here is like the length of time you
spend out in the sun. The longer you spend in the
sun the increased chances of you getting a tan
(of course spending too long in the sun can mean
being over exposed). - Aperture is like sunscreen which you apply to
your skin. Sunscreen blocks the sun at different
rates depending upon its strength. Apply a high
strength sunscreen and you decrease the amount of
sunlight that gets through and as a result even
a person with highly sensitive skin can spend
more time in the sun (ie decrease the Aperture
and you can slow down shutter speed and/or
decrease ISO). - You may also hear the metaphor concerning hose
pipes and water (the wider the hose, the less
time it takes to drench something/somebody).
There are others.
4
The Exposure Triangle
- Bringing It All Together
- While an automatic-metering camera can give you
'perfect' exposures every time, mastering the art
of exposure is something that takes a lot of
practice. In many ways its a juggling act and
even the most experienced photographers
experiment and tweak their settings as they go.
Keep in mind that changing each element not only
impacts the exposure of the image but each one
also has an impact upon other aspects of it -
Each element of the triangle has 'side effects'
that we can use to our advantage. - Digital cameras are the ideal testing bed for
learning about exposure. You can take as many
shots as you like at no cost and they not only
allow you to shoot in Auto mode and Manual mode
but also generally have semi-automatic modes like
aperture priority and shutter priority modes
which allow you to make decisions about one or
two elements of the triangle and let the camera
handle the other elements. Unlike rolls of film,
you can change the sensitivity (ISO) of the
sensor for each shot (with film you need to
'rate' and develop the whole roll of film to get
a particular ISO). - A lot more can be said about each of the three
elements in the exposure triangle......
5
ISO
- In traditional (film) photography ISO (or ASA, or
DIN) was the indication of how sensitive a film
was to light. It's measured in numbers - the
lower the number, the lower the sensitivity of
the film and the finer the grain in the shots
youre taking. - In Digital Photography, ISO measures the
sensitivity of the image sensor. The same
principles apply as in film photography the
lower the number the less sensitive your camera
is to light - and the less 'digital noise'.
Higher ISO settings are generally used in darker
situations to get faster shutter speeds (for
example an indoor sports event when you want to
freeze the action in lower light) however the
cost is noisier shots. Noise is most visible in
larger 'blank' areas of an image. See the two
enlargements below the one on the left was
taken at 100 ISO and the one of the right at 3200
ISO.
6
ISO
- 100 ISO is generally accepted as normal and
will give you higher quality images (little
noise/grain). However, any half-decent digital
camera can work just as well at ISO200 and it
will give a little more flexibility and a
consistently higher shutter speed (which, as
we'll see, is a GOOD thing.... usually). - Some people keep their digital cameras in Auto
Mode where the camera selects the appropriate
ISO setting depending upon the conditions youre
shooting in (it will try to keep it as low as
possible) but most cameras also give you the
opportunity to select your own ISO. - When you override your camera's Auto settings and
choose a specific ISO youll notice that it
impacts the aperture and shutter speed needed for
a well exposed shot. For example if you bumped
your ISO up from 100 to 400 youll notice that
you can shoot at higher shutter speeds and/or
smaller apertures. How much higher and how much
smaller will be discussed later.
7
ISO
- When choosing the ISO setting we should ask
ourselves the following four questions - 1. Light Is the subject well lit?
- 2. Grain Do I want a noise-free shot or can
I accept some noise? - 3. Tripod Should I/Must I use a tripod?
- 4. Moving Subject Is my subject moving or
stationary? - If there is plenty of light, I want little grain,
Im using a tripod and my subject is stationary I
will generally use a pretty low ISO rating. - However if its dark, I can accept some noise, I
dont have a tripod and/or my subject is moving I
might consider increasing the ISO as it will
enable me to shoot with a faster shutter speed
and still expose the shot well. - The big trade-off of this increase in ISO will be
noisier shots.
8
ISO
- Situations where you might need to push ISO to
higher settings include - Indoor Sports Events where your subject
is moving fast yet you may have limited light
available. - Concerts also low in light and often
no-flash zones - Art Galleries, Churches etc- many galleries
have rules against using a flash and of course
being indoors are not well lit. (A tripod might
help but they often have rules against them too!) - Birthday Parties blowing out the candles
in a dark room can give you a nice moody shot
which would be ruined by a bright flash.
Increasing the ISO can help capture the scene. - ISO is an important aspect of digital photography
to have an understanding of if you want to gain
more control of your digital camera. Experiment
with different settings and how they impact your
images today. - (The biggest contributing factor to digital noise
is a high density of photo-receptors (pixels) on
a sensor. Very expensive cameras have lower
density and have very little noise even at
extremely high ISO while cheaper cameras often
cram too many receptors onto the sensor and they
interfere with each other, electronically).
9
Shutter Speed
- What is Shutter Speed?
- the amount of time that the shutter is open.
- The length of time that the film or sensor is
exposed to the scene youre photographing. - The shutter itself is a small plastic or cloth
sheet that opens and closes to allow light onto
the sensor/film. When you press the shutter
release button on your camera to take a picture,
if using Auto Focus, the focusing will and then
the shutter opens for a time determined by the
user. - In cameras with TTL (through the lens)
viewfinders, the shutter release button also
moves a mirror upwards and out of the way of the
film and shutter curtain. It is this movement of
the shutter curtain and the mirror that gives
taking a picture its distinctive "click" sound,
but note that it can also cause vibration. For
this reason, some shooting modes on better
cameras will lock the mirror up and pause before
opening the shutter. - Let's break down the topic into some bite sized
pieces that should help digital camera owners
trying to get their head around shutter
speed............
10
Shutter Speed
- Shutter speed is measured in seconds in most
cases, fractions of seconds (e.g. 1/1000th is
much faster (shorter amount of time) than
1/30th). - In most cases youll probably be using shutter
speeds of 1/60th of a second or faster. This is
because anything slower than this is very
difficult to use without getting camera shake.
Camera shake is when your camera is moving while
the shutter is open and results in blur in your
photos. - If youre using a slow shutter speed (anything
slower than 1/60) you will need to either use a
tripod or some some type of image stabilization
(more and more cameras are coming with this built
in). - Shutter speeds available to you on your camera
will usually double (approximately) with each
setting. As a result youll usually have the
options for the following shutter speeds 1/500,
1/250, 1/125, 1/60, 1/30, 1/15, 1/8 etc. This
doubling is handy to keep in mind as aperture
settings also double the amount of light that is
let in as a result increasing shutter speed by
one stop and decreasing aperture by one stop
should give you similar exposure levels.
11
Shutter Speed
- Some cameras also give you the option for very
slow shutter speeds that are not fractions of
seconds but are measured in seconds. These are
used in very low light situations, when youre
going after special effects and/or when youre
trying to capture a lot of movement in a shot).
Some cameras also give you the option to shoot in
B (or Bulb) mode. Bulb mode lets you keep the
shutter open for as long as you hold the button
down.When considering what shutter speed to use
in an image you should always ask yourself
whether anything in your scene is moving and how
youd like to capture that movement. If there is
movement in your scene you have the choice of
either freezing the movement (so it looks still)
or letting the moving object intentionally blur
(giving it a sense of movement). - To freeze movement in an image (like in the
surfing shot above) youll want to choose a
faster shutter speed and to let the movement blur
youll want to choose a slower shutter speed. The
actual speeds you should choose will vary
depending upon the speed of the subject in your
shot and how much you want it to be blurred.
12
Shutter Speed
- Motion is not always bad there are times when
motion is good. For example when youre taking a
photo of a waterfall and want to show how fast
the water is flowing, or when youre taking a
shot of a racing car and want to give it a
feeling of speed, or when youre taking a shot of
a star scape and want to show how the stars move
over a longer period of time etc. In all of these
instances choosing a longer shutter speed will be
the way to go. However in all of these cases you
need to use a tripod or youll run the risk of
ruining the shots by adding camera movement (a
different type of blur to motion blur). - Focal Length and Shutter Speed - another thing to
consider when choosing shutter speed is the focal
length of the lens youre using. Longer focal
lengths will accentuate the amount of camera
shake you have and so youll need to choose a
faster shutter speed (unless you have image
stabilization in your lens or camera though
that's not perfect). The rule of thumb' to use
with focal length (in non image stabilized
situations) is to choose a shutter speed with a
denominator that is larger than the focal length
of the lens. For example if you have a lens that
is 50mm 1/60th is probably fine but if you have a
200mm lens youll probably want to shoot at
around 1/250. By the way, if you're using a
tripod turn off the image stabilization the
stabilization works against natural vibrations
and movement by vibrating itself so you would
be introducing extra and unnecessary
counter-vibration to nothing.
13
Aperture
- What is Aperture?
- Aperture is the size of the opening in the lens
when a picture is taken. - When you hit the shutter release button of your
camera a hole opens up that allows your camera's
image sensor to catch a glimpse of the scene. The
aperture that you set impacts the size of that
hole. The larger the hole the more light that
gets in the smaller the hole the less light. - Aperture is measured in f-stops, or 'f numbers'
for example f/2.8, f/4, f/5.6, f/8, f/11, f/16,
f/22 etc. They equate to fractions of the maximum
lens aperture (a theoretical 'f/1'). Moving (a
higher f number) from one f-stop to the next
halves the size of the opening in your lens (and
the amount of light getting through). Moving
(lower in f number) doubles the amount. (The
numbers above f/2, f/2.8, f/4, f/5.6 etc are
whole 'stops', most lenses will have intermediate
steps. - Keep in mind that a change in shutter speed from
one stop to the next will also double or halve
the amount of light that gets in this means if
you increase one and decrease the other you let
the same amount of light in you will start to
see the relationship..... a 'perfect' exposure
might be, say, f/5.6 at 1/250th the same
exposure would be achieved with one stop more
aperture (f/8) and one 'stop' slower shutter
speed (1/125th) .
14
Aperture
- Depth of Field and Aperture.... There are a
number of results of changing the aperture of
your shots that youll want to keep in mind as
you consider your setting but the most noticeable
one will be the depth of field that your shot
will have. - Depth of Field (DOF) is that amount of your shot
that will be in best focus. Large depth of field
means that most of your image will be in focus
whether its close to your camera or far away
(like the picture to the top left where both the
foreground and background are largely in focus
taken with an aperture of f/22. - Small (or shallow) depth of field means that only
part of the image will be in focus and the rest
will be blurred (like in the bottom left). Youll
see in it that the tip of the yellow stems are in
focus but even though they are only 1cm or so
behind them that the petals are out of focus.
This is a very shallow depth of field and was
taken with an aperture of f/4.
15
Aperture
- Small numbers mean small DOF and large numbers
mean large DOF. While the camera can actually
only focus on one tiny point in space, the depth
of field determines how much of the image is in
"acceptable focus" to the human eye. - Do some experimenting. Go outside and find a spot
where youve got items close to you as well as
far away (fence posts, perhaps) and take a series
of shots with different aperture settings from
the smallest setting to the largest. Youll
quickly see the impact that it can have and the
usefulness of being able to control aperture. - Some styles of photography require large DOF. For
example in most landscape photography youll see
small aperture settings (large numbers) selected
by photographers. This ensures that almost
everything from the foreground to the horizon is
relatively in focus. A wider angle lens (around
the 20-28mm equivalent) has a huge DOF at almost
all apertures used. - On the other hand, in portrait photography it can
be very handy to have your subject perfectly in
focus but to have a nice blurry background in
order to ensure that your subject is the main
focal point and that other elements in the shot
are not distracting. In this case youd choose a
large aperture (small number) to ensure a shallow
depth of field. A longer than 'normal' lens is
used very often because the longer lens (like the
equivalent of 90mm) has a narrower relative DOF
at wide apertures. - Macro photographers tend mainly to use large
apertures to ensure that their subject totally
captures the attention of the viewer while the
rest of the image is completely thrown out of
focus. DOF also depends on distance to subject
and the focal length of the lens in Macro
shots the DOF is incredibly small, while in
longer distance shots, with a telephoto lens, the
DOF is relatively small, compared to a wider
angle lens.
16
Depth of Field - 1
- Depth of field is the range of distance within
the subject that is acceptably sharp. The depth
of field varies depending on camera type,
aperture and focusing distance, although print
size and viewing distance can influence our
perception of it. - The depth of field does not abruptly change from
sharp to unsharp, but instead occurs as a gradual
transition. In fact, everything immediately in
front of or behind the focusing distance begins
to lose sharpness - even if this is not perceived
by our eyes or by the resolution of the camera.
Three shots taken with the same lens, from the
same spot, using different apertures...... (left
to right f/2.8, f/5.6, f/8.)
17
Depth of Field - 2
- Aperture and focal distance are the two main
factors that determine how big the DOF will be on
your camera's sensor. Larger apertures (smaller
F-stop number) and closer focal distances produce
a shallower depth of field. - Why not just use the smallest aperture (largest
number) to achieve the best possible depth of
field? Other than the fact that this may require
prohibitively long shutter speeds without a
camera tripod, a very small aperture softens the
image by creating a larger circle of confusion
(or "Airy disk") due to an effect called
diffraction - even within the plane of focus.
Diffraction quickly becomes more of a limiting
factor than depth of field as the aperture gets
smaller. (Despite their extreme depth of field,
this is also why "pinhole cameras" have limited
resolution). Your camera may go to f/32.....
don't bother to use it, or indeed anything above
f/22.
18
The Exposure Triangle
- ISO (International Standards Organisation)
- The measure of the sensitivity of the Film or
Digital Sensor - Shutter Speed
- How long do you expose your film or sensor to the
light from the lens? - Aperture
- The size of the opening in the lens when the
picture is taken
19
The Exposure Triangle
- Bringing It All Together
- So, we've seen that the three main elements in
photography have to combine together so that we
can get the best effects. It's quite possible
that you'll happily switch your camera's
operation control to P (for professional, eh?) or
Auto and don't bother with what's going on
inside. Well that's fair enough it could be
said that you're concentrating on the composition
of the subject and not getting hung up on the
technicalities. But successful photographers I
mean those that exhibit, get published, make a
living out of it need to know the nuts and
bolts intimately. At an enthusiasts level, we
will become better by knowing those elements. - Each element of the triangle is important and
must be selected in harmony and each element
also has 'side effects' that we should use to our
advantage. - Oh, did I mention the fourth Element? It may be
more like an Exposure Square rather than a
Triangle? Oh well.... another day perhaps.
Recommended
CrystalGraphics Presentations


