
Introduction to NT Administration PowerPoint PPT Presentation
1 / 124
Title: Introduction to NT Administration
1
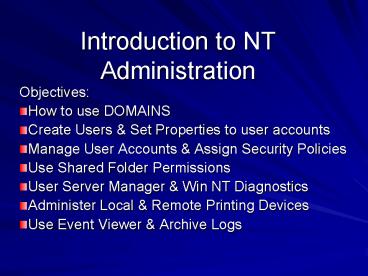
Introduction to NT Administration
- Objectives
- How to use DOMAINS
- Create Users Set Properties to user accounts
- Manage User Accounts Assign Security Policies
- Use Shared Folder Permissions
- User Server Manager Win NT Diagnostics
- Administer Local Remote Printing Devices
- Use Event Viewer Archive Logs
2
Compare Win NT Server 4.0 with Win NT Workstation
4.0
Server Allows a nearly unlimited number of users to connect to a shared resource at one time Tuned for file- and print-sharing performance Symmetric multiprocessing suport on up to four processors Can be a Domain Controller Workstation Allows up to 10 users to connect to a shared resource at one time Tuned for application responsiveness Symmetric multiprocessing support on up to two processors Cannot be a Domain Controller
3
Why Do We NETWORK?
- Share Resources
- More Computing Power
- Collaborate Communicate
- More File Space
- Faster Access than a Sneaker Net
4
DOMAINS
- The concept behind NT Networks
5
Workgroups
- A workgroup is a collection of computers that
form a peer-to-peer network. In a workgroup, each
computer can act as both a server a client for
sharing resources. - Each station in a Workgroup is Managed
Separately. - Advantages? Disadvantages?
6
A workgroup
List of users
List of users
List of users
7
PERMISSIONS
- The Rules that limit which users can use
specified network resources
8
Permissions and permission sets
Task name Task Read (R) Display the folders
data, attributes, owner, and permissions Write
(W) Create new files or change the folders
attributes Execute (X) Run files in the folder
or open the folder Delete (D) Delete files in
the folder Change Permissions (P) Change the
folders permissions Take Ownership (O) Become
the owner of the folder Permission Allows No
Access Denies all access to the
folder List RX Read RX Add XW Add
Read RXW Change RXWD Full Control RXWDPO Speci
al Directory Access Any custom combination of
tasks Special File Access Set independently
9
Layers of security
Shared folder
NTFS security
Share security
User workstation
Network request
10
Unified logon for Microsoft networks
Enter Network Password
Enter your network password for Microsoft
Networking
Peer-to-peer network
OK
Cancel
User name
Password
Enter Network Password
Enter your network password for Microsoft
Networking
OK
Cancel
Windows NT domain
User name
Password
Domain
11
DOMAINS
- A DOMAIN is a collection of computers that can be
used and managed as a single entity. Users can
log on once to a domain then have access to any
computer or resource for which they have
permissions. - Usually, Domains are organized by a common use or
purpose
12
A DOMAIN
- Requires the presence of at least one computer
running Windows NT Server. - This computer, called the Primary Domain
Controler (PDC), maintiains a central accounts
database called the directory database of its
members. - A Domain may have multiple servers, clients or
domain controllers (maintains directory database
participates in validating logon requests)
13
A domain has a centralized directory database
Domain controller
List of users
14
The role of Windows NT Server domain controllers
Windows NT Server PDC
Processes user logons
client
Windows NT Server BDC
15
The role of Windows NT Server domain controllers
(cont.)
Windows NT Server PDC
Update accounts database and perform directory
replication
client
Windows NT Server PDC
16
DOMAINS
- WHAT IF
- The PDC goes down? Can users logon to the
network?
Yes, BUT only if there is a Backup Domain
Controller (server) with the current directory
database.
17
DOMAINS
- Give two advantages of using a domain model for
your network.
Computers can be centrally administered
The common directory database simplifies security
administration
Give one Disadvantage of using DOMAINS
A DOMAIN requires a dedicated Network
Administrator!
18
DOMAIN CONTROLLERS
- Primary Domain Controller (PDC)
- The PDC database is the only copy that can be
edited (User Manager). If the PDC is offline,
you cannot change the directory database. - The first WinNT Server created in a Domain will
automatically become the PDC. You can override
this at a later time AFTER adding a BDC (Backup
Domain Controller). - You can ONLY have ONE PDC in a Domain.
19
Backup Domain Controller (BDC)
- A BDC assist the PDC by authenticating domain
users. The BDC maintains a read-only version of
the directory database (it cannot be edited)
which it periodically updates with the PDC. - You MUST specify during installation that a
computer will act as a BDC. - If you promote a BDC to a PDC, then the existing
PDC will automatically be demoted to a BDC.
20
Backup Domain Controller (BDC)
Domain CLASS
21
MEMBER SERVER
- A member server is not a domain controller. It
merely makes resources available within the
Domain. - Because a member server does not maintain a copy
of the directory database does not participate
in the logon validation processit can better
serve its resources to the domain. - Member servers are created when you install the
server software. Member servers cannot be
promoted to a PDC or BDC unless you reinstall
WinNT Server - You can have multiple member servers in a Domain.
22
The role of application servers
application server
Runs application in RAM
client
23
The role of application servers (cont.)
application server
Runs application in RAM
Responds to client requests
client
24
PLANNING A DOMAIN
- You cannot change the domain to which a domain
controller belongs without reinstalling WinNT
Server. - Each Domain in a Network must have a unique name.
- SIDs (Security Identification Numbers) validate
a resource to the Domain NOT the computer or
resource name. - A Single Domain can span a routed connection (All
campuses of a school district) or a Wide Area
Network (WAN). - Network Traffic Patterns NOT physical Design
should determine how your Domains are setup. - (I.E. BUSINESS APs versus PEIMS)
- WHAT ABOUT STUDENT FOLDERS?
- WHAT ABOUT AR DATABASE?
- WHAT ABOUT WEB Productivity Access?
25
LOGGING IN
- Ctrl Alt Del
- Takes you to the Login Screen
- Identify
- User Name, Password, DOMAIN
- Ctrl Alt Del
- Change Password
- Lock Workstation
- Task Manager
26
Types of traffic
DHCP Dynamic Addressing WINS registration
Resources on the Network Browser announcements
Master Browser HTTP Web Access FTP Files
Transferred over Internet (Downloads) Media
Streaming Video broadcasts Logon Logging Files
Browse lists, DNS, File transfer, HTTP
Trust, WINS replication, Domain
synchronization, Directory replication
27
MANAGING USERS
- A USER ACCOUNT contains the information that
allows a user access to the WINNT operating
system and its resources. - USER NAME must be unique
- LOGON PASSWORD
- Group Membership List are contained in the
account - BUILT-IN ACCOUNTS
- Administrator Account
- Guest Account May wish to disable or change
the name password to Training etc.
28
TOOLS for MANAGING USER ACCCOUNTS
- USER MANAGER
- Allows Administrator to Create a User Account
- Options
- User Must Change Password At Next Logon
- User Cannot Change Password
- Password Never Expires
- Account Disabled AUP Violations, Moves from
District, Retires
29
Lets Practice
- Open USER MANAGER For the Domain (usrmgr)
- What are invalid characters in User Names in NT?
- Cannot Include Special Characters / \ ? lt gt
, - User Name should be descriptive
- 05roussj (preferably no more than 8 characters)
- Password is case-sensitive it may be up to 14
characters - Initial Password like 123456
- Assign User to Groups
30
Lets Practice
- User Properties
- Characteristics of a User Account
- User Name
- Full Name (may include spaces)
- Description
- Password
- Password Control Options
- Groups User Belongs to
- Profile Settings
- Hours During Which the User can log on to
Computer - Computers from which a user may log on
- Special Account Properties
- Dial-in Permissions -- RAS
31
Lets Practice
- Create a Home Folder
- Home Folders network folder location that is
used to store all the personal programs data
files for the user - \\senior01\users\username
- When a Home folder is set in the users account,
it becomes the users default folder for the Open
Save As dialog boxes in most applications. - NTFS will create these folders share them with
the user - FAT you must create share home folders
32
Lets Practice
- Create a Home Folder
- Select User, Properties, Profile
- Enter the Universal Naming Convention (UNC) path
next to Local Path textbox for the Home Directory - \\senior01\users\username
- Two back slashes
- server name
- slash
- shared folder
- slash
- username
- The server shared folder must first exist on
the network. NT will create a subfolder using
the User ID name for the folder name. Click OK.
33
Lets Practice
- Look through the HOURS options
- Observe the Grid
- Drag from Monday at 800 am to Friday at 500 pm
- Click Disallow
- Click OK
- What does this action accomplish?
- When would you use it?
34
Lets Practice
Explore Answer the following How can you
Restrict a users logon access to a single
computer? How can you set an expiration date to
an account?
35
Lets Check for Understanding
Troubleshooting User Account Properties Create a
User Account for your machine with the following
properties Username Student Password
Logical No account options enabled Home folder
D\Users\Student\username Logon Hours Monday
to Friday, 9 to 5 Disabled Domain Users have the
right to logon locally.
36
Lets Check for Understanding
Troubleshooting User Account Properties Create a
User Account for your machine with the following
properties Username Student Password
Logical No account options enabled Home folder
C\Users\Student Domain Users have the right to
logon locally. Logoff as administrator log on
as student Create a Notepad document attempt to
save it using Save As. Where does Notepad
attempt to save the file by default?
37
User Profiles
User PROFILES are files that store user
configuration information, such as the desktop
appearance. Profiles are created and maintained
by the system. Each user is assigned a profile
with information stored in a set of files and
folders within the Windows (Winnt) Profiles
folder. Profiles can reside on the client
computer (or each client computer a user logs
onto OR ROAMING Profiles may reside on the logon
server. ROAMING Profiles follow a user from
client to client. Roaming Profiles can be
Personal OR Mandatory on WINNT
machines. Roaming Personal Profiles User can
change Roaming Mandatory Profiles User cannot
change
38
User Profiles
- When you assign a server location for user
profiles, a copy of the users local profile is
saved both locally remotely on the server.
Comparison of both profiles is made at the next
logon the user is asked which profile to load. - Create a roaming Profile
- Create a normal user profile by logging on as a
user changing your desktop - Log off logon as the Administrator. In Control
Panel, open the System application activate the
USER PROFILE TAB. - Select the users profile click on Copy TO
- Enter the name of the destination network folder
(\\senior01\users\username will work) - In the Permitted To Use box click on Change. Add
appropriate User. Click OK
39
User Profiles
In the USER MANAGER For DOMAINS, view properties
for the user to whom you will be assigning this
roaming profile. Click on Profiles to display
the User Environment Profile dialog box Enter
the Path to users roaming user profile using the
UNC name Click OK.
40
User Profiles
Roaming Mandatory User Profiles May NOT be
modified. I.E. User CANNOT change the desktop
color. To create a mandatory user profile,
create a roaming personal user profile and rename
the Ntuser.dat file to Ntuser.man This file is
found WHERE?
41
User Profiles
In a DOMAIN, where should you create your User
Accounts? What tool do you use to create the
accounts? Where does one get this tool? Where
can this tool be placed? What are the three
types of User Profiles? Where are they stored?
User Profiles \windows\profiles, Roaming Personal
Profiles Roaming Mandatory Profiles stored
on the server.
42
Local Global Groups
- Local Groups belong to the Domain can be
assigned permissions rights - Local Groups can contain Global Groups
- Global Groups do not have permissions or rights
assigned to them, but they can become members of
local groups that do have permissions rights - Global Groups can only contain Users from the
Domain - The Primary Reason for creating Global Groups is
that they are to be assigned to a Local Group
43
Remember Local vs. global groups
Local group
Global group
Can contain
Can contain
- Users from a local database
- Users from other computers databases
- Users from outside of the domain
- Global groups
- Users from the domain database
44
A strategy for implementing network security
(cont.)
2. Organize user accounts into global groups.
(Domain Group)
1. Create user accounts.
3. Put global groups into local groups.
WebMasters
Local Groups Give Access To Resources
45
A strategy for implementing network security
(cont.)
2. Organize user accounts into global groups.
(Domain Group)
1. Create user accounts.
3. Put global groups into local groups.
WebMasters
4. Grant permissions to the local group.
46
Groups in a trust relationship
Users
Global groups
Local groups
47
Lets Practice
- Decide what Global Groups Local Groups are
needed for your campus. - Decide this by looking at all the resources.
- File Servers
- Folders
- Plan a Folder Scheme
- Name of Folder
- Needed Subfolders
- Level of Sharing
- Application Servers
- CD ROM Towers
- Internet Access
- RAS Access
- Printers
- Client Hardware (Drives Printers
- Folders (Shared CD ROM Drives Folders)
48
Lets Practice
- Decide what Global Groups Local Groups are
needed for your campus. - Create Global Local Groups to Manage Identified
Resources - Diagram Resource those Local Groups Global
Groups
49
Lets Practice
- Assign Permissions to resources using your Local
Groups - Describe what Permissions you will need to assign
- for each resource per Local Group
50
Managing GROUPS
51
Managing GROUPS
In your own words, describe the difference
between local global groups
A Local Group can contain Global Groups Global
Groups cannot contain Local Groups Global Groups
can contain ONLY users from within your
Domain Local Groups can be used ONLY on the
computer on which they were created (unless the
computer is a Domain Controller)
52
Managing GROUPS
Would you assign permissions to a specific user
accounts or To a Group?
You always assign permissions to groups rather
than directly to user accounts. When new users
need access to those resources, you simply add
them to the appropriate group.
53
Managing GROUPS
The Built-in Groups.page 3-4
Administrators Replicators Power
Users Users Guests Backup Operators Account
Operators Server Operators Print Operators
54
Managing GROUPS
The Built-in Groups.page 3-4
Each Group has certain capabilities that are
allowed by their default user rights.
55
Access this computer from the network X X
Back up Restore files folders X X X
Change the system time X X
Force Shutdown from a remote system X X
Load Unload device drivers X
Log on Locally X X X X X
Manage auditing security log X
Shut down the system X X X X X
Take ownership of files other objects X
Account Op
Print Op
Backup Op
Server Op
Replicator
Everyone
Admin
Users
Guests
X
56
Managing GROUPS
TEST YOUR UNDERSTANDING
- Can Account Operators modify a User Account that
is a member of the Administrative Group? - Can Users create Local Groups on a server if they
have access to the User Manager for Domains
Application? - Which Built-in Groups can be modified by an
Account Operator?
The Users, Guests, and Replicator
57
Managing GROUPS
TEST YOUR UNDERSTANDING
- Which Built-in group is not available on WINNT
Server Computers, but is available on
Workstations?
Power Users Group
2. Which built-in Groups are available only on
Domain Controllers?
Account Operators, Server Operators, Print
Operators
3. Which built-in Groups Can Backup Restore
Files?
Administrators, Server Operators, Backup
Operators
58
BUILT-IN GLOBAL GROUPS
Global Group Purpose Contains by default Who can Modify Member of Which Local Group
Domain Admins To enable members to perform administrative task on the local computer Administrator (user account) Administrators Administrators (local group)
Domain Users To enable members to perform tasks granted to the Users group on every local computer in the Domain Administrator (user account) Administrators, Account Operators Users
Domain Guests To enable members to perform tasks granted to the Guests group on every local computer in the Domain Guest (user account) Administrators, Account Operators Guests
59
Global Groups
- Global groups do not have inherent capabilities
to perform system administration or other network
functions as local groups do. Instead, global
groups acquire their capabilities by being
members of the appropriate local group.
60
Determining Memberships
- Practice Log on as Administrator
- Open user Manager For Domains
- Notice that Global Groups begin with the globe
icon and the word Domain (ie Domain Admins) - Double-click on Administrators (Administrators is
a user account Domain Admins is a global group
account) - Who are the members of the Domain Users Global
Account?
Administrators, any users
61
Built-in system groups
Group Members Purpose Example of a Use
Interactive Users who log on to the system locally. To restrict local access to a resource, you could assign the NO ACCESS permission to the Interactive group
Network Users that connect to a network available resource (a share) permissions available to all To restrict network access to a resource while allowing local access, you could assign the NO ACCESS permission to the Network group
Everyone All users that connect to the system, locally or across the network You can make a resource, such as a printer available to everybody by giving the EVERYONE group Full Control Rights.
CreatorOwner A user that creates a resource (such as a file) is a member of this group. If the Administrator creates the resource, the Administrators group is made a member of this group. You can use this group to grant special privileges to the creators of objects, such as files or print jobs.
62
When might you Use each of these Groups?
- Anytime you wish to use default levels of user
rights
63
Creating Managing Groups Must be created on
PDC database
- Use Manager For Domains to create groups (must be
Administrator or Account Operator) - To create a global group
- Choose User, New Global Group
- Enter name of group (20 character limit)
- Use Add button
- Click OK
- If you need to add several users to a group, hold
down the Ctrl key, select each user to add then
choose User, New Global Group.
64
Creating Local Groups
- Use User Manager for Domains
- Choose User, New Local Group
- Enter name of your group (256 characters however
only the first 22 will be displayed) - Use Add button
- Click OK
65
Lets PracticeCreate a Local Group Add the
Global Group to it.
- Perform this task at the PDC or BDC
- In the Groups list box select NetUsers (to ensure
that no user accounts are automatically placed in
the new local group) - Choose User, New Local Group
- In the Group Name text box, enter LocalUsers
- Click Add
- In the Names list box, select NetUsers
- Click Add, Click OK After name is displayed in
the Add Names List Box. (P 3-13)
66
4-1 Account Administration
- Copying User Accounts
- You can create a New User account by copying an
existing user account (using existing user
account as a template) - Creating Templates for Users is helpful when you
must add large numbers of new users - Template that expires on graduation date for
students. Templates usually begin with an
underscore character _ to display it at the
top of the User Name List
67
Lets Practice
- Log on as Administrator
- Open User Manager for Domains
- In the list of User Names double-click on Guest
- Observe the properties
- Click on Cancel
- Choose User, Copy
- Observe the information that is automatically
entered in the Copy of Guest dialog box - In the Username text box, type _copy
- In the Description text box type copy of Guest
account - Enter a password
- Click Add
- Click Close
- In the Username list box, double-click on your
new use account to view properties - Click Cancel
68
Modifying Multiple User Accounts
- If you need to modify two or more User Accounts
in the same way, you can make the changes
simultaneously. - Use the Ctrl key to highlight those accounts
the accounts selected, choose User, Properties - The User Properties dialog box for multiple user
accounts is slightly different you can modify
descriptions, enable disable the 4 user account
options, and modify group memberships and profile
information.
69
Lets Practice Page 4-4
- Select your _copy
- Press Ctrl and select several users
- Choose User, Properties
- In the Description Box enter User Account
- Uncheck Users Cannot Change Password password
Never Expires - Click OK
- Double-click on a User Account to check
properites - Click Cancel
70
RENAMING USER ACCOUNTS
- All user Accounts can be renamed.
- When might you want to RENAME a User Account?
- Select a User
- Choose User, Rename
- Type in New name
- Click OK
71
Deleting User Accounts
- All Users except the Administrator Guest
accounts can be deleted by using the User, Delete
command. - Once User Accounts have been deleted, they cannot
be re-created. - At creation each user account is given an SID
which is unique. Creating the exact user account
again DOES NOT assign the same SID to that
account therefore the system sees the exact user
name password as a NEW account - When should you Delete a User Account?
72
Adding a User to the Account Group
- In the Username list box, double-click on a User
- Click on the Groups button
- Click on Account Operators
- Click Add
- Click OK
- Choose Policies, User Rights
- Which Rights are automatically assigned to the
Account Operator? - Click Cancel
73
Account Policies
- The Account Policy is used to control how
passwords are used maintained by users. - Account Policy dialog box is divided into two
sections - Password Restrictions
- Account Lockout
- Explore these options
- When would you use each option?
74
5-1 Securing Network Resources
OBJECTIVES
- Use Shared Folder Permissions to Secure Network
Resources - Use NTFS permissions to secure network resources
- Determine effective permissions on a file or
folder, given set of group, user, and share
permissions.
75
Using Shared Folder Permissions
- Requirements for Sharing a Folder
- Organize files folders so that folders with the
same security requirements are located within the
same branch in the folder hierarchy. For
example, if users require Read permissions to
several folders, store those folders within the
same folder - Member of Administrator Group
- Server Services Must be Started
- NTFS (New Technology File System)
partitionAdditional Considerations
76
Sharing a Folder By Using Windows NT Explorer
- Run Explorer
- Select and observe the Temp folder
- Choose File, Properties, Sharing, Share AS
- Accept the Defaults
- Observe the User Limit Box
- Click OK
77
Permissions versus Rights
- A Permission is a specific level of access a user
or group is granted to a particular resource.
Unlike rights, which apply to the system as a
whole, permissions are associated with specific
objects. Therefore a user right can override any
object permissions that are also assigned to a
user. - For example, if you grant the user the right to
back up files and folders, it automatically
includes the ability to read all files, even if
the file permissions have been set specifically
denying the user access rights to the files.
78
Shared Folder Permissions
- Once you create a share for a folder, you must
set remote access permissions to allow other
users to access the folder. - Default is EVERYONE FULL CONTROL
- Use Permissions Button to set the Folder
Properties to NO ACCESS, READ, CHANGE, FULL
CONTROL - NOW, Create a NOTEPAD.txt document in your own
TEMP Folder and save it. - SHARE your Temp Folder with only Mickey
- Type of ACCESS READ
- Click OK
79
Accessing Shared Folders with Network Neighborhood
- Logoff as Administrator Logon As Mickey
- Double-click on Network Neighborhood
- Double-click on Partners computer name
- Double-click on your Partners TEMP folder
- Access the NOTEPAD.txt document
- Are you able to edit the text?
- Can you save a copy of the edited text file to a
different remote location where you have rights?
To a local location? - Can you Delete the file?
- Can you Move the file?
80
Accessing Local Resources
- Swap Computers with your Partner
- Logon As Mickey
- Access Document in TEMP Folder
- Can you Edit?
- Create A New Text File?
- Delete a text file?
Shared Folder Permissions apply ONLY to REMOTE
connections AND DO NOT have any effect on what
you can do if you are seated at the computer
containing the shares.
81
Using the Run Command to Connect to Shared Folders
- In the Run Command box type the UNC path to the
shared folder - \\computer_name\shared_folder
- Hit Enter
82
Default Administrative Shares
- In a Network Environment (WINNT, 2000, XP) there
are two automatic shares for remote access Admin
Drive_letter for each hard drive partition. - Admin takes you to the \winnt_root folder
- drive_letter remotely takes you to each hard
drive partition - PRACTICE Use the RUN Command Line Type
\\partners_computer\C - Can you Access your partners D Drive?
83
Hidden Shares
- at the end of the administrator sharenames
indicates that these are HIDDEN SHARES. The
hides the shared folders from users who browse
the computer - Hidden Shares must be accessed remotely by their
UNC path - Practice
- Hide your TEMP Share see if your partner can
ACCESS IT - Rename the folder without the
84
Hidden Shares
- Open the Control Panel
- Open Server
- Click on Shares
- Observe the Hidden Shares
- Click Close. Cancel
85
Stopping the Sharing of a Folder
- You can stop the sharing of all folders by Right
Clicking, Choose Sharing, Select NOT SHARED,
Click OK - YOU CANNOT stop the sharing of the Admin or
Drive
86
Using NTFS Permissions to Secure Network Resources
- Unlike FAT file system, which provides only
shared folder permissions, NTFS file system
provides security for files folders - NTFS also provides ownership priviledges that are
important - On NTFS volume, you can implement security on a
per-file, per-folder, or per-drive basis by
assigning various levels of permissions. THIS
DOES EFFECT the ability of users to access the
shared file LOCALLY AS WELL AS REMOTELY
87
Set FILE Permissions
- In WINNT EXPLORER use the Security tab in the
Properties dialog box to set or view the
permissions - Permissions can be set on a per-group, or
per-user basis - Select the Temp folder Notepad.txt file
- Choose File, Properties, Security tab,
- Click Permissions what are the defaults?
88
FILE PERMISSIONS
- READ (R)
- WRITE (W)
- EXECUTE (X)
- DELETE (D)
- CHANGE Permission (P)
- TAKE OWNERSHIP (O) (Special Access)
- To be able to change permissions on a file, you
must take ownership of it (creator already has
ownership) then YOU can set the permissions
89
Inheriting Permissions
- File Folder Permissions are separate. However,
unless the permissions are explicitly set
otherwise, files folders will inherit the
permissions of their parent folder. - When you view permissions on a folder, you will
see two sets of permissions in parenthese, for
example (RXW) (RX). The first refers to the
permissions on the folder itself its
subfolders the second set applies to permissions
on files in that folder. THERE ARE SOME folder
permissions that files do not inherit. - The FULL CONTROL folder permission overrides the
file permission of not deleting.
90
Permission Allows Files Inherit
No Access Denies all access Denies all access
List RX Not Specified
Read RX RX
Add XW Not Specified
Add Read RXW RX
Change RXWD RXWD
Full Control RXWDPO RXWDPO
Special Directory Access Any combo Set independently
Special File Access Set independently Any combo
91
Changing Folder Permissions
- By default when you change permissions on a
folder, you DO change permissions of any existing
files in the folder, but NOT on the subfolders. - New subfolders files will inherit the new
permission set. Take CARE in CHANGING Folder
Permissions
92
Setting Folder Permissions Practice
- Open Windows NT Explorer
- Open the Temp folder select the Notepad.txt
file - Choose File, Properties
- Click Security tab, Permissions (observe current
permissions) Click Cancel - Now Select the TEMP folder
- From the Type of Access drop-down list box,
select LIST - Click Add, Select Administrator, Click Add, From
the Type of Access drop-down box Select Full
Control, Click OK twice - Now Select Notepad.txt, click File, Properties,
Security Tab, Click Permissions The original
file permissions have been replaced by inherited
permissions from the folder
93
Copying/Moving Shared Folders
- Observing permissions on copied and moved files
- Give Everyone FULL Control of your Temp folder,
remove any other permissions - Select \TEMP\Notepad.txt on your partners
computer. Observe the permissions on the file - Make sure your partners Share folder has given
the Administrator Full Control, remove all other
permissions - Move the Notepad.txt file to the Share folder,
Observe the new File Permissions - Now Move the Notepad.txt file BACK to your
partners TEMP folder, Observe the File Permissions
94
Mapping a Shared FolderLets Practice
- Use Explorer to Find your Partners Shared Folder
TEMP - Choose Tools, Map Network Drive
- Observe the Drive Drop-down Box, choose a letter
for your Drive - In the Path box, type your partners shared folder
UNC - \\computer\temp
- Click OK
- Right-click on the folder in the left pane
- Choose MAP NETWORK DRIVE
- Select the folder, create a NOTEPAD.text document
Save in the shared TEMP folder, Choose FILE
SAVE AS Browse for the Mapped folder
95
DISCONNECTING FROM A REMOTE RESOURCE
- In the WINNT Explorer choose Tools, Disconnect
Network Drive - Select the Network Drive to Disconnect From
- Click OK
- Choose the Folder, Right-Click
- Choose Disconnect, YES
96
Taking Ownership of Files
- If you create it you own italso, if you copy a
file, you own the copy. The owner cannot assign
ownership to anyone else. However, they grant the
Take Ownership permission to others. - You can take ownership of a file if you have Full
Control permission OR you have been given Take
Ownership permission
97
Taking Ownership of Files
- To take ownership of a file, display the files
Properties dialog box, click on the Security tab,
click on the Ownership, and Click on Take
Ownership. - You can also take Ownership of a Folder all
Subfolders.
98
Security System Interactions
- User Group Permissions are cumulative.
Permissions you can ultimately exercise are a
combination of the permissions granted to you as
a user the permissions granted to any group to
which you are a member - EXAMPLE The user is assigned READ permission to
a particular folder. A group the user belongs to
is assigned WRITE permissions to the same
folder.the user has RW Permissions to that
folder. - There is ONE exception The NO ACCESS permission
overrides all others. - HOWEVER, having NO ACCESS permission applied to a
folder which contains a file for which the user
has permissions does NOT prevent the user from
opening the file from its respective application!
- The user can open the file, providing you use the
local or UNC path to the file in the File Open
dialog box of the application.
99
Consider this Scenario
Chris Permissions Teacher Group Permissions Grade-level Group Permissions Chris Effective Permissions
READ ADD Not specified Add Read
Not Specified Full Control No Access
Read Change Take Ownership
List Add Not Specified
Special Access Read Delete Not Specified Add Read
100
REMEMBER
- The Individual Read, Execute, Write permissions
are slightly different from the Add Read
permissions because files do NOT inherit the List
or Add permissions - NTFS permissions affect file folder access for
a local user remote user...this adds a second
layer of security to the network.
101
REMEMBER
- A good rule of thumb to remember between the
interaction share permissions NTSF is that the
most restrictive permission applies. This is
because share NTFS permissions are NOT
cumulative, but provide two layers of access. - If the share permission for a particular user is
READ, and the NTFS permission is FULL CONTROL,
the user will have READ access. Or the user could
exercise the FULL CONTROL permission by accessing
the file locally instead across the network.
102
Scenario
Share Permissions NTFS Permissions Effective Permissions
Read Add Read Read
Full Control Change
No Access Add Read
Change Read
Full Control Full Control
103
LAB Time
104
6-1Managing Network Resources
105
Features of the Client for Microsoft Networks
- Automatic setup of networking capabilities in
Windows 98 - Windows 98 GUI integrates the networking
capabilities - Client-side caching
- Plug and Play support (USB)
- Peer resource sharing services Must be selected
- Automatic reconnection for lost server
connections - Long filenames for network resources --AVOID!
106
Monitoring and optimizing performance
- Processor
- RAM
- Hard Drive
- Network
Four areas to monitor
107
Troubleshooting tools
- Resource Kits
- Books Online
- TechNet
- Microsofts World Wide Web site
- Microsofts ftp site
- MSN
- Microsoft technical support
- Administrative tools (Event Viewer, Server
Manager, etc.)
108
Creating partitions by using the FDISK Disk
Administrator utility
Primary partition
C
FDISK
D
unpartitioned disk (all free space)
Logical drives
Extended partition
E
F
109
Lets Practice
110
Installation sources
Network drive sources Shared CD-ROM or hard disk
Local drive sources CD-ROM or floppy disk
111
Virtual directories
Actual structure
Client sees
C\ InetPub\wwwroot Alias ltHomegt D\Data\Docume
nts Alias/Publishing \\Corpserver\Sales_Mkt\Fil
es Alias /Marketing D\Data\Corp\Promos Alias
/Marketing/Promos
www.corp.com ltHomegt /Publishing /Marketing
/Promos
112
The role of file and print servers
file and print server
printer
Requests files and sends print jobs
client
113
The role of file and print servers (cont.)
file and print server
printer
Sends files
Sends and monitors print jobs
client
114
Overview of the Windows NT printing process
print request
printing device
Windows 95 or Windows NT client
Occurs on print server
Occurs on client
print request
printer driver
spooler
printing device
other clients
Occurs on server
Occurs on client
115
Setting priorities between printers
116
Point and Print support
117
The Windows NT print process
Print client
Print server
1. Application generates print request.
2. Print driver loaded (locally or from
server). 3. Job partially rendered. 4. Client
spooler receives job. 5. Client spooler
calls server spooler.
6. Server spooler receives job. 7. Router
determines destination print device. 8.
Print processor formats for printer
device. 9. Separator page processed. 10.
Print monitor sends to device.
11. Print device produces output.
can be same computer
118
Print troubleshooting guidelines
Power on? On-line? Paper jam? Paper/toner?
Printer
Physical network problems? Printer
shared? Correct user logged on?
Correct permissions assigned?
Network
Correct printer driver? Default printer? Printer
port? Print from other application? Print to port
or to file? Disk space for spooler? Spooler
service running?
Print server/ print client computer
119
The Intel boot sequence
1. Conduct Power On Self Test (POST) 2. Load
Master Boot Record (MBR) 3. Load active
partitions boot sector 4. Load NTLDR
Preboot sequence
1. Change processor to flat memory model 2.
Start minifile system (FAT or NTFS) 3. Read
BOOT.INI to build Boot Loader Menu 4. Load
operating system
Boot sequence NTLDR
5. Load BOOTSECT.DOS
5. Call NTDETECT.COM to examine hardware 6.
Begin Windows NT load phases
120
The RISC boot sequence
121
The Windows NT load phases
- Kernel load (screen shows progress dots)
- Kernel initialization (screen turns blue)
- Service load (blue screen shows progress dots)
- Subsystem start (Begin Logon dialog box appears)
122
ARC naming
multi(0)disk(0)rdisk(0)partition(1)\\WINNT NT
Server
- Multi
- IDE
- ESDI
- SCSI
- with
- BIOS
- enabled
- SCSI
- SCSI
- without
- BIOS
rdisk(0) First disk numbered 0 Second
disk numbered 1 Used only in systems with
non-SCSI disks (set to 0 with SCSI disks)
partition(1) Partition on disk that stores NT
files 0 special partition and generally not
used 1 First partition 2 Second partition
. . .
\WINNT Folder that stores the Windows NT boot
files
NT Server Name of the operating system Appears
in the boot menu
(0) First adapter in system numbered 0 Second
adapter in system numbered 1 . . .
123
Comparing file system characteristics
NTFS
FAT under NT
Filename length File size Restricted filename
characters Case in filenames File
attributes Directory structure Supported
operating systems Security Compression Formatting
Maximum partition size Optimal partition
size File system overhead
124
Comparing file system characteristics (completed)
NTFS
FAT under NT
Filename length File size Restricted filename
characters Case in filenames File
attributes Directory structure Supported
operating systems Security Compression Formatting
Maximum partition size Optimal partition
size File system overhead
255 characters
255 characters
16 EB
4 GB
? / \ lt gt
? / \ lt gt
Case preserving supports case sensitivity for
POSIX
Case preserving
Elemental and extended
Elemental (R,A,S,H)
B-tree
Linked list
Windows NT Windows 95 OS/2 DOS
Windows NT
Per-file and per-directory
None
3rd party utilities
Per-file, per-folder, per-drive
Can format floppy and hard disks
Can format hard disks
16 EB
4 GB
gt400 MB
lt400 MB
1-5 MB recommended minimum 50 MB partition
lt1 MB
Recommended
