
Supporting Tools, 6 Steps to Problem Solving PowerPoint PPT Presentation
Title: Supporting Tools, 6 Steps to Problem Solving
1
Supporting Tools, 6 Steps to Problem Solving
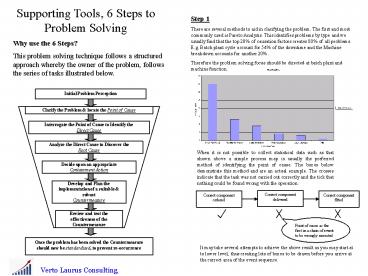
Step 1 There are several methods to aid in
clarifying the problem. The first and most
commonly used is Pareto Analysis. This identifies
problems by type and we usually find that the top
20 of causation factors creates 80 of all
problems. E.g. Batch plant cycle account for 54
of the downtime and the Machine breakdown
accounts for another 20. Therefore the problem
solving focus should be directed at batch plant
and machine function.
Why use the 6 Steps? This problem solving
technique follows a structured approach whereby
the owner of the problem, follows the series of
tasks illustrated below.
Initial Problem Perception
Clarify the Problem locate the Point of Cause
Interrogate the Point of Cause to Identify the
Direct Cause
Analyze the Direct Cause to Discover the Root
Cause
When it is not possible to collect statistical
data such as that shown above a simple process
map is usually the preferred method of
identifying the point of cause. The boxes below
demonstrate this method and are an actual
example. The crosses indicate that the task was
not carried out correctly and the tick that
nothing could be found wrong with the operation.
Decide upon an appropriate Containment Action
Develop and Plan the implementation of a suitable
robust Countermeasure
Review and test the effectiveness of the
Countermeasure
Point of cause as the first in a chain of events
to be wrongly executed
Once the problem has been solved the
Countermeasure should now be standardised, to
prevent re-occurrence
It may take several attempts to achieve the above
result as you may start at to lower level, thus
creating lots of boxes to be drawn before you
arrive at the correct area of the event sequence.
2
Supporting Tools, 6 Steps to Problem Solving
Step 2 Once we have found the point of cause it
must be interrogated to establish the direct
cause. This is best done using the structured
brainstorming approach known as the Cause
Effect Diagram. To enable structure during the
brainstorming session each main bone or leg leads
to a titled main area . The four main topics are
the ones detailed below and are known as the four
Ms. Additional boxes can be added as required or
other topic headings can be used such as Time,
Resources etc.
Nominal Group Technique Make a simple graph such
as the one below, take the 5 most likely ideas
and grade them individually. The scores are then
fed into the matrix and as shown below. The
majority of the group sees idea E as the most
likely cause. This will now become the Direct
Cause for further investigation.
One of the golden rules of Brainstorming is that
no ones ideas should be mocked or refused to be
written down, as this could stifle an individual
whom might have more to offer the process.
Once the team is exhausted of ideas it is then
time to choose the most likely idea which will
become the Direct Cause. Unless the direct cause
is consensed by the group, however, you may take
the wrong path in the rest of your problem
solving activities. This can happen quite easily
if there is a dominant member in the group.
Therefore the emotion can be removed from the
process using the following tool, The Nominal
Group Technique.
If however Steff had been the dominant member of
the group the wrong issue could have quite easily
have been selected for the next stage. This
chart is written onto the back of the worksheet
and should be used as a reference document,
should we have to return to the problem because
the issue was not resolved first time around. The
next choice to go onto the next stage would
therefore be Idea D as it had the second highest
agreed score by the group. Sometimes it may be
necessary to go back to the Fish Bone diagram as
new issues may have come to light during
implementation of the 1st countermeasure.
3
Supporting Tools, 6 Steps to Problem Solving
Step 3 In theory this appears to be the simplest
of techniques, but in practice it is
significantly harder than anything else you will
encounter in the problem solving process. The aim
is to ask why of the Direct Cause and then to ask
why of the subsequent answers until the question
why has been asked on average 5
times. Example Why Do containers get damaged
in transit ? Because Because they slide ? Why
do they slide in transit ? Because they are
not tied or secured. Root Cause No 1 Why are
they not tied or secured ? Because In trials
they did not move. Why Did they not move in
trial but do now ? Because driver speed was
limited to 25 mph to prevent movement? Why is
limit of 25 mph being broken? Because new
fleet of trucks have no limiters ? Root Cause No
2
Never assume an answer always get facts and
always try to stay within the realms of that
which you are able to solve. For example if you
find yourself beginning to talk about Peoples
Morals or blaming bad management you are heading
down the wrong path as you will not be able to
resolve these types of issues. You may also
find more than one root cause, as is the case
opposite. If this is the case try to resolve them
both when planning your countermeasures or
escalate to an appropriate owner if specialised,
but ask to be kept informed of their
progress. Sometimes the 1st root cause
resolution is a temporary containment action
until the Secondary Root cause can be resolved.
Step 4 Now that you know what the Root cause of
the problem is, a containment action should be
put in place immediately. This is only a
short-term solution until the robust
countermeasure is put in place. An ideal
containment action for the 5 Whys investigation
we have just looked at, would be to ensure that
all trucks be fitted with rope and eyes for tying
down. The containment will also be useful later
on for testing the robustness of the
countermeasure. For instance when you remove the
containment does the countermeasure hold fast and
prevent re-occurrence e.g. Once the trucks are
fitted with limiters to 25mph does the sliding of
containers cease to be a problem and the
subsequent container damage.
4
Supporting Tools, 6 Steps to Problem Solving
- Step 5
- Once you have decided upon the best
countermeasure, using the tools talked about
previously such as Brainstorming and the Nominal
Group Technique, you will need to plan their
implementation. The planning stage is very
important to you as the owner so that you are
able to do the following - Regularly review progress of the project against
the plan - Give ownership of issues to those involved
- Report back accurately regarding the status
- Support any areas where slippage is occurring
- Save and use for reference for similar issues in
the future.
- Areas of the plan that should usually always be
included - - Containment Action in place
- Resource allocation for project
- Planning what the countermeasure will look like
- Making of the countermeasure
- Training those involved in using the
countermeasure - The implementation date
- Status Review Meetings
Step 6 The final stages of the problem solving
process are to ensure that the countermeasure is
effective, and will prevent re-occurrence. This
can again be done using a plan to highlight
review dates for monitoring, as well as how to
monitor and who. Once the team is happy that the
countermeasure is successful they then need to
standardise it. This can be done using several
methods from placing on daily checklists or
writing a formal procedure, to implementing a
mechanical method company wide on all like
processes.
Date
Owner
1Containment Action in place 2Resource
allocation for project 3Planning what CM will
look like 4Making of the countermeasure 5Training
6The implementation date 7Status Review Meetings
Action
Wk1
Wk2
Wk3
Wk4
Wk5
Illustrates Behind Schedule
Illustrates Ahead of Schedule
Illustrates on Schedule
5
Supporting Tools, Problem Countermeasure
What is problem countermeasure?
How does it work?
- A method of empowering all employees to raise
concerns. Problem Countermeasure is a
structured method of highlighting, challenging
solving problems found on a daily basis. - A workgroup based method of documenting concerns
- A workgroup method of tracking for closure of
concerns - A tool for communication escalation
IDENTIFY A CONCERN
FEEDBACK TO INITIATOR
ADD CONCERN TO PROB C/M BOARD
FOLLOW FOR COUNTERMEASURE
RAISE ISSUES AT MANAGEMENT BOARD REVIEW - WEEKLY
MAINTAIN AREA BOARD - DAILY
CONTACT A RESPONSIBLE PERSON / DEPT
ADD ACTIONS AND TIMINGS TO BOARD
INVITE THEM DOWN TO DISCUSS THE CONCERN
- What do we use it for ?
- Identifying area concerns
- Raising awareness (logging problems)
- Allocating names responsibility
- Allocating actions with timings
- Feedback of activities status
DISCUSS HOW TO COUNTERMEASURE
PUT CONTAINMENT IN PLACE
DECIDE HOW TO CONTAIN THE CONCERN
Usually the sheet is large and displayed on a
Problem Countermeasure board
CONTAINMENT COUNTERMEASURE
DATE
CONCERN
No.
RAISED
TIMING
AGREED
RESP
Problem Countermeasure should be owned by the
workgroup. It should be stored at the place of
work and kept up to date continuously.
6
Supporting Tools, Problem Countermeasure
Why use problem countermeasure?
Roles in problem countermeasure
The Management team must support the workgroup
by committing to help resolve difficult issues
beyond the control of the workgroup
MANAGEMENT ROLE
WORKGROUP ROLE
- Raise Concerns
- Follow for Closure
- Give Clear Status
- Escalate for Help
- Support
- Coach
- Help
- Listen
The Workgroup should try where possible to fix
issues in their area and only request help at the
Management Reviews when they feel that they are
unable to resolve the issue without support.
Typical issues to be raised and tracked on sheet?
- Benefits of using Problem Countermeasure
- Created and owned by the shop floor
- Provides a voice and log of issues effecting the
team or workgroup - Enables the shop floor to manage concern
resolution - Allows progress to be monitored
- Allows escalation where and when needed
PPE AREA ERGO PARTS SAFETY FACILITY TOOLING
PROCESS EQUIPMENT NEW MODEL HOUSEKEEPING PERSO
NAL ISSUES
ANY DEVIATION FROM NORMAL
7
Supporting Tools, 6 Steps to Problem Solving
8
Supporting Tools, 6 Steps to Problem Solving
9
Explanation of Worksheet Steps
1. Set the Objectives (SMART) SMART stands
for Specific, Measurable, Achievable, Realistic,
Time Bound The What - What product or process
you are looking at (Be Specific). The Where - In
which area are you going to work, plant, process
etc. (Be Specific) The When - What date will you
start and end. (Time Bound Realistic) The Who -
Name the members of the team that will be
responsible for the project. (Be Specific) The
Why - The reasoning behind the project and its
importance. (Be Specific and Realistic) The How -
State your basic plan of action to complete your
project on time, and to cost and to get the
required results. (Achievable) The Target -
Ensure that you have clear targets that can be
measured to show the benefits of the project.
(Measurable)
- 2. Analyse the current state
- Gather as much information as possible to
highlight the current condition of the work area,
and to explain the benefits gained by the project
at the end. - Typical Information
- Operator Cycle times
- Total Working Area
- In Process Stock Levels
- Number of Operators
- Capital Equipment Requirements
- Inventory levels
- Safety Issues, ergonomic and environment
- Draw a layout of the process and record the
walking in process to give a typical distance
travelled per shift. - First Time Through percentage
- This list is not definitive but is merely a
guide. Each process is different and the
measurements taken must be linked to the targets
to enable you to prove that what you have done
has made a difference.
10
Explanation of Worksheet Steps
3. Brainstorming Having all observed the process
as a means to gather the data for the previous
section, you will all have had thoughts and ideas
on how we can improve the process. This section
allows you to list all of the ideas for later
inclusion in the plan. As with any brainstorming
session, we should never refuse a suggestion, or
laugh / mock someone who has raised a point. When
all of the ideas have been listed we must then
categorise them into the following three areas.
This is done using the Stoneleigh Matrix, which
looks at cost benefit and time. O Zero cost
and can be done straight away - Low cost and
can easily be completed in Project Time X High
cost outside budget or too long lead time All of
the above are then rated against benefit, as
there will be many ideas that we may not have
time within the project. We must therefore
select those with the greatest impact on the
targets set.
- 4. Plan changes
- Plan the best layout to give the following
- Single piece flow
- Visibility across the whole process
- Balanced workloads at each process stage
- Reduction in working area required
- Elimination of accident risk
- To assist in the planning process, a paper doll
exercise is useful - Stage 1 Draw out the current layout to scale,
including all racking and equipment. Copy the
layout to 100 scale, and cut out paper templates
of all equipment required in the process. On
blank paper draw out the basic area to the same
scale. - Stage 2 Place the equipment in the best
possible arrangement to meet lean requirements.
Move the cut out equipment pieces to trial new
layouts. Check health and safety for all operator
areas. Confirm safe clearances for equipment
load/unload. Confirm material handling equipment
turning circles laden un-laden.
11
Week 23
Week 24
Week 25
Week 26
Week 27
Write Standard Work
Implement Audit
Develop Operator Balance Board
Train in 5s
Do 5s Workshop
Develop 5s Audit Document
Begin 5s Audits
Develop TPM System
Train all in TPM
12
5. Execute the Plan
Tasks / Problems
Description of Action
Rating
Who
Status
13
Explanation of Worksheet Steps
- 6. Review new method
- When complete, celebrate the results of your
improvement. Remember, sometimes a simple thank
you and well done from the right person is
enough. - 30 day Follow up -- agree with the rest of the
team to re-visit the area in 30 days time to
ensure the following - All outstanding actions are closed
- All improvements have been sustained
- Any issues which have arisen since the change
can be addressed
4. Plan changes Paper doll exercise
continued Stage 3 Involve all departments that
will be required to facilitate the move
(maintenance for equipment and lighting, MPL for
parts location planning and reduction of parts
quantities). The safety officer will need to be
involved to agree changes and to lead risk
assessments of new processes if radically
different from previous process design. Agree
changes and draft schedule of tasks to meet time
frame.
Measurable Before After
Square meters 1024 950
No. of processes 21 15
Work in progress 60 20
Lead time 9 5
Equipment
Glue machine 8 4
Screw driver 12 4
Build tables 14 6
Glue pistols 12 6
5. Execute the plan After the plan is complete
and all stakeholders have bought in to it,
execute the plan. Each team member should use
the timeline plan to develop their personal sheet
that shows their detailed actions. This sheet
also allows tracking using the PDCA cycle.
Daily or weekly team meetings are important to
monitor progress and communicate issues among the
team. For a behind schedule item, team members
are to present a catch back plan for agreement by
the team. Once agreed their personal sheet is
updated with the revised tasks. Team discussion
and interaction is helpful in resolving problems
or barriers.
Recommended
