
matting PowerPoint PPT Presentation
1 / 28
Title: matting
1
matting
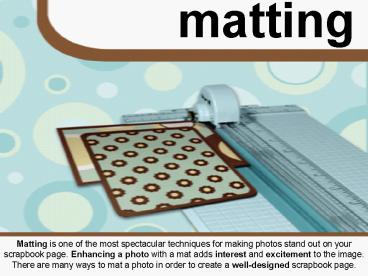
Matting is one of the most spectacular techniques
for making photos stand out on your scrapbook
page. Enhancing a photo with a mat adds interest
and excitement to the image. There are many ways
to mat a photo in order to create a well-designed
scrapbook page.
2
matting fundamentals
Matting is the art of creating a frame for your
photograph. A mat can be as simple as one
complementary color or as ornate as several
layers of color enhanced with punches, stickers,
fibers, markers, ribbons and rub-ons.
Single
Double
Triple
Espresso Square Mint on Espresso Cardstock
Square Espresso on Mint on Espresso Square
3
create a photo mat
The easiest way to mat a photo is to lightly
adhere your photo 1/4 in from the corner of a
piece of complementary cardstock. Finish mat by
trimming 1/4 out from the two remaining sides of
the cardstock.
4
create a photo mat
triple mat Triple matting is the addition of a
third layer to the double mat. When the
additional layers are incremented in the same
proportion, a symmetrical look is acquired. When
the additional layers are incremented in
differing proportions, an asymmetrical look is
acquired.
single mat The single mat is the beginning of
more elaborate matting techniques. Double
and triple matting adds greater interest and
is the next building block on the single mat
double mat Double matting is created by adding
a second layer to the first mat.
5
vary mat proportions
Professional framers mat by using a variety of
increments between mat sizes. The variety in mat
sizes increases the eyes ability to focus on the
content of the frame and enhances the image being
framed. Follow these same guidelines when
creating your mat.
6
vary mat proportions
You can create mats in any size. A general
guideline to follow when varying mat proportions
is that a thick mat is 3/4 or greater, a thin
mat is 1/4, and a skinny mat is 1/8 or less.
Create combinations of mats by mixing the
thickness of several mats for one photo.
7
vary mat proportions
Use decorative paper and sharp contrasts between
colored cardstock to highlight the changes in
your matting techniques. Select a decorative
paper or an accent color cardstock as the largest
mat for this technique. The largest mat catches
the readers attention and the contrasting mats
draw the eye toward the image.
8
vary mat proportions
step one Adhere the small Mini Dots Espresso
rectangle on the small mint rectangle. step
two Adhere the Fun Dots rectangle on the large
Espresso rectangle. step three Adhere the small
matted rectangles over the Fun Dots matted
rectangle.
9
vary mat dimensions
You have just learned to vary mats
proportionately. When you vary your mats
disproportionately, you leave room for
enhancements.
10
vary mat dimensions
Varying a mat in this way means that you make one
side larger than the others.
11
vary mat dimensions
The increased space helps with creating balanced
layouts and allows room for enhancements, which
can be in the form of stickers, journaling,
fibers, lettering, punches, and rubber stamps
basically, anything you can think of!
12
vary mat dimensions
step one Adhere the Fun Dots rectangle to the
left side of the Espresso rectangle. step two
Adhere the Mint Espresso stripes strip to the
right side of the Espresso rectangle. step
three Punch a flower from the Mini Dots Espresso
square using the Paper Shapers Retro Flower
punch. Punch a circle from the Mint square using
the Paper Shapers 5/8 Circle Nesting Punch.
Glue the circle to the center of the flower.
Adhere the completed flower on the bottom right
corner of the photo mat.
13
color block mat
Color Blocking is a fun matting technique that
uses blocks of patterned paper or colored
cardstock to create a pattern on a large mat that
will frame the photo.
14
color block mat
This technique is best used on the focal point of
your page because it creates a large eye-catching
mat.
15
color block mat
Four steps to create a Color Block Mat step one
Mat the photo with a thin 1/8 mat. step two Cut
a second mat from a complementary color cardstock
at least 1/2 larger than your 1/8 matted
photograph. This mat will be the foundation for
your color block frame. step three Create a
color block pattern with paper on the large
mat. step four Center the 1/8 matted photo on
the large color blocked mat.
16
color block mat
step one Adhere the small Mini Dots Espresso
rectangle on the small Cream rectangle. step
two Adhere the Mint Espresso stripes strip
anywhere along the width of the large Espresso
rectangle. step three Center the matted
rectangle on the large Espresso rectangle to
achieve a Color Block Mat.
17
mat with decorative corners
Mats do not always have to have straight,
tailored edges. Sometimes, a design defies
contrast and attempts to blend elements.
18
Mat with decorative corners
Rounding the edges of a mat offers gentle
movement and soft contrast to the layout.
CornerAdorner Corner Rounders are available in
three sizes small, medium and large. Simply
insert the corner of your paper into the punch,
use the Corner Clip to properly align the paper
and punch.
19
mat with decorative corners
A little can go a long way with rounded edges.
Single corners can be rounded to exaggerate the
interest of the element. It is also possible to
add variety in your mats by incorporating
alternative Paper Shapers CornerAdorner punch
options to shape the corners.
20
mat with decorative corners
step one Adhere the Fun Dots rectangle on one of
the Espresso rectangles. step two Round the
corners of the remaining Espresso rectangle and
the Dotty Flowers rectangle using the
CornerAdorner Small Corner Rounder punch. Adhere
the Dotty Flowers rectangle on the Espresso
rectangle. step three Adhere the corner rounded
Dotty Flowers photo mat over the Fun Dots photo
mat as shown.
21
frame photos with cropped lines
Matting techniques can be used with all visual
design components. Incorporating mats around both
photos and enhancements helps develop unity and
clarity and provides purpose within the design.
22
frame photos with cropped lines
For example, highlight journaling through simple
mats include embellishments to create a strong
focal point.
23
frame photos with cropped lines
Add interest through layers of mats with shaped
edges achieved by tearing or using one of the
shaped Cutterpede shuttles.
24
frame photos with cropped lines
- step one With the Curvy Cutter blade shuttle on
the first tick mark from the blade. Place the
blade shuttle in the blue track of the small
circle template. Remove the sizing guide to cut a
3 circle from the Mint Espresso Toile square. - step two Without lifting the Curvy Cutter
template, adjust the blade shuttle to the fourth
tick mark from the blade, and place the blade
shuttle in the red track of the template. Cut a 3
¼ circle. - step three Without lifting the Curvy Cutter
template, adjust the blade shuttle to the second
tick mark from the blade, replace shuttle to the
red track and cut a 3 ¾ circle. Remove the inner
ring. - step four Use the Curvy Cutter to cut a 4
circle from the Espresso square. - step five Mat the size 3 circle
- and the size 3 ¾ ring on the
- Espresso 4 circle.
25
mat with shape enhancements
Matting enhancements adds dimension to your
embellishments, and gives them a purpose for
being on the page. Matting additional elements on
a layout helps develop unity and clarity in the
design.
26
mat with shape enhancements
If you want to add importance to journaling, be
sure to add a varied mat around the journaling
and include embellishments to the mat to develop
a strong focal point.
27
mat with shape enhancements
Create interest by adding extra mats or enhance a
mat by altering the shape of one or more edges
through tearing or use of one of the shaped
Cutterpede shuttles.
28
mat with shape enhancements
step one Mat Mint Espresso Mini Dots rectangle
onto large Espresso rectangle. step two Using
Cutterpede Wave Blade Shuttle, trim 1/2 along
one length of Mint Espresso Stripe rectangle, and
adhere onto left side of mat. step three Attach
small Espresso rectangles to left side of mat,
and embellish with A Touch of Jolees Dragonfly
stickers as shown.
Recommended
