
Frog Dissections PowerPoint PPT Presentation
1 / 37
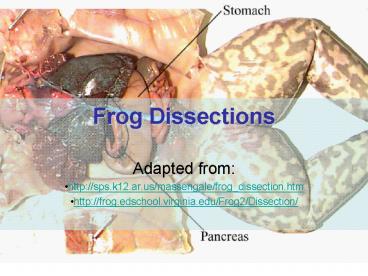
Title: Frog Dissections
1
Frog Dissections
- Adapted from
- http//sps.k12.ar.us/massengale/frog_dissection.ht
m - http//frog.edschool.virginia.edu/Frog2/Dissection
/
2
Set-Up 1 Materials
- safety goggles, gloves, and a lab apron
forceps preserved frog dissecting pins
(610) dissecting tray and paper towels
plastic storage bag and twist tie scissors
marking pen dissecting needle
3
Set-Up 2 Pinning the Frog
- Rinse the frog in water.
- Place it in the dissection pan on its dorsal
(back) side. - Pin the limbs to the dissection pan (This will
keep the frog in place).
4
Identify
5
Frogs gender?
- Place a frog on a dissection tray. To determine
the look at the hand digits, or fingers, on its
forelegs. A male frog usually has thick pads on
its "thumbs," which is one external difference
between the sexes, as shown in the diagram below.
Male frogs are also usually smaller than female
frogs. Observe several frogs to see the
difference between males and females.
6
- Use the diagram below to locate and identify the
external features of the head. Find the mouth,
external nares, tympani, eyes, and nictitating
membranes.
7
- Turn the frog on its back and pin down the legs.
Cut the hinges of the mouth and open it wide. Use
the diagram below to locate and identify the
structures inside the mouth. Use a probe to help
find each part the vomerine teeth, the maxillary
teeth, the internal nares, the tongue, the
openings to the Eustachian tubes, the esophagus,
the pharynx, and the slit-like glottis.
8
Incision time
9
Incision 1 Skin First
- Make the first incision in the skin along the
center of the frog, bisecting it equally. - Lift the frog's skin with forceps between the
rear legs. - Make a small cut through the lifted skin with the
scalpel. Take care to cut only the skin. - Use the scissors to continue the incision up the
midline all the way to the frog's chin. - Stop cutting when your scissors reach the frog's
chin.
10
Incision 2 Skin Horizontal
- Use the scissors or scalpel to make sideways
incisions in the skin. - The first incisions are made between the front
legs. - The next incisions are made just above the rear
legs. - Be careful to only cut through the skin, not the
muscle.
11
Incision 3 Separate Skin
- Pick up the flap of skin with the forceps.
- Use a scalpel to help separate the skin from the
muscle layer below. - After you've opened the flaps of skin, pin them
to the dissection tray.
12
Incision 4 First Muscle Incision
- Repeat the incisions, this time through the
abdominal muscle. - You will find it easier to begin the vertical
incision by lifting the muscle layer with the
forceps Do this between the rear legs of the
frog. - Make a small cut with the scalpel.
- Using the scissors, continue the incision up the
midline to a point just below the front legs. - Be careful that you don't cut too deeply. The
muscle is thin. It is easy to damage the organs
underneath.
13
Incision 5 Chest Bone
- Cut through the chest bones.
- When you reach the point just below the front
legs, turn the scissors blades sideways, so that
you only cut through the bones in the chest. Be
careful that you don't cut too deeply. - This should prevent damage to the heart or other
internal organs. - When the scissors reach a point just below the
frog's neck, you have cut far enough.
14
Incision 6 Muscle Horizontal
- Make the horizontal incisions.
- Just as you did with the skin, make a sideways
incision in the muscle with the scalpel. - Make the first incision between the front legs.
- The next incision is just above the rear legs.
- Again, be careful that you don't cut too deeply.
15
Incision 7 Muscle Separate
- Separate the muscle flaps from the organs below.
- Pull back and hold the muscle flaps with the
forceps. - Use the scalpel to separate the muscle from the
organ tissue. - Pin the muscle flaps back far enough to allow
easy access to the internal organs.
16
Incision 8 Triangular Flaps
- Pin the triangular flaps of the skin and muscle
to the pan. - Pick up the triangular flap of muscle that is
just above the legs with the forceps. - Use the scalpel, if needed, to help separate the
muscle flap from the tissue underneath. - Pin the flaps back far enough to allow access to
the body cavity.
17
(No Transcript)
18
organs
19
Organs 1 Introduction
- We are now ready to explore the frog's anatomy.
- To make our exploration easier, we will look at
the organs in four different layers, beginning
with the liver and heart layer. - As we get deeper into the frog's anatomy, we will
reveal new layers. - We'll even explore the differences between male
and female reproductive anatomy.
20
Organs 2 Liver
- When we pull back the muscles and skin, the first
organs we can see are the liver and heart. - We'll examine these organs in both a preserved
and a pithed frog. - The liver is a large, brownish colored organ
covering most of the body cavity.
21
Organs 3 Heart
- You should also be able to see the heart in Layer
1. - It is a small triangular shaped organ between the
front legs and anterior to the liver.
22
Organs 4 Layer 2
- Reveal layer two.
- The heart and liver in layer one hide some of the
organs below them. - Use the forceps and the probe to pick up the
liver and reveal layer two. - Layer two includes the gall bladder, the stomach,
and the small intestine.
23
Organs 5 Gall Bladder
- Examine the gall bladder. Under the liver, we see
a small, greenish sac. This is the gall bladder. - You might also see it by separating the right and
middle lobes of the liver. - The gall bladder can be hard to find. Move your
pointer over the pictures to see the gall bladder
highlighted. - In the bottom image of the pithed frog, the liver
has been removed instead of folded bac
24
Organs 6 Stomach
- Examine the stomach.
- The stomach looks like a sac on the frog's left
side (on your right). It is a large firm organ. - Cut open the stomach to find a possible last meal
25
Organs 7 Small Intestine
- Examine the small intestine.
- The small intestine is a long, folded, tube like
organ that is posterior the stomach. - It is similar in color to the stomach, but
smaller in diameter.
26
Organs 8 Layer 3
- Reveal layer three.
- Remove the liver to see the organs in layer
three. - The liver is easier to remove if you remove the
gall bladder and heart at this time. - Now we can look at the frog's lung and pancreas.
27
Organs 9 Lungs
- In this layer, we will take a close look at the
lungs and pancreas. - The lungs are difficult to locate in a preserved
frog. - They're at the anterior end of the body cavity on
either side of the heart. - In the pithed frog, they are much easier to
locate. (Only one lung expands because the other
one was punctured.)
28
- Again refer to the diagram below to identify the
parts of the circulatory and respiratory systems
that are in the chest cavity. Find the left
atrium, right atrium, and ventricle of the heart.
Find an artery attached to the heart and another
artery near the backbone. Find a vein near one of
the shoulders. Find the two lungs.
29
Organs 10 Pancreas
- You can't see the pancreas without lifting the
stomach and intestines with the forceps. - The pancreas is a thin, yellowish ribbon.
- The intestines are held in place by thin,
transparent tissue called the mesentery. - pancreas
- large gland secreting digestive juices
30
Organs 11 Layer 4
- To see layer four, you need to remove the
stomach, small intestine, and pancreas. - They are all connected, so this should not be
difficult, but you may want to watch the movie to
see how it is done. - In layer four, we'll look at the procedures
required to see the different organs in both male
and female frogs.
31
Organs 12 Spleen
- Examine the spleen (organ that purifies blood by
removing bacteria.) - Locate the spleen in the male frog. It is a
small, round reddish organ.
32
Organs 13 Male Kidneys
- Can you locate the kidneys in the male frog?
- The kidneys are elongated, brownish colored
organs found in the lower part of the frog's
abdomen. - The kidneys are situated on each side of the
middle of the frog.
33
Organs 14 Frog Testes
- Locate the testes in the male frog.
- The testes are tan colored, bean shaped organs
near the anterior end of each kidney.
34
Organs 15 Ovaries
- Examine layer four in a female frog.
- The ovaries are very easy to locate. They are
dark organs which may fill most of the frog's
body cavity, depending on the time of year that
the frog was collected.
35
Organs 16 Oviducts
- Locate the oviducts (a tube that allows passage
of the eggs). It is more difficult than locating
the ovaries. - They are yellowish, coiled tubes near the back
surface of the ovaries. They are on either side
of the body cavity. - You might have to lift the ovaries with the
forceps to locate them.
36
(No Transcript)
37
Clean-Up and Review
- If you have been following along through the
dissection pages, you have just completed the
dissection and it's now time for the clean-up and
review. If you perform a live dissection - Dispose of the frog properly.
- Rinse and dry all equipment, including the
dissecting pan. - Put the dissecting pan and tools away.
Recommended
