
Volvo EC300D LR EC300DLR Excavator Service Repair Manual Instant Download PowerPoint PPT Presentation
Title: Volvo EC300D LR EC300DLR Excavator Service Repair Manual Instant Download
1
Service Information
Document Title Cooling system, description Function Group 260 Information Type Service Information Date 2015/2/15
Profile EXC, EC300D LR GB Profile EXC, EC300D LR GB Profile EXC, EC300D LR GB Profile EXC, EC300D LR GB
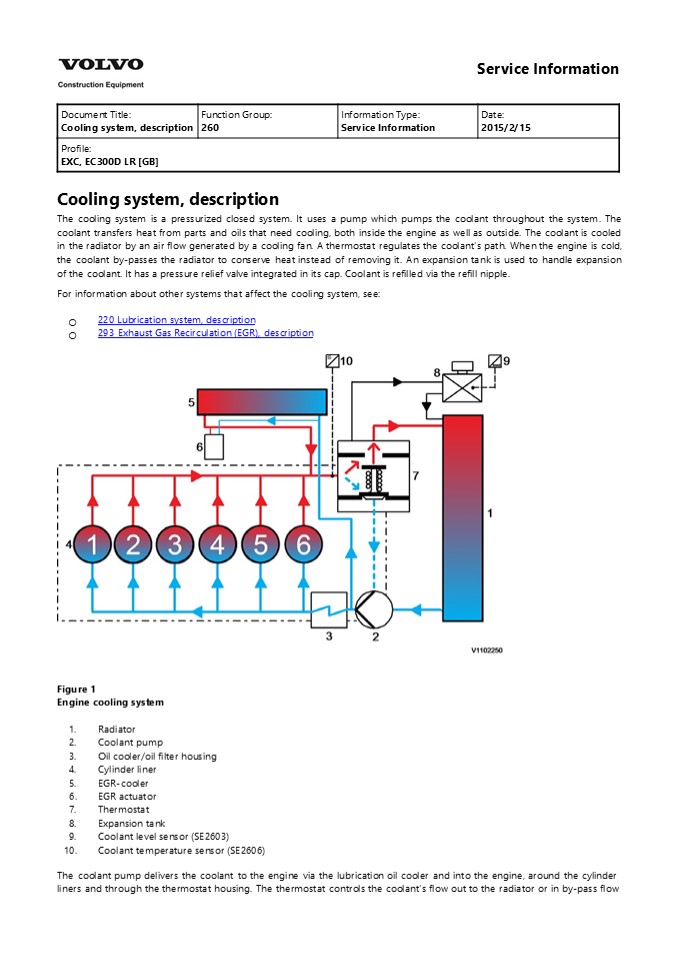
Cooling system, description The cooling system is
a pressurized closed system. It uses a pump which
pumps the coolant throughout the system. The
coolant transfers heat from parts and oils that
need cooling, both inside the engine as well as
outside. The coolant is cooled in the radiator
by an air flow generated by a cooling fan. A
thermostat regulates the coolant's path. When the
engine is cold, the coolant by-passes the
radiator to conserve heat instead of removing it.
An expansion tank is used to handle expansion of
the coolant. It has a pressure relief valve
integrated in its cap. Coolant is refilled via
the refill nipple. For information about other
systems that affect the cooling system, see
220 Lubrication system, description 293 Exhaust
Gas Recirculation (EGR), description
? ?
- Figure 1
- Engine cooling system
- Radiator
- Coolant pump
- Oil cooler/oil filter housing
- Cylinder liner
- EGR-cooler
- EGR actuator
- Thermostat
- Expansion tank
- Coolant level sensor (SE2603)
- Coolant temperature sensor (SE2606)
- The coolant pump delivers the coolant to the
engine via the lubrication oil cooler and into
the engine, around the cylinder liners and
through the thermostat housing. The thermostat
controls the coolant's flow out to the radiator
or in by-pass flow
2
- back into the engine, depending on the coolant
temperature. - The coolant pump also forces some coolant to the
EGR-cooler via internal channels inside the pump
and external pipes. A small amount of the EGR
coolant flow is routed through external pipes to
cool the EGR actuator. After cooling the exhausts
in the EGR-cooler, the coolant is routed back to
the engine via external pipes and then enters
channels inside the engine before the
thermostat. - The coolant is cooled in the radiator and is then
transported back into the engine's cooling
system. - The coolant is also transported via external
pipes and hoses to parts on the machine. For
example, the cab heater or the transmission oil
cooler. The cab heater takes its coolant from the
warm side of the engine, before the thermostat,
and the return leading to the pump's suction
side. The transmission oil cooler takes its
coolant after its been cooled in the radiator
and the return leading back to the pumps suction
side. - Coolant pump
- The coolant pump is of impeller type and is
belt-driven. The rear of the pump is bolted to
the cylinder block, oil cooler, and oil filter
housing, and it has channels for coolant
distribution. - Thermostat
- The coolant circulation thermostat is of the
piston type and has a temperature-sensitive wax
body which controls opening and closing. The
thermostat begins to open when the coolant
temperature reaches a level which indicates that
the engine is warm and the coolant needs to
transport heat away from the engine. The
thermostat is located inside a thermostat housing
containing channels for coolant distribution.
The thermostat housing is bolted to the cylinder
head. - Parameters
- There are no parameters for this function.
- Supplementary information
260 Cooling system, component location 263
Cooling fan, description 263 Reversible cooling
fan, description
? ? ?
- Function check
- 28407-3 Sensor values, monitoring
- Diagnostics
Component Control unit Message ID
SE2603 MID128 PID111
SE2604 (Only EXC) MID128 PID26
SE2606 MID128 PID110
PWM2602 (Only EXC) MID128 SID33
3
Service Information
Document Title Cooling system, component location Function Group 260 Information Type Service Information Date 2015/2/15
Profile EXC, EC300D LR GB Profile EXC, EC300D LR GB Profile EXC, EC300D LR GB Profile EXC, EC300D LR GB
Cooling system, component location
- Figure 1
- Expansion tank
- Thermostat
- Charge air cooler tube
- Radiator assembly
- Stay bar
- Fan
- Radiator hose
- Coolant pump
- Engine oil cooler
- Description
260 Cooling system, description
?
4
https//www.ebooklibonline.com Hello dear
friend! Thank you very much for reading. Enter
the link into your browser. The full manual is
available for immediate download. https//www.eb
ooklibonline.com
5
Service Information
Document Title Carbon monoxide in coolant system, check Function Group 260 Information Type Service Information Date 2015/2/15
Profile EXC, EC300D LR GB Profile EXC, EC300D LR GB Profile EXC, EC300D LR GB Profile EXC, EC300D LR GB
- Carbon monoxide in coolant system, check
- Op nbr 260-001
- 9808038 Leak detector
- Check the coolant level according to the
machine's operator's manual. - Warm up the engine, and let the engine run during
the entire test. - Dismantle 9808038 Leak detector.
- Lubricate the O-rings with silicone grease or
clean vaseline. - Fill both chambers with reaction fluid up to the
marked line. - Cover the inlet hole at the same time as the
carbon monoxide detector is assembled so that no
fluid is pressed out. - NOTE!
- The carbon monoxide detector and its fluids must
not be exposed to cigarette smoke, exhausts, or
similar.
WARNING
- Open the radiator cap carefully if the engine is
warm. High pressure in the radiator may cause hot
coolant to jet out. - Open the radiator cap.
- Install 9808038 Leak detector over the opening on
the expansion tank and pump 35 times with the
rubber bulb to suck in air from the tank. Wait
1015 seconds to see if the reaction fluid
changes colour. - NOTE!
- Coolant may not be sucked in to the carbon
monoxide detector. - If the reaction fluid changes colour, it means
that there is carbon monoxide in the cooling
system. Often there are very small quantities in
the machine's systems, and that is why the
measurement should be repeated if the first
measurement produces a reaction. - Suck fresh air in to 9808038 Leak detector by
pumping a few times on the rubber bulb. Pump
until the reaction fluid has returned to its
original colour. - Ventilate the air above the expansion tank.
- NOTE!
- Do not blow by exhaling since exhaled air
contains carbon dioxide. - Repeat the test.
- Carbon monoxide in the coolant indicates that
exhausts are forced into the cooling system. This
may be due to leakage by a unit injector's
copper sleeve, leaking cylinder head gasket, or
cracks in the cylinder head. These defects may
also cause low compression. - To determine if compression is low, perform a
compression test with VCADS Pro.
6
10. Reinstall the radiator cap. Stop the engine.
7
Service Information
Document Title Radiator, description Function Group 261 Information Type Service Information Date 2015/2/15
Profile EXC, EC300D LR GB Profile EXC, EC300D LR GB Profile EXC, EC300D LR GB Profile EXC, EC300D LR GB
Radiator, description The cooling unit cells and
tanks are made of aluminium. The hydraulic oil
cooler and the charge air cooler are installed to
the radiator frame. Air is drawn into the engine
compartment passing through the radiator, the oil
cooler and the charge air cooler as the fan
rotates.
- Figure 1
- Fan guard
- Charge air inlet/outlet
- Coolant inlet/outlet
- Hydraulic oil inlet/outlet
- Charge air cooler
- Hydraulic oil cooler
- Radiator
- Coolant drain valve
8
Service Information
Document Title Coolant, checking anti- freeze resistance Function Group 261 Information Type Service Information Date 2015/2/15
Profile EXC, EC300D LR GB Profile EXC, EC300D LR GB Profile EXC, EC300D LR GB Profile EXC, EC300D LR GB
Coolant, checking anti-freeze resistance Op nbr
261-002 88890105 Refractometer
WARNING
Open the expansion tank cap slowly and carefully.
The cooling system operates at high pressure and
hot coolant may rush out and cause severe
burns. 1. Check the freezing protection with
88890105 Refractometer. Open the cover on the
refractometer and place a few drops of the
coolant on the glass surface. Close the cover and
read off the value against strong light
source. Read off the value on the ethylene scale.
The coolant should be taken from the filling
point on the expansion tank.
Figure 1 2. The machine is delivered with a
coolant mixture for optimal cooling and corrosion
characteristics. That is why the same coolant
mixture shall be filled, regardless of ambient
temperature conditions. See 160 Coolant and 160
Coolant with freezing and corrosion protection.
9
Figure 2 NOTE! Volvo Construction Equipment
concentrated coolant with anti-freeze must not be
mixed with other brands of anti-freeze or
additives as this type of mixture could have
negative effects.
10
Service Information
Document Title Coolant, changing Function Group 261 Information Type Service Information Date 2015/2/15
Profile EXC, EC300D LR GB Profile EXC, EC300D LR GB Profile EXC, EC300D LR GB Profile EXC, EC300D LR GB
Coolant, changing Op nbr 261-004
WARNING
Risk of burns - stop the diesel engine and allow
it to cool down before starting any work.
WARNING
Risk of scalding and burns when the expansion
tank cap (radiator cap) is opened due to high
pressure in the cooling system. Draining
coolant 1. Open the engine hood and slowly
remove the cap from the expansion tank.
- Figure 1
- Expansion tank cap
- Open the left side door of the machine.
- Loosen the drain valve handle and drain off the
coolant. - NOTE!
- Prepare a suitable container.
11
- Figure 2
- 1. Drain valve
- NOTE!
- The cooling system is not protected from freezing
after draining. There may still be pockets of
water in the system. - NOTE!
- Handle and take care of waste oil/fluids in an
environmentally safe manner. - NOTE!
- The Volvo Construction Equipment Groups
concentrated coolant with anti-freeze must not be
mixed with other brands of anti-freeze or
additives as this type of mixture could have
negative effects. - NOTE!
- Anti-freeze must always be used, see Section 1,
Coolant with freezing and corrosion protection,
Section S. - Refilling coolant into drained cooling system
- Refill coolant through the expansion tank.
- NOTE!
- Coolant refill capacity see 160 Specification,
filling capacities. - NOTE!
12
Service Information
Document Title Radiator, replacing Function Group 261 Information Type Service Information Date 2015/2/15
Profile EXC, EC300D LR GB Profile EXC, EC300D LR GB Profile EXC, EC300D LR GB Profile EXC, EC300D LR GB
Radiator, replacing Op nbr 261-008
WARNING
Risk of burns - stop the diesel engine and allow
it to cool down before starting any work.
WARNING
- The parts are heavy. Take appropriate safety
precautions. - Place the machine in the service position B. See
091 Service positions - Remove the intercooler (charge air cooler)
assembly. See 258 Intercooler, replacing. - Remove the hydraulic oil cooler.
- Remove the radiator and replace it as a new one.
- NOTE!
- Use a new sponge when installing a radiator
assembly to the machine.
- Figure 1
- Charge air cooler
- Hydraulic oil cooler
- Radiator
- For assembling, reverse disassembly procedure.
- NOTE!
- Do not reuse O-rings and gaskets.
- Refill coolant through the expansion tank.
NOTICE
Never fill a hot engine with cold coolant, as
this may cause the cylinder block or the cylinder
head to crack. Failure to change coolant will
cause clogging of the cooling system and the risk
of engine damage.
13
NOTICE
- Volvo Coolant VCS must never be mixed with any
other coolant or corrosion protection to avoid
damage to the engine. - NOTE!
- Coolant refill capacity see 160 Specification,
filling capacities. - NOTE!
- Fill coolant to 2/3 of the expansion tank volume.
- NOTE!
- Anti-freeze must always be used, see Section 1,
Coolant with freezing and corrosion protection,
Section S. - After completion of the work, start the engine
and check for leaks. - Run the engine to operating temperature and top
up with coolant so that the cooling system is
completely filled with coolant and is free of
air. - NOTE!
- Check the coolant level after the engine has been
run to operating temperature and then cooled down.
14
Service Information
Document Title Radiator hoses all, replacing Function Group 261 Information Type Service Information Date 2015/2/15
Profile EXC, EC300D LR GB Profile EXC, EC300D LR GB Profile EXC, EC300D LR GB Profile EXC, EC300D LR GB
Radiator hoses all, replacing Op nbr 261-016
WARNING
- Risk of burns - stop the diesel engine and allow
it to cool down before starting any work. - Drain off coolant, See 261 Coolant, changing.
- Close the drain valve after draining the coolant
in about 4 minutes. - Remove the radiator under cover.
Figure 1 3. Remove the clamps and replace the
radiator hoses as a new one.
- Figure 2
- Radiator hose (Outlet)
- Radiator hose (Inlet)
15
4. Refill coolant through the expansion tank.
NOTICE
Never fill a hot engine with cold coolant, as
this may cause the cylinder block or the cylinder
head to crack. Failure to change coolant will
cause clogging of the cooling system and the risk
of engine damage.
NOTICE
- Volvo Coolant VCS must never be mixed with any
other coolant or corrosion protection to avoid
damage to the engine. - NOTE!
- Coolant refill capacity see 160 Specification,
filling capacities. - NOTE!
- Fill coolant to 2/3 of the expansion tank volume.
- NOTE!
- Anti-freeze must always be used, see Section 1,
Coolant with freezing and corrosion protection,
Section S. - Install the radiator under cover.
- After completion of the work, start the engine
and check for leaks. - Run the engine to operating temperature and top
up with coolant so that the cooling system is
completely filled with coolant and is free of
air. - NOTE!
- Check the coolant level after the engine has been
run to operating temperature and then cooled
down. - Close the engine hood.
16
Service Information
Document Title Expansion tank, replacing Function Group 261 Information Type Service Information Date 2015/2/15
Profile EXC, EC300D LR GB Profile EXC, EC300D LR GB Profile EXC, EC300D LR GB Profile EXC, EC300D LR GB
Expansion tank, replacing Op nbr 261-018
WARNING
- Risk of burns - stop the diesel engine and allow
it to cool down before starting any work. - Open the engine hood.
- Drain off coolant, See 261 Coolant, changing.
- Close the drain valve after draining the coolant
in about 5 minutes. - Disconnect the hose.
- Figure 1
- Hose
- Hose
- 4. Disconnect the wire harness connector and the
hoses.
Figure 2
17
- Wire harness connector
- Hose
- Hose
- 5. Remove the clamps and the expansion tank.
- Figure 3
- Expansion tank
- Clamp
- Install the new expansion tank.
- Connect the wire harness connector and the hoses.
- Refill coolant through the expansion tank.
NOTICE
Never fill a hot engine with cold coolant, as
this may cause the cylinder block or the cylinder
head to crack. Failure to change coolant will
cause clogging of the cooling system and the risk
of engine damage.
NOTICE
- Volvo Coolant VCS must never be mixed with any
other coolant or corrosion protection to avoid
damage to the engine. - NOTE!
- Coolant refill capacity see 160 Specification,
filling capacities. - NOTE!
- Fill coolant to 2/3 of the expansion tank volume.
- NOTE!
- Anti-freeze must always be used, see Section 1,
Coolant with freezing and corrosion protection,
Section S. - After completion of the work, start the engine
and check for leaks. - Run the engine to operating temperature and top
up with coolant so that the cooling system is
completely filled with coolant and is free of
air. - NOTE!
- Check the coolant level after the engine has been
run to operating temperature and then cooled
down. - Close the engine hood.
18
Service Information
Document Title Thermostat, replacing Function Group 262 Information Type Service Information Date 2015/2/15
Profile EXC, EC300D LR GB Profile EXC, EC300D LR GB Profile EXC, EC300D LR GB Profile EXC, EC300D LR GB
Thermostat, replacing Op nbr 262-098
WARNING
Risk of burns - stop the diesel engine and allow
it to cool down before starting any work.
WARNING
- Open the expansion tank cap slowly and carefully.
The cooling system operates at high pressure and
hot coolant may rush out and cause severe burns. - Open the engine hood.
- Drain off coolant, See 261 Coolant, changing.
- Close the drain valve after draining the coolant
in about 4 minutes. - Remove the clamp and disconnect the radiator hose
from the engine.
- Figure 1
- Clamp
- Radiator hose
- 4. Remove the mounting screws and the thermostat
housing.
19
- Figure 2
- Thermostat housing
- Screw
- 5. Remove the thermostat with the gasket.
- Figure 3
- Gasket
- Thermostat
- Install a new thermostat with a new gasket.
- NOTE!
- Use only new gaskets and copper washer when
installing. - For assembling, reverse disassembly procedure.
- Refill coolant through the expansion tank.
NOTICE
Never fill a hot engine with cold coolant, as
this may cause the cylinder block or the cylinder
head to crack. Failure to change coolant will
cause clogging of the cooling system and the risk
of engine damage.
NOTICE
Volvo Coolant VCS must never be mixed with any
other coolant or corrosion protection to avoid
damage to the engine. NOTE! Coolant refill
capacity see 160 Specification, filling
capacities.
20
- NOTE!
- Fill coolant to 2/3 of the expansion tank volume.
- NOTE!
- Anti-freeze must always be used, see Section 1,
Coolant with freezing and corrosion protection,
Section S. - After completion of the work, start the engine
and check for leaks. - Run the engine to operating temperature and top
up with coolant so that the cooling system is
completely filled with coolant and is free of
air. - NOTE!
- Check the coolant level after the engine has been
run to operating temperature and then cooled
down. - Close the engine hood.
21
Suggest If the above button click is invalid.
Please download this document first, and then
click the above link to download the complete
manual. Thank you so much for reading
22
Service Information
Document Title Thermostat, check Function Group 262 Information Type Service Information Date 2015/2/15
Profile EXC, EC300D LR GB Profile EXC, EC300D LR GB Profile EXC, EC300D LR GB Profile EXC, EC300D LR GB
Thermostat, check 1. Place the thermostat in a
container filled with water.
- Figure 1
- Thermostat inspection
- Thermometer
- Thermostat
- 2. Heat it while measuring the water temperature,
and see that the thermostat is actuated at the
temperature of following table. - Concerning the operating temperature, see 262
Coolant pump, thermostat, specifications. - NOTE!
- Valve opening temperature is scribed on the
flange.
- Figure 2
- Thermostat inspection
- Thermometer
- Thermostat
- Tester probes
23
https//www.ebooklibonline.com Hello dear
friend! Thank you very much for reading. Enter
the link into your browser. The full manual is
available for immediate download. https//www.eb
ooklibonline.com
Recommended
