
New Holland TB100 Tractor Service Repair Manual Instant Download PowerPoint PPT Presentation
Title: New Holland TB100 Tractor Service Repair Manual Instant Download
1
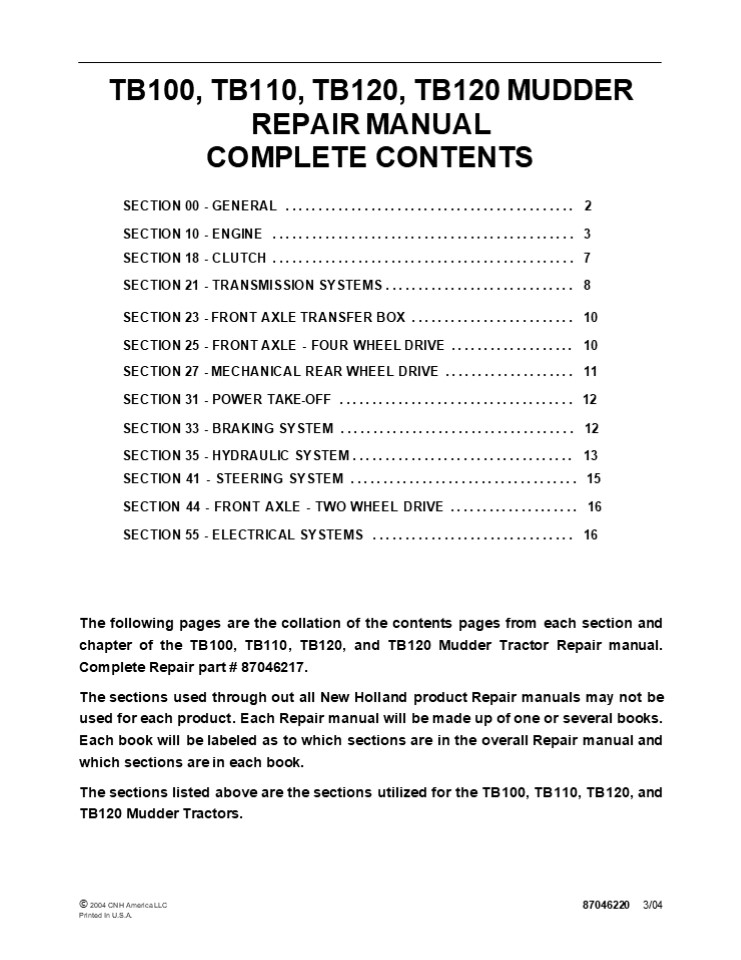
TB100, TB110, TB120, TB120 MUDDER REPAIR MANUAL
COMPLETE CONTENTS
- SECTION 00 - GENERAL .............................
............... 2 - SECTION 10 - ENGINE ..............................
................ 3 - SECTION 18 - CLUTCH ..............................
................ 7 SECTION 21 - TRANSMISSION
SYSTEMS ............................. 8 - SECTION 23 - FRONT AXLE TRANSFER BOX
......................... 10 - SECTION 25 - FRONT AXLE - FOUR WHEEL DRIVE
................... 10 - SECTION 27 - MECHANICAL REAR WHEEL DRIVE
.................... 11 SECTION 31 - POWER
TAKE-OFF .................................... 12 - SECTION 33 - BRAKING SYSTEM ......................
.............. 12 - SECTION 35 - HYDRAULIC SYSTEM ....................
.............. 13 - SECTION 41 - STEERING SYSTEM .....................
.............. 15 SECTION 44 - FRONT AXLE - TWO
WHEEL DRIVE .................... 16 SECTION 55 -
ELECTRICAL SYSTEMS ...............................
16
The following pages are the collation of the
contents pages from each section and chapter of
the TB100, TB110, TB120, and TB120 Mudder Tractor
Repair manual. Complete Repair part
87046217. The sections used through out all New
Holland product Repair manuals may not be used
for each product. Each Repair manual will be made
up of one or several books. Each book will be
labeled as to which sections are in the overall
Repair manual and which sections are in each
book. The sections listed above are the sections
utilized for the TB100, TB110, TB120, and TB120
Mudder Tractors.
? 2004 CNH America LLC Printed In U.S.A.
87046220 3/04
2
SECTION 00 - GENERAL - CHAPTER 1 GENERAL
INSTRUCTIONS IMPORTANT NOTICE All maintenance
and repair operations described in this manual
should be carried out exclusively by New Holland
authorised workshops. All instructions should be
carefully observed and special equipment where
indicated should be used. Anyone who carries out
service operations described without carefully
observing these prescriptions will be directly
responsible for any damage caused.
- NOTES FOR EQUIPMENT
- Equipment which NEW HOLLAND proposes and shows in
this manual is - studied and designed expressly for use on NEW
HOLLAND tractors - necessary to make a reliable repair
- accurately built and strictly tested to offer
efficient and long -lasting working life.
NOTICES The words front, rear, right hand,
and left hand refer to the different parts as
seen from the operators seat oriented to the
normal direction of movement of the tractor.
3
SECTION 00 - GENERAL - CHAPTER 1 HEALTH AND
SAFETY CONTENTS Description Page HEALTH AND
SAFETY PRECAUTIONS ...............................
.......................... 2 ACIDS AND ALKALIS
..................................................
....................... 3 ADHESIVES AND SEALERS -
see Fire .........................................
................ 3 ANTIFREEZE - see Fire,
Solvents e.g. Isopropanol, Ethylene Glycol,
Methanol. ...................... 3 ARC WELDING -
see Welding. .....................................
............................ 4 BATTERY ACIDS -
see Acids and Alkalis. ...........................
............................ 4 BRAKE AND CLUTCH
FLUIDS (Polyalkylene Glycols) - see Fire.
................................... 4 BRAZING -
see Welding. .....................................
................................. 4 CHEMICAL
MATERIALS - GENERAL - see Legal Aspects.
........................................ 4 DOS
..................................................
..................................... 4 DO NOTS
..................................................
................................. 5 CORROSION
PROTECTION MATERIALS - see Solvents, Fire.
.................................... 5 DUSTS
..................................................
................................... 5 ELECTRIC
SHOCK ............................................
............................... 5 EXHAUST FUMES
..................................................
......................... 6 FIBRE INSULATION -
see Dusts. .......................................
....................... 6 FIRE - see Welding,
Foams, Legal Aspects. ............................
......................... 6 FIRST AID
..................................................
................................ 6 FOAMS -
Polyurethane - see Fire. .........................
.................................... 6 FUELS -
see Fire, Legal Aspects, Chemicals - General,
Solvents. .................................. 7
GAS CYLINDERS - see Fire. ........................
.......................................... 7
GENERAL WORKSHOP TOOLS AND EQUIPMENT
..............................................
8 LEGAL ASPECTS ..................................
..........................................
8 LUBRICANTS AND GREASES .........................
........................................ 8 PAINTS
- see Solvents and Chemical Materials - General.
......................................... 9
SOLDER - see Welding. ............................
..........................................
9 SOLVENTS - see Chemical Materials - General
Fuels (Kerosene), Fire. ..........................
. 10 SUSPENDED LOADS .............................
..........................................
10 WELDING - see Fire, Electric Shock, Gas
Cylinders. .......................................
..... 10
HEALTH AND SAFETY PRECAUTIONS Many of the
procedures associated with vehicle maintenance
and repair involve physical hazards or other
risks to health. This section lists, alphabeti-
cally, some of these hazardous operations and the
materials and equipment associated with them. The
precautions necessary to avoid these hazards are
identified. The list is not exhaustive and all
operations and procedures and the handling of
materials, should be carried out with health and
safety in mind.
4
https//www.ebooklibonline.com Hello dear
friend! Thank you very much for reading. Enter
the link into your browser. The full manual is
available for immediate download. https//www.ebo
oklibonline.com
5
SECTION 00 - GENERAL - CHAPTER 1
ACIDS AND ALKALIS -- see Battery acids, e.g.
caustic soda, sulfuric acid. Used in batteries
and cleaning materials. Irritant and corrosive to
the skin, eyes, nose and throat. Causes
burns. Avoid splashes to the skin, eyes and
clothing. Wear suitable protective gloves and
goggles. Can destroy ordinary protective
clothing. Do not breathe mists. Ensure access to
water and soap is readily available for splashing
accidents.
Provide adequate ventilation and avoid skin and
eye contact. Follow manufacturers instructions.
Anaerobic, Cyanoacrylate and other Acrylic
Adhesives Many are irritant, sensitizing or
harmful to the skin. Some are eye irritants. Skin
and eye contact should be avoided and the
manufacturers instructions followed. Cyanoacrylate
adhesives (super -glues) must not contact the
skin or eyes. If skin or eye tissue is bonded
cover with a clean moist pad and get medical
attention. do not attempt to pull tissue apart.
Use in well ventilated areas as vapours can cause
irritation of the nose and eyes. For two -pack
systems see Resin based adhesives/ sealers.
ADHESIVES AND SEALERS -- see Fire Highly
Flammable, Flammable, combustible. Generally
should be stored in No Smoking areas
cleanliness and tidiness in use should be
observed, e.g. disposable paper covering benches
should be dispensed from applicators where
possible contain- ers, including secondary
containers, should be labelled. Solvent based
Adhesives/Sealers - See Solvents. Follow
manufacturers instructions. Water based
Adhesives/Sealers Those based on polymer
emulsions and rubber lattices may contain small
amounts of volatile toxic and harmful chemicals.
Skin and eye contact should be avoided and
adequate ventilation provided during use. Follow
manufacturers instructions. Resin based
Adhesives/Sealers - e.g. epoxide and formaldehyde
resin based. Mixing should only be carried out in
well ventilated areas as harmful or toxic
volatile chemicals may be released. Skin contact
with uncured resins and hardeners can result in
irritation dermatitis and absorption of toxic or
harmful chemicals through the skin. Splashes can
damage the eyes.
Isocyanate (Polyurethane) Adhesives/ Sealers --
see Resin based Adhesives.
Individuals suffering from asthma or respiratory
allergies should not work with or near these
materials as sensitivity reactions can occur. Any
spraying should preferably be carried out in
exhaust ventilated booths removing vapours and
spray droplets from the breathing zone.
Individuals working with spray applications
should wear supplied air respirators.
ANTIFREEZE -- see Fire, Solvents e.g.
Isopropanol, Ethylene Glycol, Methanol. Highly
Flammable, Flammable, Combustible. Used in
vehicle coolant systems, brake air pressure
systems, screenwash solutions. Vapours given off
from coolant antifreeze (glycol) arise only when
heated. Antifreeze may be absorbed through the
skin in toxic or harmful quantities. Antifreeze
if swallowed is fatal and medical attention must
be found immediately.
6
SECTION 00 - GENERAL - CHAPTER 1
ARC WELDING -- see Welding.
The effects of excessive exposure to chemicals
may be immediate or delayed briefly experienced
or permanent cumulative superficial life
threatening or may reduce life -expectancy.
BATTERY ACIDS -- see Acids and Alkalis. Gases
released during charging are explosive. Never use
naked flames or allow sparks near charging or
recently charged batteries.
DOS Do remove chemical materials from the skin
and clothing as soon as practicable after
soiling. Change heavily soiled clothing and have
it cleaned. Do carefully read and observe
hazard and precaution warnings given on material
containers (labels) and in any accompanying
leaflets, poster or other instructions. Material
health and safety data sheets can be obtained
from Manufacturers. Do organise work practices
and protective clothing to avoid soiling of the
skin and eyes breathing vapours/aerosols/dusts
/fumes inadequate contain- er labelling fire
and explosion hazards. Do wash before job breaks
before eating, smoking, drinking or using toilet
facilities when handling chemical materials. Do
keep work areas clean, uncluttered and free of
spills. Do store according to national and local
regulations. Do keep chemical materials out of
reach of children.
BRAKE AND CLUTCH FLUIDS (Polyalkylene Glycols) --
see Fire. Combustible. Splashes to the skin and
eyes are slightly irritating. Avoid skin and eye
contact as far as possible. Inhalation of vapour
hazards do not arise at ambient temperatures
because of the very low vapour pressure.
BRAZING -- see Welding.
CHEMICAL MATERIALS - GENERAL -- see Legal
Aspects. Chemical materials such as solvents,
sealers, adhesives, paints, resin foams,
battery acids, antifreeze, brake fluids, oils
and grease should always be used with caution and
stored and handled with care. They may be toxic,
harmful, corrosive, irritant or highly
inflammable and give rise to hazardous fumes and
dusts.
7
SECTION 00 - GENERAL - CHAPTER 1
DO NOTS Do Not mix chemical materials except
under the manufacturers instructions some
chemicals can form other toxic or harmful
chemicals give off toxic or harmful fumes be
explosive when mixed together. Do Not spray
chemical materials, particularly those based on
solvents, in confined spaces e.g. when people are
inside a vehicle. Do Not apply heat or flame to
chemical materials except under the
manufacturers instructions. Some are highly
inflammable and some may release toxic or harmful
fumes. Do Not leave containers open. Fumes given
off can build up to toxic, harmful or explosive
concentrations. Some fumes are heavier than air
and will accumulate in confined areas, pits
etc. Do Not transfer chemical materials to
unlabelled containers. Do Not clean hands or
clothing with chemical materials. Chemicals,
particularly solvents and fuels will dry the skin
and may cause irritation with dermatitis. Some
can be absorbed through the skin in toxic or
harmful quantities. Do Not use emptied containers
for other materials, except when they have
been cleaned under supervised conditions. Do
Not sniff or smell chemical materials. Brief
exposure to high concentrations of fumes can be
toxic or harmful. Clutch Fluids - see Brake and
Clutch Fluids. Clutch Linings and Pads - see
Brake and Clutch Linings and Pads.
Cutting - see Welding. De -Waxing - see Solvents
and Fuels (Kerosene).
DUSTS Powder, dusts or clouds may be irritant,
harmful or toxic. Avoid breathing dusts from
powdery chemical materials or those arising
from dry abrasion operations. Wear respiratory
protection if ventilation is inadequate.
- ELECTRIC SHOCK
- Electric shocks can result from the use of faulty
electrical equipment or from the misuse of
equipment even in good condition. - Ensure that electrical equipment is maintained in
good condition and frequently tested. - Ensure that flexes, cables, plugs and sockets are
not frayed, kinked, cut, cracked or otherwise
damaged. - Ensure that electric equipment is protected by
the correct rated fuse. - Never misuse electrical equipment and never use
equipment which is in any way faulty. The results
could be fatal. - Use reduced voltage equipment (110 volt) for
inspection and working lights where possible. - Ensure that the cables of mobile electrical
equipment cannot get trapped and damaged, such as
in a vehicle hoist. - Use air operated mobile equipment where possible
in preference to electrical equipment. - In cases of electrocution -
- switch off electricity before approaching victim
- if this is not possible, push or drag victim from
source of electricity using dry non
-conductive material - commence resuscitation if trained to do so
- SUMMON MEDICAL ASSISTANCE
CORROSION PROTECTION MATERIALS -- see Solvents,
Fire. Highly flammable, flammable. These
materials are varied and the manufacturers
instructions should be followed. They may contain
solvents, resins, petroleum products etc. Skin
and eye contact should be avoided. They should
only be sprayed in conditions of adequate
ventilation and not in confined spaces.
8
SECTION 10 - ENGINE - CHAPTER 1 SECTION 10 -
ENGINE Chapter 1 - Diesel Engines CONTENTS
Description Page Specifications
..................................................
................ 3 Lubricants ....................
................................................
11 Torque Values .................................
.............................. 12 Special Tools
..................................................
.............. 13 Grease and Sealants
..................................................
....... 13 Fault Finding .........................
.......................................
14 Description and Operation .....................
................................ 19 Cylinder Head
Assembly .........................................
............. 19 Camshaft Assembly
..................................................
........ 19 Crankshaft Assembly
..................................................
....... 19 Connecting Rods .......................
...................................... 19 Pistons
..................................................
................... 19 Manifolds
..................................................
................. 20 Cylinder Block Assembly
..................................................
.... 20 Timing Gears .............................
...................................
20 Lubrication System ............................
............................... 21 Diesel Engine
Strip-down .......................................
............... 23 Separating the Tractor
..................................................
...... 24 Disassembly and Overhaul
..................................................
.. 32 Cylinder Head ..............................
................................. 37 Rocker Shaft
..................................................
.............. 37 Valve and Spring Assembly
..................................................
.. 38 Valve Inserts ..............................
.................................. 40 Valve
Guides ...........................................
..................... 42 Valve Springs
..................................................
.............. 43 Rocker Shaft ...................
.............................................
44 Cylinder Head .................................
.............................. 45 Engine Front
Cover and Timing Gear ............................
............... 46 Timing Gear ...................
..............................................
47 Oil Pan .......................................
.............................. 53
Section
9
SECTION 10 - ENGINE - CHAPTER 1 Connecting Rods,
Bearings, Pistons, and Rings .....................
............. 53 Connecting Rod Bushings
..................................................
... 56 Cylinder Block ............................
................................... 58 Cylinder
Bore .............................................
................... 60 Sleeves ...................
..................................................
62 Balancer ....................................
................................ 66 Main Bearings
..................................................
............. 66 Flywheel ........................
............................................
66 Crankshaft ....................................
.............................. 66 Balancer
..................................................
.................. 67 Main Bearing
..................................................
.............. 69 Flywheel .......................
.............................................
70 Rear Cover Plate ..............................
............................... 71 Oil Pump
..................................................
.................. 73 Oil Filter Support Assembly
..................................................
.. 75 Crankshaft .................................
.............................. 77, 80 Balancer
Gear .............................................
.................. 78 Timing Gear
..................................................
............... 79 Camshaft ......................
.............................................
82 Camshaft Bearings .............................
.............................. 83 Intake Manifold
..................................................
......... 84, 85 Exhaust Manifold
..................................................
........ 84, 86 Engine Testing ...................
............................................
87 Compression Test Procedure ....................
.............................. 87 Compression
Test Readings ....................................
............... 87 Engine Break-in (Low Hp
Application) .....................................
...... 87 Engine Break-in (Other Than Low Hp
Application) ................................ 88
10
SECTION 10 - ENGINE - CHAPTER 1 ENGINE
SPECIFICATIONS
Model Unit TB100 TB110 TB120
Turbocharged Engine Turbocharged Engine Yes Yes Yes
Cylinders Cylinders 4 4 6
Bore mm 111.8 111.8 111.8
in 4.4 4.4 4.4
Stroke mm 127.0 127.0 127.0
in 5.0 5.0 5.0
Displacement cu cm 4987 4987 7472
cu in 304 304 456
Compression Ratio Compression Ratio 175 -1 175 -1 175 -1
Cylinder Bore Compression (at cranking speed of 200 rpm) bar 25.85 25.85 25.85
psi 375 375 375
Firing Order (clockwise) Firing Order (clockwise) 1--3 -4--2 1--3 -4--2 153624
Idle Speed rev/min / - 50 750 750 750
Maximum No-Load Speed rev/min 2320 ? 50 2220 2320
Rated Engine Speed rev/min 2170 2070 2070
CYLINDER BLOCK
Cylinder Bore Taper maximum wear limit 0.127 mm 0.005 in.
maximum repair limit 0.025 mm 0.001 in.
Cylinder Bore Out-of-Round maximum wear limit 0.127 mm 0.005 in.
maximum repair limit 0.030 mm 0.001 in.
Cylinder Bore Diameter Cylinder Bore Diameter 111.778-111.841 mm 4.4007-4.4032 in.
Rear Oil Seal Diameter Rear Oil Seal Diameter 140.77-140.87 mm 5.542-5.546 in.
Head-to-Block Surface Flatness Limit any 152 mm (6 in.) area 0.080 mm 0.003 in.
Head-to-Block Surface Flatness Limit any 25.40 mm (1 in.) area 0.030 mm 0.001 in.
Head-to-Block Surface Flatness Limit overall 0.127 mm 0.005 in.
CYLINDER HEAD
Valve Guide Bore Diameter 9.469-9.495 mm 0.3728-0.3738 in.
11
SECTION 10 - ENGINE - CHAPTER 1
LUBRICATION SYSTEM Installed on the rear of the
engine block, behind the flywheel left side, is a
rotor type pump, which provides engine
lubrication, Figure 1. The camshaft drives the
oil pump, which draws oil from the engine oil pan
through a tube and screen assembly. The oil
filter body mounted on the left side of the
engine block incorporates an integral
spring-loaded relief valve to prevent over
pressurization of the system. The spin-on type
oil filter mounted to the support housing allows
easy access at service intervals. Oil flows from
the filter to the main oil gallery, which runs
the length of the cylinder block and intersects
the camshaft follower chamber. The main gallery
also supplies oil to the crankshaft main bearings
and connecting rods. The underside of the pistons
and pins are lubricated by oil pressure jets
mounted adjacent to each main journal
housing. The camshaft drive gear bushing is
pressure lubricated through a drilled passage
from the front
main bearing. The gear has small oil passages
machined on both sides allowing excess oil to
escape. The pressure lubricated camshaft
drive gear bushing, and oil splashed from the
cam follower chamber, lubricates the timing
gears. A drilled passage from the cylinder block
crankshaft thrust bearing web to the balancer
housing lubricates the dynamic balancer on
4-cylinder engines. Oil flows through the
balancer housing to the drilled balancer gear
shafts, and onto the bushings in the balancer
gears. A drilled passage on the cylinder block
directs an intermittent flow of oil to the valve
rocker arm shaft assembly. This is located
vertically above the No. 1 camshaft bearing and
aligns with a hole in the cylinder head. The
rotation of the camshaft allows a controlled
intermediate flow of lubrication. The oil filter
support housing supplies oil to the turbocharger
(where installed).
Engine Oil Flow
1
Engine Lubrication System with Turbocharger
Installed
12
- SECTION 10 - ENGINE - CHAPTER 1
- Engine Components - Right Side
- Air Cleaner
- Fuel/Water Sediment Separator
- Fuel Injection Pump with Wax Plug
- Fuel/Water Separator
- Engine Oil Dip Stick
- Electric Lift Pump and Fuel Filter Assembly
- Starting Motor and Solenoid
- Engine Intake Manifold and Thermostart Unit
- Radiator Recovery Tank
2
- Engine Components - Left Side
- Vertical Exhaust Muffler
- Alternator
- Exhaust Manifold
- Oil Filter Assembly with Relief Valve
- Mounting point for Auxiliary Pump and Breather
- Fuse Box
- Oil Pressure Sender
3
- Engine Components - Front
- Center Support Bracket
- Coolant Temperature Sender
- Water Pump, Pulley and Fan
- Fuel Injection Pump and Engine Timing Cover
- Radiator Hose
- Thermostatic Switch
- Thermostat Housing
4
13
- SECTION 10 - ENGINE - CHAPTER 1
- DIESEL ENGINE STRIP-DOWN
- Certain operations can be performed with the
engine still in the tractor, or unattached at the
connection to the front axle support, or
separated from the transmission housing as
follows - Overhaul and repair procedures with the engine
still in the tractor - Cylinder head and associated inlet and exhaust
components - Fuel injection pump and related parts
- Water pump, thermostat, and associated compo-
nents - Oil pump relief valve
- Oil pan and gasket
- Turbocharger
- Overhaul and repair procedures with the engine
separated from the front axle - Front timing cover/timing gear removal
- Crankshaft and balancer, bearing shells, piston
removal, and oil pump suction tubing - Front pulley and damper assembly
- Overhaul and repair procedures with the engine
separated from the transmission housing, and the
oil pan removed - Crankshaft rear oil seal and carrier removal
14
SECTION 10 - ENGINE - CHAPTER 1 WARNING Separating
the tractor at any location is a dangerous
operation. Always use the appropri- ate tools,
lifting cranes, hoists, slings and support
stands. Securely support the tractor where
necessary when removing attaching hardware for
the front axle, transmission and engine. Failure
to adhere to safe maintenance practices may lead
to serious personal injury or death, or cause
irreparable damage to the tractor.
SEPARATING THE TRACTOR The following procedures
describe two methods of disconnecting the engine
from the tractor. The method required depends on
the component, the location of the component, and
the extent of the maintenance action.
1
Engine-to-Front Axle
- Raise the engine hood assembly (1).
- Disconnect the battery negative (ground) cable.
5
3. Disconnect power steering hoses (1) from the
steering cylinder (2). Cap and plug openings to
prevent contamination. Drain excess hydraulic
fluid into a suitable container.
2 1
6
- On four-wheel drive models
- Disconnect the front differential lock hydraulic
tube. Cap and plug openings to prevent
contamination. - Disconnect and remove the axle-shaft guard bolts
(1) and axle-shaft guard. - Remove the driveshaft from the tractor.
7
15
SECTION 10 - ENGINE - CHAPTER 1
5. Open the drain cock (1) at the lower left
side of the radiator, and allow coolant to drain
into a suitable container.
1 50025593
NOTE Loosening the radiator cap will facilitate
fast- er draining.
- Remove radiator hoses from engine block.
- Disconnect oil cooler hoses. Drain excess
hydraulic oil into a suitable container. Cap and
plug openings to prevent contamination. - Remove horn assembly connectors.
8
- Remove fan guards (where installed).
- Remove the center brace connected at the top of
the radiator below the air cleaner intake tube,
and at the front of the engine block (1). - Position Splitting Tool No. MS2700C with engine
Support Tool No. MS2700 -C -8 in position. If
the splitting tool is unavailable, use an
overhead crane with suitable straps. Position
straps at the front and rear of the front
support for maintaining balance.
1 20031379
WARNING
Separating the tractor at any location is a
dangerous operation. Always use the appropri- ate
tools, lifting cranes, hoists, slings and support
stands. Securely support the tractor where
necessary when removing attaching hardware for
the front axle, transmission and engine. Failure
to adhere to safe maintenance practices may lead
to serious personal injury or death, or cause
irreparable damage to the tractor.
9
- Support the engine at the front of the
transmission, and insert wedges, between the
axle and the front support. - Remove the hardware securing the engine to the
front support. - Wheel the front support and axle away from the
engine.
16
SECTION 10 - ENGINE - CHAPTER 1 Engine-to-Front
Transmission WARNING Separating the tractor at
any location is a dangerous operation. Always use
the appropri- ate tools, lifting cranes, hoists,
slings and support stands. Securely support the
tractor where necessary when removing
attaching hardware for the front axle,
transmission and engine. Failure to adhere to
safe maintenance practices may lead to serious
personal injury or death, or cause irreparable
damage to the tractor.
- Disconnect the battery negative (ground) cable.
- Raise the hood assembly (1).
1
10
- Remove the radiator recovery tank hose (1),
recovery tank (2) and bracket (3). - Remove fuel lines to the lift pump and filter
assembly. Cap all openings to prevent the
ingestion of contaminants.
1 2 3 20031385
11
5. Remove electrical connector (1) at the lift
pump and filter assembly (2).
2 1 20031385
12
17
SECTION 10 - ENGINE - CHAPTER 1
6. Remove the mounting bolts and the lift pump
and filter assembly (1) to facilitate removal of
the starting motor.
1 20031385
13
7. Remove the battery ground wire (1) attached
to the engine block near the starting motor (2).
1
2
40031376
14
8. Remove the protective cover (1), and then
disconnect the starting motor solenoid wires (2).
1 2
40031370
15
18
Suggest If the above button click is invalid.
Please download this document first, and then
click the above link to download the complete
manual. Thank you so much for reading
19
SECTION 10 - ENGINE - CHAPTER 1 9. Remove the
retaining bolts (1) and starting motor (2).
2
1
20031390
16
- Remove the throttle control-to-injection pump
linkage. - Remove fuel tank-to-injection pump fuel line (1).
Cap and plug openings to prevent contamina-
tion. - Remove leak-off tube from fuel injectors to fuel
tank.
1
40031375
17
13. Remove air cleaner restriction warning switch
(1) from the intake tube (2). Secure wires and
connectors out of the way.
1
2
20031388
18
10-30
20
https//www.ebooklibonline.com Hello dear
friend! Thank you very much for reading. Enter
the link into your browser. The full manual is
available for immediate download. https//www.ebo
oklibonline.com
Recommended
