
How to Create Multi-Language Store in Magento 2 PowerPoint PPT Presentation
Title: How to Create Multi-Language Store in Magento 2
1
How to Create Multi-Language Store in Magento 2
Many ecommerce stores have multiple store views
because they want to reach a wider audience in
languages that their audience is familiar with.
When a customer gets information in a familiar
language, it is easier for them to understand the
product or service. This, in turn, makes it
easier for them to make a purchase decision.A
store in ones own language also makes one feel
like they can trust the store. They feel catered
to. This increases their chance of coming back to
your store, provided the overall experience is
good.
In this blog, we are going to talk about how you
can enable multiple languages in Magento 2 or
create a multi-language website in Magento 2.
Heres an extensive step-by-step guide to set up
your own multilingual store from Magento
2 backend.
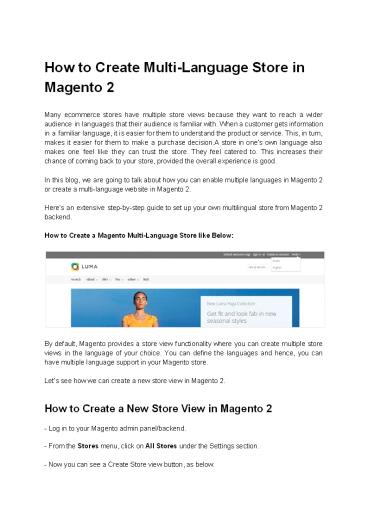
How to Create a Magento Multi-Language Store like
Below
By default, Magento provides a store view
functionality where you can create multiple
store views in the language of your choice. You
can define the languages and hence, you can have
multiple language support in your Magento store.
Lets see how we can create a new store view in
Magento 2.
How to Create a New Store View in Magento 2 - Log
in to your Magento admin panel/backend.
- From the Stores menu, click on All Stores under
the Settings section. - Now you can see a Create
Store view button, as below
2
As you can see in the image, weve already
created some store views with the store name and
code. Similarly, as per your preference, you can
add store views with name, code and set status as
enable/disable. Once youve set up your store
views, you can fix a sort order for store views
and select a default store view for your store.
For more detailed guide you can refer this link
https//devdocs.magento.com/guides/v2.3/config-gui
de/multi-site/ms_websites.html
How to Setup Locale Language for Your Store View
- From the admin panel, tap on the Stores menu,
then under Settings, choose Configuration.
- Now you should able to see a menu on the left.
Under that, you can find the General tab. Choose
General to open configuration.
- To change configuration for a specific Store
view, you need to switch the store from the
top of the page.
- From the Store view, list at the top of the
page, choose one of the store views as shown in
the following figure
3
- Now, you should be able to define the locale
for the chosen store view in Magento 2. You will
have to deploy your theme static content for
multiple locales as you have configured set up
for multiple languages.
You can run the command given below to deploy
static content for the multiple language
php bin/magento setupstatic-contentdeploy en_GB
en_US ro_RO
Here instead of en_GB en_US ro_RO, you need to
add your own language code based on
your locale setup.
If you will set your store mode as production at
that time, it will automatically set up a
store and deploy content with required locale.
Now, you have set up a multiple language store
view, so you can proceed with the translation.
How to Translate Theme Static Content
There are two ways to translate the themes
static content Based on the language, you
can map a word with the language specific word
that you want to translate it to or by installing
a language pack.
gtgt Translate Inline
- To use this feature, your Magento store should
be in developer mode because only then
you can use the Inline translation.
- Before enabling the inline translation for
proper output, you have to disable
mentioned cache.
4
gtgtHow to Disable Output Caches - In the admin
section, go to System menu and choose Cache
Management. - Mark the following checkboxes
- Page Cache
- Blocks HTML output
- Translations
- Set the Actions to Disable. Then, click
Submit. gtgtNow Enable the Inline Translation - In
the Admin panel sidebar, click on Stores and
choose Configuration.
- To work with a specific store view, click on
the name of one of your store view, from
the store view list, that is to be updated.
- On the left side of the page, under the
Advanced tab, choose Developer mode. (If you are
not able to see it, first enable the developer
mode of you Magento 2 backend.)
- Expand the Translate Inline group. Then if
necessary, clear theUse Website checkbox, set
Enabled for Storefront to Yes and save the
configuration.
gtgtUpdate the Text
- Open the frontend/storefront in a browser, and
go to the page that you want to edit. If
necessary, use the language chooser to change the
store view.
The text of each string that can be translated
will be outlined in red. When you hover over any
text box, a book icon (lt/span) appears.
- Click on to open the Translate window. Check
the Store View Specific checkbox and
provide your custom text for that store.
Now you can refresh the page to see the updated
store view. You can process that with the other
elements.
5
In order to disable the inline translation, just
set value No to Enabled for Frontend from
the Translate inline group from the admin and
save the configurations.
gtgtLanguage Pack and CSV based Translation
- For the CSV based translation, you have to
create a CSV with the language code
like en_US.csv or de_DE.csv which contains the
original phrase and the translated phrase in the
language you want to translate.
You can place this file in the path given below
app/design/frontend/Vendorname/themename/i18n/
en_US.csv
You can also install ready made translated
language pack if you do not want to create a CSV
with your own words and phrases. You can directly
use any language pack and install that in your
store. Install it with the command line using the
composer.
You can go to this link and find available
language packs
https//packagist.org/?querylanguage20pack20mag
ento202
In some cases, some words are not translated
using this. For that, static content should
be added in a way that it can be detected by the
i18n tool of Magento. This way youll be able
to add the strings in the dictionary for the
translation.
gtgtString Added In the phtml file
6
- Should use the __('ltyour_stringgt') method while
adding a custom string, so it is able to
translate.
For example
php echo __('Translation Original Phrase')
php echo __('Hello s , How are you' ,
name) gtgtString Added for the Email template
- When string will be added, need to use the
following trans string text of the printing
For example
trans "text of the printing"
When a string is added with a variable value in
the email template trans "variable string"
variable"value" gtgtString Added for the UI
component template html file Here, you need to
implement the data-bind attribute with the
i18n For Example
ltspan data-bind"i18n 'String'"gtlt/spangt To add a
string with no binding to an HTML element lt!--
ko i18n 'Your String Message' --gtlt!-- /ko
--gt While string is added on attribute of an HTML
element ltinput type"text" data-bind"attr
placeholder t('String for translation')"
/gt gtgtString Added for the UI component
configuration xml files
You will have to implement the translate
attribute and set this as true for the
translation.For
example
ltitem name"label" xsitype"string"
translate"true"gtDeletelt/itemgt
7
While fetching the data programmatically from the
xml, you will have to use the method
__(variable) to display translated text.
Example
__(this-gtconfig-gtgetData('label'))
gtgtString Added for the .js files
In the js file, you should implement the
mage/translate library to be able to translate
the text. You can add translate library as below
define ('jquery', 'mage/translate', function
() ...) You have to use the
.mage.__('')function when adding your
string .mage.__('ltstringgt')
Whereas, have to use the below method for adding
string with a variable .mage.__('Hello
1').replace('1', yourVariable)
For the translation of dynamic content like the
category, product, CMS page and block, you will
have to define the translated value for the Store
view.
As a store owner, having multiple store views is
beneficial and can help you acquire customers
from all over the world.
In case, all this went above your head or you
want to save your time from this tedious task
of translating, you can go for a Magento language
translation extension. You can also opt
for AppJettys Magento 2 language translator
which uses the Google Translate API and
is equipped with features like
- Mass Translation of CMS pages, product category
pages, etc. in a matter of minutes
using console/cron.
- WYSIWYG Editor
- Database Search Translate
Original Blog https//www.appjetty.com/blog/multi
-language-store-magento2
Recommended
