How to Install Acrylic Brick Slips PowerPoint PPT Presentation
Title: How to Install Acrylic Brick Slips
1
How to Install Acrylic Brick Slips
2
- Everyone wants that their home to look prettier
than that of other peoples. This applies to not
only the inside but also the outside of the home.
That also explains why we are always on the
lookout for new and attractive methods of
construction and design for our homes. Your
homes wall cladding is one such area that can
enhance the appearance of your home. There are
several ways of decorating your wall cladding.
And the focus of this infographic is one of the
best and most cost-effective brick
cladding systems, acrylic slips. - Acrylic slips have numerous advantages to them.
For starters, they are among the most
cost-effective brick slip cladding choices. Brick
slip installers often recommend acrylic slips if
you want a solution that accurately imitates the
appearance of traditional brickwork but doesnt
require as much maintenance. You can install
these brick slips made of acrylic on your own or
have them installed by a professional brick
installer. An acrylic brick slips installation in
your home will last for a long time and keep your
wall surface looking fresh for years to come.
3
If you are looking for a cheaper, quicker and
simpler alternative to traditional brick slips,
acrylic slips are the perfect choice. Here we
look at the basic steps involved in installing
acrylic slips.
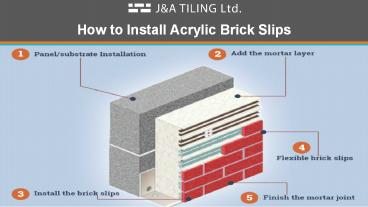
- 1. Panel/substrate Installation The first step
in the process of installing acrylic slips, panel
installation is required to hold the slips in
place. As a bonus, a well-done substrate adds a
nice texture and stratification to your wall
surface. - 2. Add the mortar layer The mortar used here is
not of the regular kind. Rather, it is a
specialist adhesive mortar that is essential for
the installation of acrylic slips. Adhesive
mortars are available in a variety of colours and
shades. - 3. Install the brick slips After the application
of the adhesive mortar layer, install and adjust
the acrylic slips by hand. With proper
installation and adjustment, you can match the
look of any traditional brick surface.
4
- 4. Flexible brick slips One of the best things
about acrylic slips is that they are flexible and
can be cut, which is unlike traditional brick
slips. This also enables you to cover the most
awkward angles and corners of your wall. - 5. Finish the mortar joint The final step in the
process, finishing the mortar joint enables you
to recreate the look of a traditional mortar
joint. You can finish the mortar joint of your
acrylic slip installation using a simple brush.
5
Contact Us
- JA Tiling Ltd
- 01702 233003
- info_at_jandatiling.co.uk
- https//jandatiling.co.uk/

