
Open TekNet Software PowerPoint PPT Presentation
1 / 47
Title: Open TekNet Software
1
Open TekNet Software
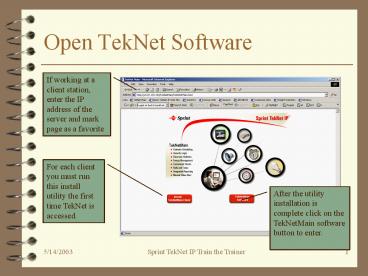
If working at a client station, enter the IP
address of the server and mark page as a favorite
For each client you must run this install utility
the first time TekNet is accessed.
After the utility installation is complete click
on the TekNetMain software button to enter.
2
Login screen
Login using your User ID and Password
Click Login
3
Software Tab Bar
Note the tabs for each software Admin, Media
Control, Resource Scheduling, Surveillance, and
Video Viewer. If you do not have these options
available to you, the tabs will be grayed out.
Click on Admin to start.
4
Editing the Periods schedule
- In the menu bar, click on Edit, then Edit
Periods. - Answer Yes in the pop up window to proceed.
- Click on the ends of the lines to adjust the
start and end times for the periods. - Add a new period by right clicking, then choose
Add a new period. Adjust the new period line to
the desired time. - Note period time lines will not overlap.
- Click on the Level 2 tab to adjust morning and
afternoon blocks of time. - Can use Level 3 tab for an all-day block of time
5
Edit Periods
Using the mouse, you may click and drag the edges
of the Period Manager window to enlarge
6
Periods Manager
To add a period at the end of the list, I place
my mouse pointer below Period 5 and right click,
choose Add period .
In the Add Period window, type name of new period
and click OK.
7
Adjust the Time Line
Place your mouse pointer on the right end of the
green time line and drag to the correct time.
Close Period Manager when all changes
are complete.
8
Printing reports
- In the menu bar, click on Edit, then Edit
Reports. - Choose from the report options, then fill in the
date parameters and other parameters if required. - Click OK. New window opens with report.
- To print report, click on File, Print.
- Close window when all reports are printed.
9
Edit Reports
10
Setting up the Resource Tree
- Start at the highest level - the school name
- Include all shared resources, including special
rooms and teacher resources - Put all like media devices into a GROUP, i.e. VCR
Group or DVD Group
11
To Add a Resource
- Highlight the level you want the resource to be
on. To add a new Reading Specialist, click on the
school name to highlight, then right click and
choose Add Resource. - In the New Resource Frame type Reading
Specialist. - Choose Person icon from the list and click OK.
- New resource will appear at bottom of the list,
but the next time the software is started, the
list will be re-alphabetized.
12
Add New Resource
13
Add Reading Specialist
Note If a resource needs to be removed from
service for a period of time, click the
Deactivate box and enter the Start and End dates.
14
New Resource added to List
15
Add New Device to a Group
- Highlight the appropriate group, right click, and
choose Add. - Name the new device to correspond with the
channel on which it will broadcast, i.e. VCR 8. - Choose the appropriate icon, in this case VCR.
- Fill in the COM Port, Device, Channel, and Phone
code fields. - Click OK.
16
Add New VCR
17
Fill in Fields
18
New Device now in its Group
Our new VCR 8 now appears within the VCR group
Slide the bottom bar to the right and you can see
the Channel and Phone Line Code for each device
19
Using Device Setup
- Only accessible from the server computer.
- At the server desktop, click on Start, Programs,
TekNet, Device Setup. - Device setup window has three main areas
Resource List, Operations List and Remote Display
area. - Any resource may be edited by highlighting the
resource, right click, and choose Edit Resource
Style.
20
Open Device Setup Utility
21
Areas of Device Setup Window
Resource list
Operations list
Remote display area
22
Editing a Device type
Highlight the resource to edit
In the Operations list, highlight the function to
edit and right click
For more detailed instructions regarding Device
Setup please refer to the online Help Manual.
23
Using MARC Manager
- To access MARC Manager, at the Server desktop
click on Start, Programs, TekNet, MARC Manager - Records may be either imported if they are in
MARC file format or entered manually.
24
Open MARC Manager
25
Adding Media Resource Titles
To import MARC files, click on File, Import MARC
File
26
Open MARC File to Import
Locate file to import, click on it, and click on
Open
27
Add Media Titles Manually
Move between fields by using tab button. Be sure
to tab after last field so there is a blank
record beginning with an asterisk
When all entries are completed, close MARC
Manager. New entries are automatically saved.
28
Getting End-users on line
- Setting up client PCs
- Accessing the TekNet web site and login
- Re-setting user preferences
- Adding/editing an event
- Viewing Schedule window
- Using Media Control
29
Setting up client PCs
- Open Browser, either Netscape or Microsoft
Explorer - In the Address window, type in the TekNet Server
TCP/IP address. - The first time the TekNet site is accessed, you
will need to install the TekNetMain Client. Click
on the Install TekNetMain Client button accept
any defaults. - When Homepage appears, mark as a Favorite.
30
Accessing the TekNet Scheduling Software
- Click on the TekNetMain Software button to open.
- Enter Login Name and Password
31
Re-setting user preferences
- From the Edit Menu, click on Preferences.
- Enter any changes desired, such as new password.
- Close window.
32
User Preferences
Be sure Auto Display Schedule is checked..
33
Adding/editing an event
- To add an event, place pointer in the event
window, right click, and select Add event. - Choose date by clicking on little calendar icon
and clicking on date. - Fill in Name field, choose the time either by
period or start and end times. - Click OK
34
Open Add Event Window
With mouse pointer in Event window, right click
and choose Add
35
Add Event Window Fields
Enter name for event
Choose date by clicking on calendar icon
Set time
Click OK to close
36
Add Resources to event
Highlight event
Highlight desired resource, right click, choose
Add to Current Event
37
Add Media Device Resource
Click on Event line again
Click on device group, right click, choose Add to
Current Event
38
Add Media Title
Click on Media Device to highlight
Click on Media Resources tab. Search database by
any parameter or just click on Get Search Results
39
Choose Title
Highlight desired title, click on Add to Current
Event.
40
Event Completed
A media title can also be added by highlighting
media device, right click, and choose Add User
Defined Title. This is useful if user supplies
the tape or disk.
41
Viewing Schedule window
- To view a schedule display for any day, first
choose day in the calendar window. - Click on the blue arrow in the upper right corner
of Scheduling Window. - To return to the Scheduling Window, click on the
arrow again, now in the upper left corner of the
window.
42
Schedule Display
43
Using Media Control
- When it is time to use the tape or program in the
classroom, the device may be controlled with the
Media Control Software. - First turn classroom TV to the scheduled
channel. - Open the Media Control Software by clicking on
the Media Control tab.
44
Open Media control Software
Click on Media Control tab..
45
User Controls
Note, only the media device which you have
scheduled is displayed.
Click on any remote control button to control
play of the media resource
Administrators who login to the Control Software
will have access to all devices and controls.
46
Purging Old Events
Note old events can be purged by clicking on
Delete Old Events, then filling in dates and
clicking OK.
47
Finally---The End
- On-line Help can be accessed from any screen in
the software by pressing the F1 key. Or you can
return to the Home Page and open the Help Manual
by clicking on the right hand button. - Q A
Recommended
