
Knee & Patella Radiography PowerPoint PPT Presentation
1 / 94
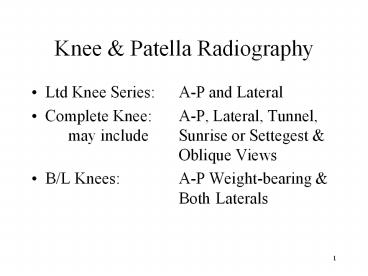
Title: Knee & Patella Radiography
1
Knee Patella Radiography
- Ltd Knee Series A-P and Lateral
- Complete Knee A-P, Lateral, Tunnel, may
include Sunrise or Settegest Oblique Views - B/L Knees A-P Weight-bearing Both
Laterals
2
Knee Patella Radiography
- May be taken erect or recumbent.
- Lateral Views more difficult erect due to taper
of the femur. - Tunnel view very difficult erect.
- Weight-bearing good to access joint spaces.
- A B/L P-A Tunnel type view is best for joint
assessment but difficult to set up.
3
Knee Patella Radiography
- Some tube angulations is used for all knee views
except for the erect lateral view. - A 5 degrees cephalad angle is used for the A-P,
P-A, Oblique and recumbent lateral views. - Because of the density of the bone of the distal
femur, views are taken Bucky.
4
A-P Knee
5
16.2 Knee A-P
- Measure A-P at patella
- Protection recumbent Apron erect Males
Bell Females Apron - SID 40 Bucky
- Tube angle 5 cephalad
- Film 8 x 10 I.D. up
6
Knee A-P
- Erect Patient standing facing tube. Recumbent
Patient supine with knee centered to vertical
center of table. - Patient internally rotates leg 15 until the knee
is in a true A-P position. Femur condyles
parallel to film.
7
Knee A-P
- Horizontal CR 1 cm distal to apex of patella
- Vertical CR long axis of knee and femur.
- Film centered to horizontal CR.
- Collimation Top to Bottom slightly less than
film size
8
Knee A-P
- Collimation Side to Side soft tissue of distal
femur and proximal lower leg. Slightly less than
film size. - Patient Instructions hold still.
- Make exposure and let patient relax
9
Knee A-P Film
- The joint space should be open.
- The patella should be midline.
- The adjacent soft tissues should be well
visualized.
10
Medial Oblique Knee
11
16.3 Knee Medial Oblique
- Measure A-P at patella
- Protection Recumbent apron Erect Male Bell,
Female Apron - SID 40 Bucky
- Tube Angle 5 cephalad
- Film 8 x 10 Regular I.D. up
12
Knee Medial Oblique
- Patient lies supine on table with affected knee
centered on table. - Patient internally rotates lower leg as far as
possible or until the femur condyles form a 40 to
45 angle to film. Avoid letting patient raise
pelvis and increase object to film distance.
13
Knee Medial Oblique
- Horizontal CR 1 cm distal to medial condyle.
- Film centered to horizontal CR.
- Vertical CR long axis of femur.
- Collimation Top to Bottom slightly less than
film size.
14
Knee Medial Oblique
- Collimation side to side soft tissue of knee
region or slightly less than film size. - Patient instructions remain still
15
Knee Medial Oblique Film
- The fibular head will be clear of the tibia.
- The Knee joint space should be open.
- The soft tissue of the knee should be visualized.
- This view is useful in detecting loose bodies.
16
Lateral Oblique Knee
17
16.5 Knee Lateral Oblique
- Measure A-P at patella
- Protection Recumbent Apron Erect Male Bell
Females Apron - SID 40 Bucky
- Tube Angle 5 cephalad
- Film 8 x 10 I.D. up
- Accessories 45 sponge
18
Knee Lateral Oblique
- The patient lies supine on table or stands facing
tube. - The knee is externally or laterally rotated 40 to
45. - The 45sponge may be used as a rest for the
lateral side of the foot. - The vertical long axis of the femur is centered
to the Bucky or table center.
19
Knee Lateral Oblique
- Horizontal CR 1 cm distal to medial condyle of
femur or through the knee joint space. - Vertical CR centered to long axis of femur.
- Collimation slightly less than film size or soft
tissues of knee.
20
Knee Lateral Oblique
- Patient Instructions Hold still
- Make exposure and let patient relax
- Note It is easy to have too much rotation. The
leg should not be turned more than 45 degrees
measured at the condyles.
21
Knee Lateral Oblique Film
- The medial condyle will be in profile.
- The fibular head, neck and shaft will be
superimposed. - Oblique view of the knee are useful in detecting
loose bodies.
22
Lateral Knee no flexion
23
16.5 Knee Lateral View
- Measure Lateral at Condyles
- Protection Apron
- SID 40 Bucky
- Tube Angle 5 cephalad
- Film 8 x 10 I.D. Up
24
Knee Lateral View
- Recumbent
- Patient lies on the affected side with femur
aligned with vertical center line of table. The
unaffected leg is brought in front of the body.
The pelvis is lateral. - Knee is bent 45 degrees.
- Horizontal CR 1 cm distal to medial condyle.
25
Knee Lateral View
- Film centered to horizontal CR.
- Vertical CR centered to medial condyle of femur
- Collimation top to bottom Distal femur and
patella to proximal tibia - Collimation side to side Soft tissues of knee
26
Knee Lateral View
- Erect
- Patient stands with affected knee next to Bucky.
- Place stool next to Bucky and have patient place
foot on rung of stool. - Knee should not be flexed more than 90 degrees.
27
Knee Lateral View
- Horizontal CR 1 cm distal to medial condyle. For
large patients, through the joint space. - Vertical CR centered to tibia.
- Make sure the femur and tibia are parallel to
film. - Film centered to horizontal CR.
28
Knee Lateral View
- Collimation side to side Soft tissue of patella
to include distal femur. - Collimation top to bottom Soft tissue superior
to femur to include distal tibia. - Either method Instructions Remain still
- Make exposure
29
Knee Lateral View Film
- Soft tissues surrounding knee should be well
visualized. - Femoral condyles should be superimposed.
- Patella should be in profile.
- Proximal Tibia and Fibula should be seen.
30
P-A Knee
31
16.6 Knee Camp-Coventry or Tunnel View
- Measure A-P at patella
- Protection Apron
- SID 40 Bucky
- Tube Angle 30 to 35 Caudal or perpendicular to
long axis of tibia - Film 8 X 10 I.D. up
32
Knee Camp-Coventry or Tunnel View
- The patient lies prone on table. The affected
knee is centered to the table. - A stool or similar device is placed on the table
for the patient to rest their shin on. - The knee is bent 30 to 35 and resting on the
rung of the stool.
33
Knee Camp-Coventry or Tunnel View
- The tibia should be perpendicular to the beam
- Horizontal CR centered through the intercondylar
fossa. - Vertical CR long axis of femur.
- Film centered to horizontal CR.
34
Knee Camp-Coventry or Tunnel View
- Collimation top to bottom slightly less than
film size - Collimation side to side soft tissue of knee
- Patient instructions Remain still
- Make exposure and let patient relax.
35
Knee Camp-Coventry or Tunnel Film
- The joint space should be open.
- The intercondylar fossa should be well visualized
including the proximal and lateral surfaces free
of rotation. - The intercondyler eminence will be seen.
36
16.7 Knee A-P Bilateral W/B
- Measure A-P at patella
- Protection
- Males Bell
- Females Apron
- SID 40 Bucky
- Tube angle 5 cephalad
- Film 17 x 7 or 17 x 14I.D. up
37
Knee A-P Bilateral W/B
- Erect Patient standing facing tube.
- Patient internally rotates leg 15 until the knee
is in a true A-P position. The heels and toes
should be touching. - Femur condyles parallel to film.
38
Knee A-P Bilateral W/B
- Horizontal CR 1 cm distal to apex of patella
- Vertical CR long axis of knee and femur.
- Film centered to horizontal CR.
- Collimation Top to Bottom slightly less than
film size
39
Knee A-P Bilateral W/B
- Collimation Side to Side soft tissue of distal
femur and proximal lower leg of both knees. - Collimation Top to Bottom Slightly less than
film size. - Patient Instructions hold still.
- Make exposure and let patient relax
40
Knee A-P Bilateral Film
- The joint space should be open.
- The patella should be midline.
- The adjacent soft tissues should be well
visualized.
41
16.8 Patella P-A
- Measure A-P at the Patella
- Protection Apron
- SID 40 Bucky
- Tube Angle 5 cephalad
- Film 8 x 10 I.D. up
42
Patella P-A
- Patient lies prone on table or stands facing
Bucky. - The affected knee is aligned with the center line
of the table or Bucky. - The limb is internally rotated until it is in a
true P-A position.
43
Patella P-A
- Horizontal CR mid patella
- Vertical CR centered to middle of knee and
patella - Film centered to Horizontal CR
- Collimation Top to Bottom 5 or to include
patella or slightly less than film size.
44
Patella P-A
- Collimation side to side soft tissue of distal
femur - Patient Instructions remain still
- Make exposure and let patient relax.
45
Patella P-A Film
- There should be no rotation.
- The knee joint and patella should be well
visualized. - Soft tissue adjacent to patella should be seen.
- Note collimation side to side is too tight.
46
16.9 Patella Lateral
- Measure Lateral at condyles
- Protection Lead apron draped over pelvis
- SID 40 table top
- Tube Angle 5 cephalad
- Film 8 x 10 Extremity or Detail Cassette I.D.
up
47
Patella Lateral
- Patient lies on affected side with knee flexed 10
to 15. Lower leg will be in a lateral position. - Extremity cassette placed under affected knee.
- Horizontal CR centered to patella.
- Film may be centered to Horizontal CR.
48
Patella Lateral
- Vertical CR through the femoral condyle and
patella joint space. - Collimation top to bottom 5 or to include
patella - Collimation side to side anterior femur and
patella - Note the entire knee need not be visualized.
49
Patella Lateral Film
- The patella and anterior knee should be in a true
lateral position. - The distal femur may appear under exposed.
50
16.10 Settegest or Sunrise View
- Measure A-P at patella
- Protection Apron draped over patient
- SID 40 Table Top
- Tube Angle 20 cephalad
- Film 8 x 10 Extremity or Detail Cassette
51
Settegest or Sunrise View
- Patient lies prone on table.
- Patient bends knee about 110.
- The belt used for the gonad shield or Velcro may
be used to assist patient hold position. Wrapping
belt around ankle and giving other end to patient
to hold..
52
Settegest or Sunrise View
- The leg should be in a true P-A position,
internally rotated 15. - Place extremity cassette under leg.
- Horizontal CR through the patella-femoral joint
space. - Film centered to Horizontal CR.
53
Settegest or Sunrise View
- Vertical CR long axis of femur or mid patella
- Collimation 5 x 5
- Instructions Remain still
- Make exposure and let patient relax
54
Settegest or Sunrise Film
- The patella will be visualized. The
patella-femoral joint space will be seen but the
view can not be used to diagnose a tracking
problem due to the extreme flexion. - Lauren or Merchants Views are used to evaluate
tracking.
55
16.11 Lauren Views of Interpatellar Fossa
- Measure A-P at mid patella
- Protection None is practical
- SID 60 non-Bucky
- Tube Angle varies with amount of knee flexion
- 1. Knee flexed 30 30 cephalad tube angle
56
Lauren Views of Interpatellar Fossa
- 2. Knee flexed 45 45 cephalad tube angle
- Film 17 x 7 Regular Speed with I.D. to
unaffected side. - Patient is seated on table with legs over side.
57
Lauren Views of Interpatellar Fossa
- The thighs and lower legs are strapped together
to prevent external rotation of femur. - Patient flexes knee to form a 30 angle. The tube
is angled 30 cephalad. - Horizontal CR through the patella-femoral joint
space.
58
Lauren Views of Interpatellar Fossa
- Vertical CR mid-sagittal plane of patient.
- Patient holds film perpendicular to central ray.
- Collimation slightly less than film size or to
soft tissue around patella. - Instructions Remain still
59
Lauren Views of Interpatellar Fossa
- Get new film and proceed with the 45 flexion
view and if needed the 60 flexion views. - The tube angle is set so the central ray is
parallel with the long axis of the patella at the
varied degrees of flexion.
60
Lauren Views of Interpatellar Fossa Film
- Both patella-femoral joint spaces must be seen on
all views. - Legs must be strapped together to diagnose, a low
lateral condyle.
61
Lauren Views of Interpatellar Fossa Film
- Flexion more than 60 will reduce an otherwise
subluxed patella and distort the depth of the
sulcus. - The Settegest View is of little value in
evaluation of the extensor mechanics of the knee
or anterior knee pain.
62
22.1 Radiographic Quality ControlVariables in
Radiographic Equipment
- kVp Calibration
- mA Calibration
- Timer accuracy
- Collimator accuracy
- Beam Alignment
- Grid Centering
- Focal Spot
- Impacts technique
- Impacts technique
- Impacts Technique
- Impacts Collimation
- Impacts Grid Cut off
- Impacts Grid Cut Off
- Impacts Resolution
63
Radiographic Quality Assurance
- Begins with the Acceptance Tests to set baseline
values and assure proper operation. - Periodic monitoring to assure continued
compliance. Annual or Semiannual - After major component repair or replacement
64
Radiographic Performance Standards
- kVp Accuracy
- mA, Timer, mAs
- Collimator
- Beam Alignment
- Grid Centering
- Exposure Reproducibility
- 5 2 between 60 and 100 kVp
- 5
- 2 of SID
- 2º
- 2º
- 5
65
22.2 Collimator Accuracy and Beam Alignment
- Tools needed
- 9 pennies or
- Collimator alignment tool
- Beam perpendicularity test tool
- Standard Must be within 2 of SID or 0.8 at 40
SID
66
Collimator Accuracy and Beam Alignment
- Procedure
- Set SID _at_ 40 to Bucky
- Place 8X10 Cassette in Bucky
- Center beam to film center
- Collimate to 5 square
- Mark borders with pennies taped to Bucky
- Make exposure and process film.
67
Collimator Accuracy and Beam Alignment
- Procedure
- mark center and horizontal and vertical axis of
beam - The exposure should be to the outer edges of the
pennies. - Must be within the diameter of the pennies to
pass the test.
68
Collimator Accuracy and Beam Alignment
- Procedure
- mark center and horizontal and vertical axis of
beam - The exposure should be to the outer edges of the
pennies. - Must be within the diameter of the pennies to
pass the test.
69
Collimator Accuracy and Beam Alignment
- Frequency semiannual or after replacement of
collimator light bulb or tube replacement. - You should hold the x-ray machine supplier to a
much higher standard. - The beam and light fields should match!
70
Collimator Accuracy and Beam Alignment
- Procedure with beam alignment test tool
- Set SID to 40 to Bucky
- Center 8 x 10 film to Beam
- Tape collimator test tool to Bucky centered to
light field. - Collimate to marked borders on tool (5 x 7)
71
Collimator Accuracy and Beam Alignment
- Procedure with beam alignment test tool
- Tape the beam perpendicularity test tool to the
collimation tool with the metal ball centered to
center of tool. - Make exposure and process the film
72
Collimator Accuracy and Beam Alignment
- Viewing of test film
- The both small balls must be within the first
circle to be in proper alignment. - Collimation should match borders of test tool.
- Frequency semiannual or after tube or Bucky
replacement or repair
73
22.3 Grid Cut Off and Perpendicularity Testing
- If the tube is not perpendicular to the Bucky,
Grid Cut-Off will result. - If the grid focus is not correct, grid cut off
will also result. - The left knee is under exposed compared to the
right. This is grid cut off.
74
Grid Cut Off and Perpendicularity Testing
- Tools Needed
- A homogenous phantom that will produce some
density on the film. This cane be A lead apron
or piece of Lucite 14x17x2 - Densitometer
- 14 x 17 Cassette
75
Grid Cut Off and Perpendicularity Testing
- Procedure
- Set the SID at 40 Bucky
- Drape Apron over Bucky or
- Place Lucite in stool in front of Bucky
- Place cassette in Bucky Tray and center tube to
film.
76
Grid Cut Off and Perpendicularity Testing
- Procedure
- Collimate to film size and make exposure.
- Process film
- Repeat test at 72 SID.
- Process Film
77
Grid Cut Off and Perpendicularity Testing
- Standard There should be not more than 0.10 OD
change from center of image to sides of image. - If 40 or 72 test passes and the other fails,
the focal range of the grid may be wrong. - If both fail, the grid is misaligned.
78
Grid Cut Off and Perpendicularity Testing
- Grid misalignment can be common with new
installations. - If the Bucky crashes to the floor, the grid can
be knocked out of alignment. - Frequency of test Semiannual
79
22.4 Linearity Of Exposure
- The same mAs should produce the same exposure
each time. - This will be true if the mA and Timer are
accurately calibrated. - The kVp must be the same.
80
Linearity Of Exposure
- Tools needed
- Aluminum Step wedge
- Lead Blockers
- 14 x17 Cassette
- Densitometer
- Standard Exposure should be within 5 across
the mA, Time and mAs settings
81
22.4 Linearity Of Exposure
- Procedure
- Set SID to 40 table top
- Place cassette on table
- Step wedge is placed on cassette.
- Collimation set to size of step wedge.
- Lead blockers cover the area around exposure.
82
Linearity Of Exposure
- Procedure
- Set a baseline technique and initiate first
exposure - Cover exposed section of film and prepare for
second exposure. - Change control setting and the put back to
original setting. - Make exposure.
83
Linearity Of Exposure
- Procedure
- Continue process with changes in power level or
mA setting, Focal Spot settings and time
settings. - Make sure that the exposed areas of the cassette
are covered by the lead blockers. - Process the film.
84
Linearity Of Exposure
- This is an example of poor calibration of the
x-ray generator. - The small and large focal spot mA setting are not
calibrated. - This was a new unit that the service engineer
failed to calibrate.
85
Linearity Of Exposure
- This is an example of proper calibration of the
machine. - Each exposure is virtually identical. If you need
to adjust a technique on this machine, you can do
it reliably.
86
22.5 Focal Spot Testing
- Test Tools
- RMI Focal Spot Test Tool or
- Pin Hole Camera or
- NEMA Star Pattern Test Tool
- Extremity Cassette
- Lead Blocker
87
Focal Spot Testing
- Procedure
- Place Extremity Cassette or Card Board Film
Holder on Table. - Cover half of cassette with Lead Blocker
- Set SID to 40 Table Top
- Place test tool on cassette with rivets aligned
with the anode and cathode.
88
Focal Spot Testing
- Procedure
- Collimate to size of test tool.
- Set technique and make exposure on small focal
spot. - Cover exposed section of cassette.
- Set tool on unexposed section of cassette.
89
Focal Spot Testing
- Procedure
- Place L on film and make exposure with large
focal spot. - Process the film.
90
Focal Spot Testing
- Interpretation of film
- Compare vertical and horizontal three bars.
- 1.0mm Focal spot will resolve 11 line pairs/mm.
- 2.0mm focal spot will resolve 5 to 6 line
pairs/mm. - If you cannot see this far, the tube may be bad.
91
Focal Spot Test Film Passed
92
Focal Spot Testing
- While the focal spot passes the test, the
exposure is different between the large and small
focal spots. - This was the first clue that the calibration of
the machine was wrong.
93
Focal Spot Test Film
- Both exposures are at the same mAs and kVp
- Resolution Passed
- Exposure Fail
94
End of Lecture
- Return to Lecture Index
Recommended
