
DNA Jewelry PowerPoint PPT Presentation
1 / 25
Title: DNA Jewelry
1
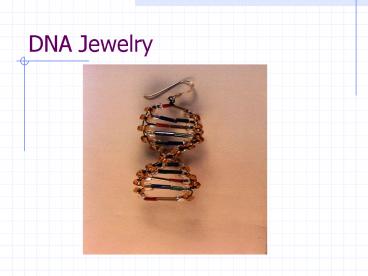
DNA Jewelry
2
Step One
- Measure out 34 inches / 86 centimeters of 28
gauge wire. Find the mid-point and place the
beads in the following manner at the halfway
point. - During this and all following operations, be
careful not to put "kinks" in the wire because
that will weaken the wire and make it difficult
to thread the wire through the narrow openings in
the tubular bugle beads.
3
(No Transcript)
4
Step Two
- Run the end of the wire on the right, in the
previous frame, through the green and silver bead
on the left. Run the end of the wire on the left
through the blue and silver bead on the right.
5
(No Transcript)
6
Step Three
- Double check that the beads are in the center of
the wire. Pull the wires gently to snug up the
beads against each other. They should look like
the photo below.
7
(No Transcript)
8
Step Four
- Add a gold (phosphate) and a silver (deoxyribose)
to the right and left wires. Add your choice of
one of the matching nitrogen bases to each wire.
Remember that the purine adenine pairs with the
pyrimidine thymine and the purine guanine pairs
with the pyrimidine cytosine. Cross the wires,
and gently remove the slack in the wire as you
did before.
9
(No Transcript)
10
Step Five
- Repeat the previous steps as many times as you
wish. The sequences are up to you--DNA has an
infinity of possible combinations of base pairs.
11
(No Transcript)
12
Step Six
- Keep the wire rather taut when you pull the gold
colored phosphate seed beads out to the sides of
the molecule. This is shown in the following
photo.
13
(No Transcript)
14
Step Seven
- Earrings can be made any length-- twelve base
pairs makes a nice single twist of the double
helix. You can, of course, make other ornaments
with this technique-- like Christmas tree
decorations.
15
(No Transcript)
16
Step Eight
- When you place your last base pair onto your DNA
molecule, allow a bit of wire to extend from
between the last two base pairs. With a pair of
pliers, or even a paperclip, form a small loop so
you can later attach the ear hook.
17
(No Transcript)
18
Step Nine
- Give the wire a little twist.
19
(No Transcript)
20
Step Ten
- The remaining wire should be threaded down
through the gold phosphate seed beads... again be
careful not to put "kinks" into the wire. The
loops tend to kink as you pull the wire through
at this point.
21
(No Transcript)
22
Step Eleven
- Cut the excess wire off at the bottom of the
helix. - If you want to make even more sturdy jewelry, you
can cross the wires at the bottom and thread them
up the opposite side. This technique makes a very
strong helix, but the wire shows.
23
(No Transcript)
24
Step Twelve
- At this point, spend a few moments adjusting all
of the beads in your helix. When all seem in
their proper positions, give the "ladder" a
little counter-clockwise twist. - Add an ear attachment hook to the loop at the top
and wear this beautiful symbol of life's main
molecule.... or give it to someone who will!
25
(No Transcript)
Recommended
