
Week 2A PowerPoint PPT Presentation
1 / 27
Title: Week 2A
1
Week 2A
- iDVD Basics
2
Choosing a DVD Theme
- What is a theme?
- Background image
- Button style
- Fonts, sizes, locations for menu titles and
button labels - IDVD comes with standard styles
- Click the Theme button
3
Adjusting your Theme
- New background
- Menu - File, Import, Image
- Title settings
- Position, font, color, size
- Button settings
- Type, position, text, color, and size
4
Getting your stuff together
- Assemble your images and movies
- Export your movies from iMovie
- True NTSC quality
- This will give you true television quality vide
- Files will be large - very large
5
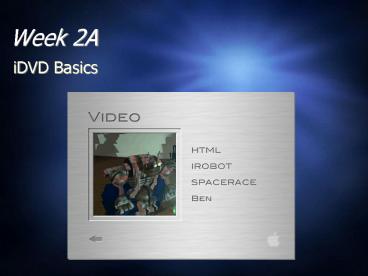
Adding movies to IDVD
- Drag the movie right on the stage
- Have the media folder open and handy
- Add though the menu
- File, Import, Video
- The name of the file will be the name that goes
on your stage - Select the name and change it if you like
6
Adding movies to IDVD
7
Changing Title and Button Text
- To change the text of a menu title or a button
label, click on the text to select it, then type
the new text - Click twice slowly
- Edit box turns light blue
8
Changing Button Style
- You can change the movie button from text to an
actual clip of the movie - Need to select free position otherwise they will
likely overlap each other
9
Changing Button Style
- You can change the movie button from text to a
clip of the movie in various button shapes - Choose text position or no text, color, and size
10
Creating a Slideshow
- Useful for
- Examples of audio work
- Printed material like scripts, papers, resume,
rundowns, etc. - Image cannot be a document or even RTF
- Image(s) are JPGs or TIFFs
- Landscape aspect ratio is best
- 720 X 480 pixels is the optimum size.
- MS PowerPoint works well for this
11
Creating a Slideshow
- Click Slideshow to create a new button
- Click twice slowly to give the button a name
- Double-click quickly to open the slideshow window
12
Creating a Picture Slideshow
- Drag pictures into slideshow folder
- or Menu - File, Import image
- You can select more than one at a time with the
command key
13
Creating a Picture Slideshow
- Display arrows box
- For manual navigation
- You can time automatically
- Add original photos on DVD-ROM
- Allows user to copy images to their computer
14
Slideshow Properties
- Duration
- How long the slide stays up before it changes to
the next slide in the slideshow - Manual
- User steps through them with their DVD player
remote with arrow button - Timed
- 10, 5, 3, 1 second
15
Slideshow Properties
- Display on Image
- Places left and right arrows on the slide
- The buttons themselves are not click-able
- Only on the DVD player remote
16
Slideshow as Resume
- Your paper resume will likely be portrait aspect
and need to be put in pieces into PowerPoint as
more than one slide - You can put all the slides into one slideshow or
make separate slideshows for each aspect of your
resume - Education, Experience, Skills, Reference, etc.
17
Slideshow for your Audio Example
- One slideshow for each audio example
- Load in an image that represents the audio for
the slide - You can make this in PowerPoint or PhotoShop
- Load the audio for the slideshow
- Menu - File, Import, Audio
18
Slideshow for Audio Example
19
Making Menus
- When would you need an additional menu?
- When you need more than six buttons on a screen
at a time - Each menu can hold up to six buttons
- If you need more then make more menus
- Most buttons on your opening page will be a menu
button - Video, audio, resume, etc. so user can go to that
section
20
Making an Additional Menu
- Click on the folder icon
- Double-click to open it
- Then add what you need
- You get a return arrow to get you back to the
previous menu
21
Monitoring Project Size
- IDVD keeps track of the amount of space your
project will take up on the DVD disk - On a 2.0 General DVD-R disk, you can store up to
1 hour of video at 720X480 resolution
22
Previewing your DVD
- You can preview your IDVD project at any time by
clicking on the the preview button - Use the remote to control your movie
- Motion
- If the page has animation you can see how it looks
23
Writing to your DVD Disk
- Are you really ready?
- Once you write to a DVD-R disk, it cannot be
overwritten - If you change anything in your IDVD project, you
have to write it to a new, blank DVD-R disk - Click the Burn DVD button twice
- Insert a blank disk into the drive
- After the 1st disk is created, you can create
additional copies
24
Writing to your DVD Disk
- What type of DVD-R disks can the Mac burn?
- 2.0 General DVD-R disks
25
Testing a DVD Disk You Made
- Test in your computer using the Apple DVD Player
- If the DVD disk plays in your computer, it has
been created correctly and will work in most
newer consumer DVD players and computers with a
DVD drive - Some older DVD players and some of the first
computers that came with DVD drives may have
problems playing your disk.
26
Managing your files
- Each DVD project will take up considerable disk
space - At the end of each semester the hard drives are
cleaned to prepare them for next semester - What you should do
- Save your IDVD project and all media files to
disk - If your portfolio is ready for BC 497 and
employers make several copies
27
(No Transcript)
Recommended
