
Setting Up Access to UCMail LDAP PowerPoint PPT Presentation
1 / 9
Title: Setting Up Access to UCMail LDAP
1
Setting Up Access to UCMail LDAP
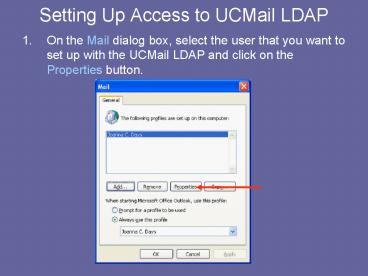
- On the Mail dialog box, select the user that you
want to set up with the UCMail LDAP and click on
the Properties button.
2
- 2. On the Mail Setup window, click on the E-mail
Accounts button to start the wizard.
3
- 3. On the E-mail Accounts wizard select Add a
new directory or address book and click on Next.
4
4. On the Directory or Address Book Type window
select Internet Directory Service (LDAP) and
click on Next.
5
5. On the Directory Service (LDAP) Settings
window type directory.umuc.edu next to Server
Name and then click on More Settings.
6
6. On the Microsoft LDAP Directory dialog box
click on Search and type oumuc.edu under the
Search base section and then click on OK.
7
- 7. Then, click on Connection, the display name
should be directory.umuc.edu and click on OK.
8
- 8. Click Next on the Directory Services (LDAP)
Settings window.
9
- 9. Click on Finish on the Congratulations window.
Recommended
