
Using a Compound Microscope PowerPoint PPT Presentation
1 / 37
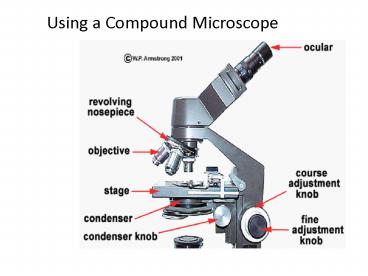
Title: Using a Compound Microscope
1
Using a Compound Microscope
2
- I can identify the parts of a microscope
- and describe the function of each. 1
- I can demonstrate how to care for, and properly
- use a microscope (i.e. how to adjust the
amount - of light, and how to focus when on low and
high - power). 2
- I can determine the total magnification. 4
3
Microscope
Parts Functions
Text p.1070
arm
4
Your Light Microscope
- TAKE CARE OF YOUR SCOPE
- Your responsibility to take care of your scope
and learn to use it properly. - MICROSCOPE LOG
- Every time that you get a scope out, make sure
that the number matches that entered in the
microscope log. - GETTING YOUR SCOPE OUT
- When transporting your scope, always hold it
with one hand under the base, and one hand around
the arm. - PUTTING SCOPE AWAY
- Whenever your are getting ready to put your
scope away - Use alcohol swab to clean stage and lens paper
to clean lenses. - Shortest lens (the one with the red band)
should be facing down toward stage. - Use course focus to position stage as low as it
can go.
ARM
BASE
5
Microscopy
- General Principles
- Magnification
- What is it?
- the ability to enlarge images
- Resolution
- What is it?
- a measure of the smallest distance between two
points in the image when the two points can be
distinguished as separate - Contrast
- What is it?
- when the area surrounding the object is
bright, from the light, and the object being
viewed is darker in comparison
6
Magnification
- To determine your magnificationyou just multiply
the ocular lens by the objective lens. - Ocular 10x Objective 40x10 x 40 400x
So the object is 400 times larger
Objective Lens have their magnification written
on them.
Ocular lenses usually magnifies by 10x
7
How a Microscope Works
Convex Lenses are curved glass used to make
microscopes (and glasses etc.)
Convex Lenses bend light and focus it in one spot.
8
How a Microscope Works
Ocular Lens (Magnifies Image)
Objective Lens (Gathers Light, Magnifies And
Focuses Image Inside Body Tube)
Body Tube (Image Focuses)
- Bending Light The objective (bottom) convex lens
magnifies and focuses (bends) the image inside
the body tube and the ocular convex (top) lens
of a microscope magnifies it (again).
9
Objective LensesScanning Objective Lens
Has red band around it. Magnifies objects
4x. Total magnification 40x This lens is of
no use to us in looking at bacterial stains.
10
Objective LensesLow Power Objective Lens
Has yellow band around it. Magnifies objects
10x. Total magnification 100x Start with this
lens to get your specimen into crisp focus.
You will not see individual bacteria with this
lens, you are just using it to focus so that you
can move up to the next magnification.
11
Objective LensesHigh Dry Objective Lens
Has blue band around it. Magnifies objects
40x. Total magnification 400x Move up to this
lens after focusing your specimen at 100xTM.
12
High Dry Objective Lens
After you focus the image at 400xTM, you need to
cover this lens with a finger cot so that it
does not get oil on it. Do not move the focus
knob or the stage when placing the finger cot on
the high dry lens or you will take the image out
of focus! NEVER use coarse focus with high dry or
oil immersion lenses!!!
13
Oil Immersion Objective Lens
Has black and a white band around it. Magnifies
objects 100x. Total magnification 1000x Move
up to this lens after focusing your smear at
400xTM and covering the 400xTM lens with a
finger cot.
14
NEVER use coarse focus with high dry or oil
immersion lenses!!!
15
Common Name Working Distance Magnification
SCANNING LENS 25 - 55 mm 4x
LOW POWER 5 - 10 mm 10x
HIGH POWER 0.15 - 0.6 mm 40x
OIL IMMERSION 0.05 - 0.15 mm 100x
16
Coarse Adjustment Knob
- Moves the stage up and down (quickly) for
focusing your image
Diagram
17
Fine Adjustment Knob
- This knob moves the stage SLIGHTLY to sharpen the
image
Diagram
18
Diaphragm
- Controls the amount of light on the
object/specimen
Turn to let more light in or to make dimmer.
Diagram
19
Parts of a Microscope
20
Using a Compound Microscope
Part B Viewing an already prepared slide of
Blood or Bone
21
- I can use the proper technique for preparing
- a wet mount, and adding stain to an already
- prepared slide. 3
- I can describe how the orientation and movement
- of a specimens image changes when viewed
- through a compound microscope. 5
- I can describe changes in the image, the field
of - view, and the available light when going from
low - to high power. 6
- I can explain why objects/specimens must be
- centered in the field of view before going
from - low to high power. 7
22
(No Transcript)
23
Human blood is a connective tissue composed
of a fluid portion (plasma) and cellular
components erythrocytes (red blood cells),
leukocytes (white blood cells) platelets
24
Human Blood Smear
25
Primary function transport of oxygen by the
red substance hemoglobin
Hemoglobin a protein in Red Blood Cells that
contains iron give the cells the characteristic
red color.
26
Human Red Blood Cells
- Red Blood cells (RBCs) are produced in the bone
marrow and as - they mature they expel their nucleus
mitochondria, and enter - general circulation throughout the body.
- Mature human red blood cells contain no nuclei,
and have a - biconcave disk shape, which gives them have a
maximum - surface area for the exchange of Oxygen (O2).
Bone Marrow
27
Bone Tissue
Haversian Canal
Osteocytes
28
Using a Compound Microscope
Part C Making a wet mount of letter e
29
Making a wet mount
1.
Be sure your slide is clean and dry. Place one or
two drops of water in the center of the slide.
2.
Place specimen in the center of the drop of
water.
3.
Lower the cover slip over the drop of water and
the specimen as if you are closing a door.
4.
Absorb any excess water with a small piece of
paper towel.
30
Wet Mounts
Poorly Done
Nicely Done
31
Letter e in upright position
Lay cover slip at an angle, then drop
32
(No Transcript)
33
- View Letter e
- Make 2 Sketches
- low power 10x
- high power 40x
- Put Microscopes Away
- Return to Seat
- Work on Questions at the
- End of the Lab
34
How did the image change when viewed through the
low power 10x lens?
Upside down Reversed
Low Power 10x
35
Letter e
High Power 40x
36
As magnification increases, field diameter
decreases
On High Power we can only see a portion of what
we see on Low Power
4x
10x
40x
100x
37
Center Object before switching to high power
Recommended
