
Painting a Portrait Lesson 9: Skin Tone - PowerPoint PPT Presentation
Title:
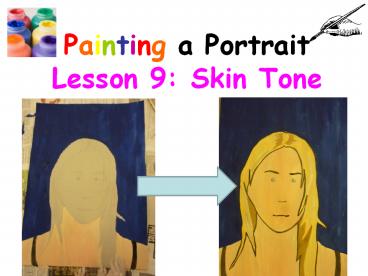
Painting a Portrait Lesson 9: Skin Tone
Description:
Painting a Portrait Lesson 9: Skin Tone Connector: Practise mixing skin tone! Skin tone needs the right balance of mixed colours: Lots of white Some yellow Little red ... – PowerPoint PPT presentation
Number of Views:132
Avg rating:3.0/5.0
Title: Painting a Portrait Lesson 9: Skin Tone
1
Painting a Portrait Lesson 9 Skin Tone
2
Connector Practise mixing skin tone!
Skin tone needs the right balance of mixed
colours Lots of white Some yellow Little
red Tiny amount of blue
3
Learning Outcomes
- ALL will paint the body.
- MOST will paint the skin tone.
- SOME will paint the hair and
- start to paint the eyes.
4
BIG Picture
- Discussion on what order to paint a portrait and
how to mix skin tone. - Demonstration How to mix skin tone, hair colour
and small details. - Individual painting time on Julian Opie
portraits. - Review of Julian Opie portrait paintings.
5
Setting up your equipment
- What equipment
- do you need?
- How do you
- layout your
- equipment?
- Newspaper
- PowderPaint
- Water pot
- Artwork
- Palette
- Paint brush
Now lay out your own work station
6
What order to paint your portrait
1) Background
2) Body clothes
5) Eyes (dots)
4) Hair (main colour)
3) Face (skin)
6) Nose (curve or dots)
8) Eyebrows eye highlight
9) Tones in hair (light dark)
7) Mouth (1 or 2 broken lines)
10) Black outline to face body
7
Mid Review Have you met your target from last
lesson?
- I need to use less water in my paint mixture.
- I need to use less powder paint in my paint
mixture. - I need to use less paint and water on my brush to
paint carefully up to the edge of the line. - I need to use the large brush for large areas and
the tip of the small paint brush for the details. - I need to paint smoothly by painting in one neat
direction. - I should try to experiment with my colour more by
mixing my own colours. - I need to mix my skin tone more accurately.
8
Cleaning Up...
- 2 students to wash up
- 2 students to take items to the sink for washing
up - 1 student to collect up powder paint trays
- TABLES MUST...
- FOLD the newspapers for reuse
- Clean their tables with a wet sponge/cloth
- WASH hands at the end of the lesson!!!
- 2 students to collect paintings after the review.
9
Review Write a target on the back of your work
- I need to use less water in my paint mixture.
- I need to use less powder paint in my paint
mixture. - I need to use less paint and water on my brush to
paint carefully up to the edge of the line. - I need to use the large brush for large areas and
the tip of the small paint brush for the details. - I need to paint smoothly by painting in one neat
direction. - I should try to experiment with my colour more by
mixing my own colours. - I need to mix my skin tone more accurately.
Recommended
CrystalGraphics Presentations


