
Plane Mirror - PowerPoint PPT Presentation
1 / 14
Title:
Plane Mirror
Description:
Plane Mirror Suppose we had a flat , plane mirror mounted vertically. A candle is placed 10 cm in front of the mirror. WHERE IS THE IMAGE OF THE CANDLE LOCATED? – PowerPoint PPT presentation
Number of Views:993
Avg rating:3.0/5.0
Title: Plane Mirror
1
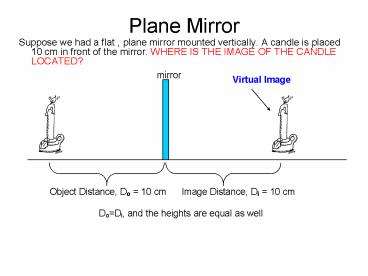
Plane Mirror
- Suppose we had a flat , plane mirror mounted
vertically. A candle is placed 10 cm in front of
the mirror. WHERE IS THE IMAGE OF THE CANDLE
LOCATED?
mirror
Virtual Image
Object Distance, Do 10 cm
Image Distance, Di 10 cm
DoDi, and the heights are equal as well
2
Real Image
- Real Images are ones you can project on to a
screen. - For MIRRORS they always appear on the SAME SIDE
of the mirror as the object.
- The characteristics of the image, however, may be
different from the original object. These
characteristics are - SIZE (reduced,enlarged,same size)
- POSITION (same side, opposite side)
- ORIENTATION (right side up, inverted)
object
image
What if the mirror isnt flat?
3
Converging (Concave) Mirror
Since the mirror is spherical it technically has
a CENTER OF CURVATURE, C. The focal point happens
to be HALF this distance.
We also draw a line through the center of the
mirror and call it the PRINCIPAL AXIS.
4
Converging (Concave) Mirror
- Light from a distant source ( the sun) parallel
to the principal axis will reflect through the
focal point (f)
5
Ray Diagram
- A ray diagram is a pictorial representation of
how the light travels to form an image and can
locate and tell you the characteristics of the
image.
C
f
object
Principal axis
Rule One Draw a ray, starting from the top of
the object, parallel to the principal axis and
then through f after reflection.
6
Ray Diagrams
C
f
object
Principal axis
Rule Two Draw a ray, starting from the top of
the object, through the focal point, then
parallel to the principal axis after reflection.
7
Ray Diagrams
C
f
object
Principal axis
Rule Three Draw a ray, starting from the top of
the object, through C, then back upon itself.
THEY INTERSECT
What do you notice about the three lines?
The intersection is where the image will form
8
Ray Diagram Image Characteristics
C
f
object
Principal axis
- After getting the intersection, draw an arrow
down from the principal axis to the point of
intersection. Then ask yourself these questions - Is the image on the SAME or OPPOSITE side of the
mirror as the object? - Same, therefore it is a REAL IMAGE.
- Is the image ENLARGED or REDUCED?
- Is the image INVERTED or RIGHT SIDE UP?
9
The position of the object will determine the
image location
- object is located at C the image develops at C
- object is located between C and f the image
develops beyond C
10
- Object at f no image will develop as the
reflected rays will be parallel
- Object within f the virtual image will develop
inside the mirror
11
The Mirror/Lens Equation
- Is there any OTHER way to predict images besides
the ray diagram? YES! - use the MIRROR/LENS equation to CALCULATE the
position of the image. - do is the distance from the mirror to the object
- di is the distance from the mirror to the image
- f focal point
12
Mirror/Lens Equation
- Assume that a certain concave spherical mirror
has a focal length of 10.0 cm. Locate the image
for an object distance of 25 cm and describe the
images characteristics.
16.67 cm
What does this tell us? First we know the image
is BETWEEN C f. Since the image distance is
POSITIVE the image is a REAL IMAGE.
Real image positive image distance Virtual
image negative image distance
13
Converging Mirror Inside of f
When you back trace the reflected rays into the
mirror they come together to form a virtual
image
f
C
The image is VIRTUAL, ENLARGED, and UPRIGHT.
This is a make-up compact mirror!
14
Ray Diagrams
- The rules for ray diagrams are the SAME for
lenses as they were for mirrors except you go
THROUGH the lens after refraction and instead of
going through, C (center of curvature) you go
through the actual center of the lens.
f
f
Rule 1 Draw a ray, starting from the top of the
object, parallel to the principal axis, then
through f after refraction. Rule 2 Draw a
ray, starting from the top of the object, through
f, then parallel to the principal axis, after
refraction. Rule 3 Draw a ray through the
center of the lens.
Recommended
CrystalGraphics Presentations


