
Weld Types - Plug Weld - PowerPoint PPT Presentation
1 / 17
Title:
Weld Types - Plug Weld
Description:
Title: Butt Joint with Backing Author: Terrance Orr Last modified by: faculty Created Date: 3/8/2006 3:19:14 AM Document presentation format: On-screen Show (4:3) – PowerPoint PPT presentation
Number of Views:480
Avg rating:3.0/5.0
Title: Weld Types - Plug Weld
1
Weld Types - Plug Weld
2
Plug Weld
- Plug welds are used to replace factory spot
welds. - The plug weld is formed by punching or drilling a
5/16 hole in the outer panel to be joined. - Duplicate the number and location of the original
factory spot welds.
3
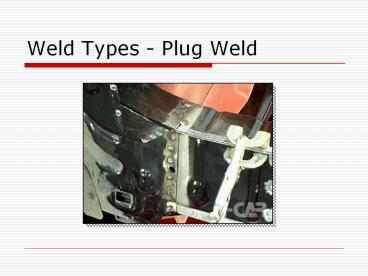
Plug Welds on Rail
- Plug Welds are commonly used with other weld
types such as the butt with backing as shown in
this picture.
4
Plug Weld
- With the example given you should have a basic
understanding of what a plug weld is and where it
is used. - Print off the Plug Weld- Task Performance Sheet
- The next step is to tune the welder and perform a
Plug Weld that will be evaluated visually and
destructively.
5
Preparing to Weld
- Select two 3x5 coupons.
- Punch a series of holes with the 5/16 metal
punch. - Place this coupon on top of the other.
6
Plug Weld Techniques
Two Recommended Techniques
Start in center of hole and move around the edge.
Start circling on the edge and finish in the
center
7
Practice
- Practice both techniques to find your preferred
method. - When you have a good weld move on to the next
assignment.
8
Assignment
- Using two 3x5 coupons punch a 5/16 hole in one
corner. - Position this coupon over the other as shown.
9
Weld
- With your preferred technique make a plug weld
that completely fills the hole. - This weld will be visually inspected and
destructively tested.
10
Plug Weld
- A Good Weld
- Should completely fill the hole.
- Have a dimple in the center of the weld.
- Have a penetration ripple on the back of the
panel.
11
Using I-Cars WQT Gauge
- I-Car has provided a gauge to help in visually
inspecting the welds for - bead length
- width
- height
- penetration
- defects
12
Using I-Cars WQT Gauge
Check the Minimum and Maximum Diameter.
13
I-Car MIG Welding Gauge
Next check the bead height.
14
Record the Results
- After the visual inspection is complete record
the results on the task performance sheet and
have the instructor verify your results. - Now the destructive test will need to be
performed.
15
Destructive Weld Test
- Secure bottom coupon in vise.
- Bend top piece back and forth to separate
coupons. - A hole should remain in the bottom coupon.
16
Final Weld Series
- When the welds pass the visual and destructive
test observe the final voltage and wire speed
setting. - Mark the destructive test results on the task
performance sheet. - Complete your final plug weld series in the flat
vertical and overhead position. - Turn these in for final grading.
17
References
- Miller Electric Mfg. Co. Education.
http//www.millerwelds.com/education/library.html,
2006. - Lincoln Electric Co. Lincoln Welders.
http//www.lincolnelectric.com/, 2006. - Inter Industry Conference on Automotive Collision
Repair. I-CAR Online Training. http//www.i-car.co
m/, 2006.
Recommended
CrystalGraphics Presentations


