
Making and Enjoying Wagon Wheel Rugs (round loom rugs) - PowerPoint PPT Presentation
1 / 24
Title:
Making and Enjoying Wagon Wheel Rugs (round loom rugs)
Description:
Beginning to Weave Take one strip and tie beside the three warp strips This becomes the first weaving strip Mark this strip with pin Begin weaving, ... – PowerPoint PPT presentation
Number of Views:754
Avg rating:3.0/5.0
Title: Making and Enjoying Wagon Wheel Rugs (round loom rugs)
1
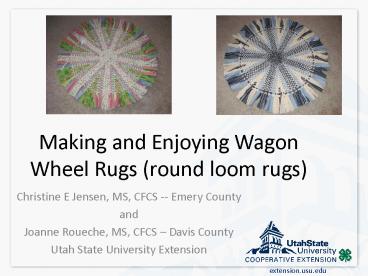
Making and Enjoying Wagon
Wheel Rugs (round loom rugs)
- Christine E Jensen, MS, CFCS -- Emery County
- and
- Joanne Roueche, MS, CFCS Davis County
- Utah State University Extension
2
Ships of the Prairie
3
- Covered wagons for crossing plains were smaller,
lighter version of the Conestoga freight wagons
of the East (carrying up to 5000 lbs.)
4
Prairie Schooner
- The view of a wagon train with its billowing tops
resembled a fleet of ships sailing over the
plains, thus called the Prairie Schooner - Prairie Schooner carried 1300 lbs, empty
- Wagon box was 10 X 3.5 foot
- could take a load of a ton and a half, but most
advised to keep the weight below this limit
5
- A frame of hickory bows held the wagon top. The
top was rolled back for ventilation. - Waterproofed with paint or linseed oil, the top
was of heavy duty canvas, often made from hemp. - Cloth top protected possessions and people from
extreme weather conditions
6
- Light wagons were less likely to bog down in
muddy stream banks or prairie sloughs--or tire
the animals teams pulling it. - Massive axles supported the weight of the wagon
body and load. A broken axle was a disaster--and
prudent wagoner's usually took along a spare. - Big wheels helped the wagon roll easily over
bumps and dips in the trail
7
- Wide rims helped keep the wagon from sinking into
soft ground - The box sat upon two sets of wheels of different
sizes the rear wheels were typically about 50"
in diameter, while the front wheels were about
44" in diameter. - Front wheels had to be smaller to permit sharp
turns--a big wheel would jam against the wagon
body.
8
Steel tires
- Weighed approximately 100 lbs or more for a 48
rim - Width was from 1 ¾ to 2
- Approximately 1 in every 6 wagons carried an
extra tire - Blacksmiths were indispensible wagon train
members
9
(No Transcript)
10
(No Transcript)
11
Getting Started
- First -- select round loom
- Bicycle rims (steel or aluminum, no spokes)
- Old round card table frame
- Recycled frame from mini-trampoline
- Welder
- Hula Hoops, PVC does not work well as it will
bend - Circular firewood rack
12
Step Two Select fabrics
- Use 100 cotton or cotton poly fabrics
- Old bullet-proof polyester
- Recycle sheets or old clothing
- DONT use drapery, flannels or other fabrics that
are lightweight, flimsy or stretch excessively
13
Preparation
- Cut fabrics into 2 strips (smaller strips for
smaller looms) - Cut initial strips (warp) 8-10 inches longer than
frame for first 7 strips - Use a variety of colors
- Spokes should stand out from weft fabrics
14
- If desired, pre-fold all strips
- Fold both cut edges to center, then fold in half
- Raw edges are not exposed
- The weaving pattern is called tabby, an
over-under pattern. - Depending on size of rug, you will need to add
new spokes each round
15
Warp Forming the Hub
- Always start with an odd number of warp strips
- Place 4 strips across loom and tie in single knot
on each end. Keep taut. - Turn loom a quarter turn.
- Tie, one at a time, 3 more warp strips, weaving
center strips in an over/under pattern. Tie at
each end.
16
(No Transcript)
17
(No Transcript)
18
Beginning to Weave
- Take one strip and tie beside the three warp
strips - This becomes the first weaving strip
- Mark this strip with pin
19
- Begin weaving, by bringing the new strip to
center and - begin weaving over/under pattern around center
hub - May pull slightly, giving a diagonal look to this
strip. Keep as straight as possible. Weave in. - When you have gone around one time, pull fabric
tight around center, using fingers - Continuing weaving over/under pattern
20
Adding Spokes
- Spokes are added around the entire wheel each
time a new spoke is added - Added in an inverted V pattern
- To add, tie one end of the warp to frame, loop
center of warp over the previous round, take warp
back down to frame and tie - Be careful to not pull weft strips too tight, may
cause a buckling in center
21
Adding fabric to weft strips
- Add fabric by sewing or using the slash knot
method - Sewing strips on angle to allow even wear along
seam
22
Finishing Rug
- Take off only one or two fringe at a time from
frame. DO NOT take all the fringe off at once! - Other methods for finishing rugs
- Tie two fringe together
- Take two fringe, cut each in half, tie half of
one and half of another together - Weave ends into rug, sew by hand or machine,
around rug - Sew entire rug edge, trim fringe off entirely
- Trim off fringe and add bias tape
- Trim fringe evenly whatever method
23
Other Weaving Activities
- By Joanne Roueche
- http//4h.wsu.edu/clothing/resources/wovenworldhan
dout.pdf A Woven World - http//4h.wsu.edu/clothing/resources/paperweavingh
andout.pdf Paper Weaving
24
- For more information or help
- contact
- Christine Jensen christine.jensen_at_usu.edu
- 435-381-2381
- or
- Joanne Roueche joanne.roueche_at_usu.edu
- 801-451-3404
Recommended
CrystalGraphics Presentations


