
5'8 Neutral Lateral Cervical Spine - PowerPoint PPT Presentation
1 / 79
Title:
5'8 Neutral Lateral Cervical Spine
Description:
... Gowning: Mousse. This patient had dreadlocks with lots of mousse in the ... Poor Gowning: Mousse. The A-P c-spine was repeated with the hair in pigtails. 51 ... – PowerPoint PPT presentation
Number of Views:116
Avg rating:3.0/5.0
Title: 5'8 Neutral Lateral Cervical Spine
1
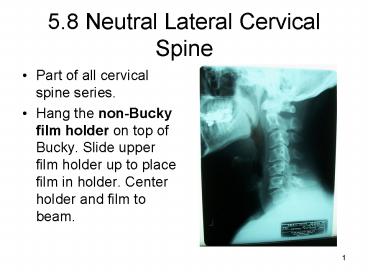
5.8 Neutral Lateral Cervical Spine
- Part of all cervical spine series.
- Hang the non-Bucky film holder on top of Bucky.
Slide upper film holder up to place film in
holder. Center holder and film to beam.
2
Neutral Lateral Cervical Spine
- Measure Lateral at C-4.
- Protection Half Apron
- SID 72 using non-Bucky film holder.
- Film 8 x 10 Regular I.D. Down Portrait with
anterior head carriage 10 x 12 I.D. Regular
Down Portrait.
3
Neutral Lateral Cervical Spine
- Patient in lateral position. Acanthiomeatal line
perpendicular to film. - Intrapupillary line perpendicular to film.
- Shoulder should touch the film.
4
Neutral Lateral Cervical Spine
- Horizontal CR at level of C-4. Proper head
extension is critical to proper placement. - Vertical CR through EAM.
- Center film to horizontal CR.
5
Neutral Lateral Cervical Spine
- Give the patient the sandbags. Ask patient to
relax their shoulders. - For broad shoulder, pull shoulders back.
- Collimation top to bottom EAM to T-1 or less
than film size.
6
Neutral Lateral Cervical Spine
- Collimation side to side Skin of neck.
- Breathing Instructions Take a small breath in,
now blow it out and hold it out. Full expiration - Make exposure
- Carefully remove film from holder.
7
Neutral Lateral C-spine Film
- Need to see down to C-7 and T-1 disc space.
- Mandibles should be superimposed. No head
rotation. - Need to see posterior aspect of hard palate to
draw Mc Gregors line.
8
Neutral Lateral C-spine Film
- If the patient is anterior weight bearing, use a
10 x 12 regular speed cassette in the
portrait orientation.
9
5.9 Flexion and Extension Lateral Cervical Spine
Views
- Taken as part of the Davis Series
- Can replace the oblique views in the complete
cervical spine series. - Taken after the Neutral Lateral. If acute patient
review, limited cervical films before doing
either flexion or extension views. - Do extension lateral before flexion because
little equipment change will be needed.
10
Extension Lateral Cervical Spine
- During extension, patient may become dizzy. Watch
patient carefully. - Patient must determine the range of motion. Dont
force farther than they can tolerate.
11
Extension Lateral Cervical Spine
- Measure Lateral at C-4.
- Protection Half Apron
- SID 72 non Bucky
- Film 8 x 10 I.D. down Portrait
- Marker L for left side to film and EXT or
arrow pointing backwards to indicate extension.
12
Extension Lateral Cervical Spine
- Patient standing or seated in lateral position.
- Intrapupillary line perpendicular to film.
- Patient given sandbags to pull shoulders down.
- Patient asked to extend head back as far as they
can tolerate.
13
Extension Lateral Cervical Spine
- Horizontal Central Ray level of C-4.
- Vertical Central Ray through EAM with full
extension. - Film centered to Horizontal CR.
- Collimation Top to Bottom EAM to T-1
14
Extension Lateral Cervical Spine
- Collimation Side to Side skin of neck.
- Breathing Instructions Take a small breath in
and blow it out.Hold it out and remain perfectly
still. Full expiration. - Make exposure.
- Tell patient to relax. Carefully remove film from
film holder
15
Extension Lateral C-spine Film
- Must see from C-1 to T-1
- Mandible should be superimposed, no evidence of
skull rotation. - Borders of collimation should be seen.
16
5.10 Flexion Lateral Cervical Spine
- Extremely important to let patients set limit of
motion. - Chin must be tucked into chest before asking
patient to flex neck forward.
17
Flexion Lateral Cervical Spine
- Measure Lateral at C-4
- Protection Half apron
- SID 72 non-Bucky
- Film 10 x 8regular speed cassette I.D. up
Landscape or 8 x 10 turned sideways. - Markers L for left side to film and FLEX or
arrow pointing forward to indicate flexion.
18
Flexion Lateral Cervical Spine
- Patient standing or seated in lateral position.
Intrapupillary line parallel to film. - Give patient the sandbags.
- From neutral position tell patient to tuck their
chin into their chest. Flex neck forward as far
as possible
19
Flexion Lateral Cervical Spine
- Horizontal Central Ray level of C-4. This will
be lower than the neutral lateral. - Vertical Central Ray at the body of C-4 or mid
way between EAM and T-1. - Center film to horizontal CR.
20
Flexion Lateral Cervical Spine
- Collimation Top to Bottom EAM to T-1
- Collimation Side to Side EAM to T-1
- Breathing Instructions Full expiration
- Make exposure
- Tell patient to breathe and relax. Remove film
with care.
21
Flexion Lateral C-spine Film
- Must see from C-1 to T-1.
- Mandibles superimposed with no evidence of
rotation. - Markers should be visible.
- Evidence of collimation.
22
Cervical Spine Pillars Projections
- Supplemental views of the cervical spine
- Oblique views always taken in pairs.
- Can be taken erect or recumbent.
- Taken to rule out fractures of the lateral masses
resulting from an extension and rotation mode of
injury.
23
5.11 A-P Pillars Projection
- This Pillars Projection is rarely taken because
the patient generally can not tolerate the
extreme extension required to take the view.
24
A-P Pillars Projection
- Measure A-P at C-4
- Protection Half Apron
- SID 40 Table Bucky
- Tube angle 25 to 30 degrees caudal
- Film 8 x 10 regular I.D. down Portrait
- Special equipment large 45 degree sponge.
25
A-P Pillars Projection
- Patient lies A-P on table.
- Large 45 degree sponge placed under shoulder.
- Patient extend neck until head touches table
- Mentameatal line should be at least perpendicular
to film and ideally greater at 100 to 120 degrees.
26
A-P Pillars Projection
- Collimation vertical skin of neck
- Breathing Instructions Dont breathe, move or
swallow. Suspended respiration - Make exposure
- Instruct patient to breathe and relax. Carefully
remove sponge
27
A-P Pillars Projection Film
- Visualization of the lateral masses and spinous
processes of the cervical spine. - There should be no rotation.
28
Oblique Pillars Projection
- The oblique Pillars Projections are the most
commonly pillars views taken. - They can be taken A-P or P-A.
- They are always taken in pairs.
29
5.12 A-P Oblique Pillars Projection
- Measure A-P at C-4
- Protection Half Apron
- SID 40 Bucky
- Tube angle 35 to 40 caudal
- Film 8 x 10 regular with I.D. down Portrait
- Patient lies or sits A-P with head turned 45 to
50
30
A-P Oblique Pillars Projection
- Horizontal Central Ray C-5
- Vertical Central Ray mid-sagittal
- Center film to HR.
- Collimation Top to Bottom C-1 to T-2
- Collimation Side to Side skin of neck
31
A-P Oblique Pillars Projection
- Breathing Instructions Suspended Respiration
- Make exposure and let patient relax.
- To visualize the lower cervical and upper
thoracic spine, increase head rotation to 60 or
70.
32
Oblique Pillars Projection Film
- Should visualize the lateral masses and spinous
processes of each cervical vertebra. - Always done in pairs to see both lateral masses
33
5.13 P-A Oblique Pillars Projection
- Measure A-P at C-4
- Protection Half Apron
- SID 40 Bucky
- Tube angle 35-40 cephalad
- Film 8 x 10 I.D. down
- Patient seated P-A to Bucky. Head turned 45 to 50
degrees for C2- C-7 lateral masses.
34
P-A Oblique Pillars Projection
- Horizontal CR C-5
- Vertical CR mid-sagittal
- Center film to HR.
- Collimation top to bottom C-1 to T-1
- Collimation side to side skin of neck.
35
P-A Oblique Pillars Projection
- Breathing Instructions suspended respiration
- Make exposure
- Tell patient to breathe and relax.
- To evaluate C-7 to T-4, increase head rotation to
60 to 70 degrees.
36
Oblique Pillars Projection Film
- Should visualize the lateral masses and spinous
processes of each cervical vertebra. - Always done in pairs to see both lateral masses
37
Oblique Pillars Projection
- If the patient is anterior weight bearing or has
a kyphotic thoracic curve, the anterior oblique
pillars will generally not work.
38
5.14 Cervical Spine Positioning
- All views taken on 8 x 10 Regular Cassettes.
One view taken with 8 x 10 turned 10 x 8. - I.D. Down for all views except when film turned
10 x 8. - Radiation Protection Half lead apron
- Measurements at level of C-4. Top of the Adams
Apple.
39
Cervical Spine Positioning
- All lateral views are taken at 72 SID using the
Non-Bucky Film Holder. - The I.D. is down for all views except the flexion
lateral when the film is turned to 10 x 8 - The A-P and Posterior Oblique Views have a 15-20
cephalad tube angle.
40
Cervical Spine Positioning
- Anterior Oblique Views use a 15 to 20 caudal
tube angle. - All oblique views have the patient turned 40 to
45 with the head turned to a lateral position. - The acanthiomeatal line is perpendicular to the
film for all routine views except the Fuchs and
Flexion and Extension Views.
41
Cervical Spine Positioning
- Take the Neutral Lateral View first.
- It is the only 72 view unless flexion
extension views are needed. - By viewing it before taking the APOM, you will be
able to determine if any tube angle is needed.
42
Cervical Spine Positioning
- Limited C-spine Neutral Lateral, A-P and
APOM - Complete C-spine Limited Oblique or
Flexion Extension - Davis Series Limited Oblique and Flexion
and Extension
43
Cervical Spine Positioning
- If patient is acute Take the Neutral Lateral,
A-P and APOM and review the films before taking
flexion and extension views. - Let patient set the range of motion for flexion
and extension views. Do not force the patient
beyond their tolerance. - Patient must tuck chin into chest before flexion
on the Flexion Lateral.
44
C-spine Problems
- The angles of the mandible should be
superimposed. - The I.D. is in the wrong location.
45
Poor Gowning Ear Ring
- A single ear ring on a lateral cervical spine
view.
46
Poor Gowning Pins in Hair
- Bobby pins can ruin cervical or skull radiographs.
47
Poor Gowning Hair in Pony Tail
- Most bands used for pigtails or ponytails have
have metal clips. - There appears to be an ear ring also.
48
Poor Gowning Wet Hair
- The patients hair is wet. Combined with the
ponytail resulted in significant artifacts.
49
Poor Gowning Mousse
- This patient had dreadlocks with lots of mousse
in the hair.
50
Poor Gowning Mousse
- The A-P c-spine was repeated with the hair in
pigtails.
51
Poor Gowning Bra
- The complete study of a brassiere.
- P-A Lateral Views
52
Cervical Spine Positioning Errors
- Horizontal CR too low so the EAM and part of
upper c-spine missed. - EAM must be in collimation and film properly
centered to avoid missing anatomy.
53
Cervical Spine Positioning Errors
- I.D. in wrong location so it blocks part of
C-1. - Note that the oblique view provides a good look
at C-7 T-1.
54
Thoracic Spine Chest
- In the thoracic region, film is centered to
patient. - The horizontal central ray is centered to the
film. - Thoracic Spine views will require compensating
filters. Always complete positioning and
collimation before installing filters
55
Thoracic Spine
- Routine Views A-P and Lateral
- Supplemental Swimmers
- A-P measure over shoulder in contact with sternum
and thoracic spine. - Lateral measurement is sub axillary.
56
6.2 A-P Thoracic Spine
- Measure A-P over shoulder
- Protection Half Apron
- SID 40 Bucky
- No tube angle
- Film 7 x 17 regular I.D. down Portrait
- Patient stands A-P with back touching Bucky.
57
A-P Thoracic Spine
- Locate C-7. Position top of film two inches above
C-7. - Make sure there is no patient rotation
- Horizontal central ray centered to film.
- Vertical central ray mid-sagittal.
58
A-P Thoracic Spine
- Locate the 40 Cervicothoracic or Thyroid Filter.
- Place on top of collimator.
- When installed, the thick part goes toward the
cervical spine.
59
A-P Thoracic Spine
- Collimate Top to Bottom C-7 to L-1 or slightly
less than film size. - Collimate side to side 5 or less than film
size. - Place 40 cervicothoracic filter into filter rack
with thickest part up. - Slide down until light is seen at top.
60
A-P Thoracic Spine
- Pull filter up to close off light at top.
- Make sure film is pushed into Bucky.
- Breathing Instructions Take a deep breath in
and hold it. Inspiration - Make exposure
- Tell patient to breathe and relax.
61
A-P Thoracic Spine Film
- Need to visualize from T1 to L1.
- No rotation Sternoclavicular joints equal
distance from spine. - Full inspiration with diaphragms down.
- Equal exposure from T-1 to T-12.
62
AP T-spine Positioning Error
- The filter was placed to the lower half of the
film. - Filter goes to the top of the film.
- Bring down until you see light at top and back up
to close off light.
63
A-P T-spine Error
- The top of the film is placed 2 inches above the
shoulder, not C-7 so the upper thoracic spine is
not on the film. - Most common error.
64
6.3 Lateral Thoracic Spine
- Measure Lateral sub- axillary.
- Protection Half apron
- SID 40 Bucky
- Film 14 x 17 regular I.D. up Portrait. Small
patient with little lordotic curve may use a 7 x
17 regular film with I.D. down Portrait
65
Lateral Thoracic Spine
- Locate point filters per technique chart.
- Patient stands lateral with shoulder touching
Bucky. - Top of film is two inches above C-7.
- Patient places hands together with arms parallel
to floor.
66
Lateral Thoracic Spine
- Horizontal central ray centered to film.
- Vertical central ray just posterior to head of
humerus. - Collimation top to bottom T-1 to L-1 or slightly
less than film size. - Collimation side to side posterior skin.
67
Lateral Thoracic Spine
- Place point filters below the axilla or
horizontal central ray. - Instruct patient to pull elbows together.
- Breathing Instructions Take a deep breath
in and hold it. Dont move. - Make exposure and tell patient to relax.
68
Lateral Thoracic Spine Film
- Should see from T-1 to T-12.
- No Rotation Ribs superimposed.
- If patient was able to have elbow touch,
shoulders will be anterior to T-spine.
69
Lateral T-spine Errors
- Point filters placed at top of image instead of
the bottom of the image. - Too much rotation, ribs not superimposed.
- Ribs magnified are the side away from film.
70
Lateral T-spine Error
- Wrong breathing instructions.
- Taken on expiration so the lungs are not filled
with air. - Under exposed.
- Note rotation
71
Lateral T-spine Error
- Wrong film size and too low.
- A small patient can be done with the 7 x 17 but
the collimation must include the posterior soft
tissue .
72
Lateral T-spine Error
- The I.D. is down whenever we use the 7 x 17
film. - Using the 7 x 17 requires tight collimation and
precise positioning. - Improves contrast.
73
Lateral T-spine Error
- No collimation.
- Patient over exposed.
- Vertical CR not posterior to head of humerus.
- Always collimate to posterior skin.
74
6.4 Swimmers Projection
- Taken when lateral cervical or thoracic spine
fails to demonstrate lower cervical or upper
thoracic spine. - Only thoracic spine view with landmarks for beam
placement.
75
Swimmers Projection
- Measure lateral sub-axillary
- Protection Half Apron
- SID 40 Bucky
- Tube angle Normally none but large patient that
cannot achieve separation of shoulders may need 5
degrees caudal. - Film 10 x 12 regular I.D. up Portrait
76
Swimmers Projection
- Patient stands lateral. Arm next to Bucky raised
over head. Other arm grasps sandbag. Patient
rotated posteriorly 5 to 10 degrees off of true
lateral. - Horizontal central ray at level of
sternoclavicular joints. - Vertical central ray Head of humerus away from
Bucky.
77
Swimmers Projection
- Center film to HR.
- Push film into Bucky.
- Collimation slightly less than film size.
- Breathing Instructions Take small breath in
and blow it out. Hold it out and dont move.
Expiration - Make exposure and have patient relax.
78
Swimmers film
- Should visualize the upper thoracic spine and
C-7. - Minimize rotation of body to as close to lateral
as possible. - Key to view is shoulder separation.
79
End of Lecture
- Return to the Winter 2008 Index and Schedule
- Return to PB-322RadTechOne Home Page