
Installation - PowerPoint PPT Presentation
1 / 55
Title:
Installation
Description:
While holding down the power button, push the reset button on the back of the Palm. ... Part II: Associate Each Palm with its own UserName for the OS ... – PowerPoint PPT presentation
Number of Views:45
Avg rating:3.0/5.0
Title: Installation
1
Installation
Installation
Install Instructions
Install Instructions
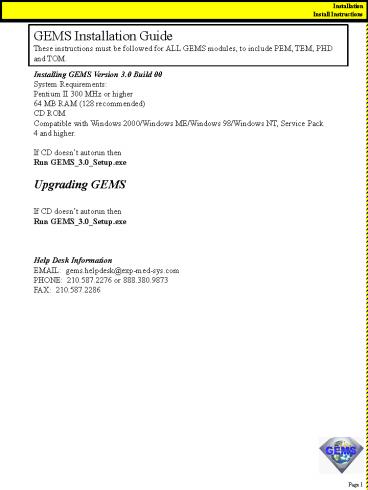
GEMS Installation Guide These instructions must
be followed for ALL GEMS modules, to include PEM,
TEM, PHD and TOM.
Installing GEMS Version 3.0 Build 00 System
Requirements Pentium II 300 MHz or higher 64
MB RAM (128 recommended) CD ROM Compatible with
Windows 2000/Windows ME/Windows 98/Windows NT,
Service Pack 4 and higher. If CD doesnt autorun
then Run GEMS_3.0_Setup.exe Upgrading GEMS If
CD doesnt autorun then Run GEMS_3.0_Setup.exe
Help Desk Information EMAIL gems.helpdesk_at_exp-me
d-sys.com PHONE 210.587.2276 or
888.380.9873 FAX 210.587.2286
Page 1
2
Installation
Click the OK button. Once you have restarted
your computer and logged back on, the GEMS
installation software will complete the setup of
GEMS.
Page 2
3
Installation
Click Next
Click Next
Page 3
4
Installation
Click Next
Click Next
Page 4
5
Installation
Click Next
Wait, patiently.
Page 5
6
Installation
Click Finish
Click OK Your System will restart and GEMS
installation will be complete.
Setup Notes The first time you run GEMS The
User Name is gems admin The password is
gemsuser2.5
If this is an upgrade from a previous version of
GEMS, the Administrative user name will be gems
admin but the password will retain any changes
you have made.
Page 6
7
Setup and Config.
Patient Encounter Module
Database
The Database tab allows you to choose where GEMS
is looks for it's database files. If no external
database is detected, the database default
settings go into effect. The application will
work as a stand alone unit by default. Database
Type Don't change the database type unless you
are instructed to do so by Help-Desk
personnel. If you are using multiple computers
on a LAN, then you can configure GEMS to look for
the central database for it's files. Note You
do not have to "map" a drive before telling GEMS
where to look for the central database, but you
MUST have the appropriate permissions (read,
write, etc..) set by your network administrator.
Page 7
8
Setup and Config.
Patient Encounter Module
Security
The Security tab allows you to set the access
privileges for personnel using the GEMS PEM.
You will only see this screen if you have
Supervisor's Privileges. This page allows the
Supervisor to add, edit, and delete users. As
well as change and reset passwords. There are 3
types of users for the PEM Users, Supervisors,
and PEM Admin. Create at least one user who is
in the Supervisor group. Only PEM Admin can make
changes to the GEMS program. Supervisors can add
new users. You MUST set up User Access Rights
for your Providers, using the "pem admin" login
will NOT allow you to document a patient
encounter.
Page 8
9
Setup and Config.
Patient Encounter Module
Add User
This tab allows you to add a user. You MUST give
the user permission to gain access to the
appropriate functions of the PEM, such as a
provider should have full read and write
privileges but a technician should have full
demographics and Patient Check-In but only read
privileges for Diagnosis, Medications,
etc.. Ancillary Data You can give your Pharmacy
and Lab personnel read privileges so they can
monitor the requests and ensure all Medications
and Lab requests were completed. Templates You
can give users the ability to create/edit
templates. Use Windows NT Logon If you choose
this option, your User Name/Login ID MUST be
identical to the user ID for Windows NT or
Windows 2000.
Page 9
10
Setup and Config.
Patient Encounter Module
MTF / Treatment Location
The Location tab allows you to view and change
YOUR location information, to include the
Latitude and Longitude. --You can obtain this
information by contacting the local security
forces personnel. Be sure to pick your
appropriate DMIS location from the pick
list. Note Most deployed locations will NOT
have a DMIS code -- You can use your host unit's
DMIS code.
Page 10
11
Setup and Config.
Patient Encounter Module
Customize Formulary
The Customize Formulary tab allows you to view
and change the medications listed in your
formulary. The PEM has all the medications
authorized for the EMEDS UTCs. Remember You
MUST click the save button before closing this
screen or no changes will be made.
Page11
12
Setup and Config.
Patient Encounter Module
Clear Pick List
The Clear Pick List tab allows you to clear your
learning pick lists. Warning This process
cannot be undone. Why would I want to do
this? If you are assigned to an ongoing mission,
and you have a constant rotation of personnel
from various units many of your pick lists will
become overly cumbersome. Such as the Home Unit,
Squadron, etc.. Perform this function with care.
Any changes made are irreversible.
Page 12
13
Reports
Patient Encounter Module
Selection and Scope
1-Select the report you need by using the pull
down menu. 2-You can select scope or
time-frame of the report by setting the From and
To dates. Click Next to move to the next
selection. 3-You can specify Treatment Location,
Provider, Unit, Visit Type, Service, and Status
to be included in the report. The default is to
include all. 7-Click the Finish button to get a
summary of the data to be included in the report.
Click Create Report to preview and print/e-mail
the report. 6-Close the PEM Reports menu by
clicking the Cancel button.
Page 13
14
Reports
Patient Encounter Module
Reports Available
-Use the Printer Icon to print the report. -The
print pop-up menu will appear, choose the print
range, the default is all. -Click the OK button
to start printing.
Reports Available Form 555 or Triple Nickle A
workload report Workload Summary Report AF 1041
DNIF Status PRP Suspension Suspension and
recertification of PRP status DNBI
Summary Disease non-battle injury summary
report Injury Report List of injuries, adjusted
by date SF 600 Chronological Record of Medical
Care
Page 14
15
Crisis Mode
Patient Encounter Module
Information
Personal Information The page starts up with an
unidentified patient, preloaded and ready for
use. To search the database for a patient Enter
the last 4 of the patient's SSAN in the SSAN
block and hit return, If the patient is already
in the database the patients' demographic
information will appear in the appropriate blocks
and sections of the patient information
page. Triage Select the triage category from
the pull down list. Contamination Check this
box if the patient is contaminated. Orders You
can order tests by clicking on the Orders button.
Disposition. Click on the arrow icon next to the
Disposition list box activate a pick list of the
most common dispositions, in addition you can
enter new dispositions not commonly listed.
TriageStats This is a running total of all
triage categories within a specified time
period. If a triage category is NOT selected it
will not appear in the running total. New Visit
Saves current record and readies the page for a
new visit (patient). SF600 Prints a SF600 for
this visit.
Page 15
16
Crisis Mode
Patient Encounter Module
More Information
Symptoms Click on the check box next to the
branch to expand the branch and select the
appropriate symptoms. To select the symptom,
click on the check box next to the symptom, this
will in-turn expand the symptom branch to provide
for a negative (pertinent negative) result and/or
a note attached to each symptom-this note will be
added to SOAP note on the SF 600. Note The
check box below the Symptom section allows you to
filter out all symptoms not checked. In other
words, to show only the symptoms
selected. Diagnosis Select a diagnosis from the
Diagnosis Tree, click the check-box next to the
major system, this will expand the branch to
reveal the applicable ICD 9 codes and common
nomenclature. To select the diagnosis click on
the check box next to the diagnosis, this will
expand the branch expand that branch to provide a
note attached to each diagnosis-this note will be
added to SOAP note on the SF 600. Medications.
Click on the Rx icon to activate the Formulary
Search page. This page allows you to perform a
type-down search for a medication.
Page 16
17
Data Management
Patient Encounter Module
Backup/Restore
Backup/Restore This function allows you to back
up your entire database. You can backup either
the External Database, the database you share
with the other GEMS users--Normaly located on
your local LAN. You can backup your Internal
Database, the database GEMS maintains on your
individual computer. GEMS maintains a carbon
copy of the External Database on your individual
computer as a contingency against the LAN being
down and the External Database not being
available. i.e., you can still function when the
LAN is not working.
Page 17
18
Data Management
Patient Encounter Module
Archive Patient
Archive Patient and Associated Visits To remove
a patient from the database -Type in the
patient's SSAN or last name and press the enter
key GEMS will search the database for a match,
if a match is found, hi-light the file by
clicking on it once and click the Archive button,
then click the close button.
Page 18
19
Data Management
Patient Encounter Module
Unarchive Patient
Unarchive Patient This function allows you to
restore a patient to the active database after
you have archived them., hi-light the file by
clicking on it once and click the Unarchive
button, then click the close button.
Page 19
20
Data Management
Patient Encounter Module
Archive Visits
Archive Visit This allows you to remove a
specific visit without removing the patient from
the database. This is commonly used to remove
"practice" sessions from the working
database. Use the Display Visits pull down menu
to display all the visits in question, then click
on the visit or visits you want to remove from
the active database and click the Archive button.
Page 20
21
Data Management
Patient Encounter Module
Unarchive Visits
Unarchive Visit -Allows you to restore a patient
visit (s) to the active database after you have
archived them. hi-light the file by clicking on
it once and click the Unarchive button, then
click the close button.
Page21
22
Visit Import/Export
Patient Encounter Module
Export and Import Visits
Visit Import/Export Export Visits This allows
you to export visits for a specific time period
or All Visits from the entire database.
(Commonly used to populate a new GEMS computer
from another). Export All visits is also the
common way to export data for transfer to other
agencies for analysis. Visit Import/Export Expor
t Visits for an individual This allows you to
export visits for a specific patient. Commonly
used to create a "electronic medical record" to
be used to update a GEMS computer at another
location..
Visit Import/Export Import Visits This allows
you to import visits into your database.
(Commonly used to populate a new GEMS computer
from another).
Page 22
23
Visit Import/Export
Patient Encounter Module
Export and Import Demographics
Demographics Import/Export Export
Demographics This allows you to export
demographic information or all demographic
information including archived patients.
(Commonly used to update one GEMS computer from
another).
Demographics Import/Export Import
Demographics This allows you to import
demographic information from another GEMS PEM
computer data from a PERSCO Table or
demographic information from MITS/CITA. (Commonly
used to update one GEMS computer from
another). Note You can choose where you want to
import the data from, use the file browser to
find the appropriate directory.
Page 23
24
Visit Import/Export
Patient Encounter Module
Palm Information
Press the HotSync PDA Data button to exchange
between the PDA and the host computer. PDA
Provider information is updated during each
HotSync. Palm PDA interface Selecting the Palm
PDA tab, opens this page which allows you to
perform PEM maintenance. From this page you can
delete or exchange information by checking the
appropriate boxes and then clicking the HotSync
PDA Data button.
Selecting the Palm PDA tab, opens this page which
allows you to perform PEM maintenance. From this
page you can delete or exchange information by
checking the appropriate boxes and then clicking
the HotSync PDA Data button.
For more in-depth information on the Palm
application refer to the Palm/PDA Chapter on page
56.
Page 24
25
Visit Import/Export
Patient Encounter Module
Palm Usage notes
Recommended Use during a Crisis The Hand Held
PEM does NOT have a dedicated Crisis Mode like
the PC based PEM. Instead, you may include as
much or as little information that time allows to
any visit or encounter. It does have a Triage
Tracking system. At minimum we recommend Dx
Diagnosis Page Ds Disposition Page Triage is
recorded on the Ds or Disposition Page. With Tx
Treatment and Sx Symptoms as time allows.
For more in-depth information on the Palm
application refer to the Palm/PDA Chapter on page
56.
Page 25
26
Templates
Patient Encounter Module
Create Template
To create a new template choose the create new
template radio button, then press the next
button. Choose a unique name for the template,
click the next button.
Page 26
27
Templates
Patient Encounter Module
Add Symptoms, Exam, Diagnosis and Treatment
Symptoms Select the items you want in your
template and hit the right arrow button to move
them into your template. If you select a
symptom category, the entire category will be
added to the template. For Example If you
click the box for the General Category the
entire category will be added as opposed to
clicking the plus sign to the left of the
Category title and expanding the category tree
and clicking the box next to the items within the
category tree. Once you have selected the
item(s) you want, click the arrow button to add
them into your template. You will notice the
Categories will be added as well, but if you
click the plus sign to the left of the category
name in the new template-only the items you
selected will be available. This process allows
you to create visit templates to meet your unique
patient or mission needs. To tag an item as
Required, click the text of the item and it
will turn bold red. To remove the tag, click the
text again. Exam, Diagnosis, and Treatment
screens Follow the same procedures as outlined
for adding Symptoms to your template. Finish
Screen Click the Finish button to create your
new template. Or click the back button to make
changes.
Page 27
28
Templates
Patient Encounter Module
Edit Template
Edit a template Click the Edit Template radio
button, then press the next button. Select the
existing template you wish to edit, click the
next button The Symptom, Exam, Diagnosis, and
Treatment screens will appear in succession, make
changes as appropriate. Finish Screen Click the
Finish button to create your new template. Or
click the back button to make changes.
Page 28
29
Templates
Patient Encounter Module
Copy and Edit a Template
Copy and Edit a Template If you need to create
a template based on an existing template use this
option. Click the Copy and Edit Template radio
button, then press the next button. Select the
existing template you wish to use as the basis
for your new template by clicking it once, then
type in a new and unique name for your new
template. Click the next button The Symptom,
Exam, Diagnosis, and Treatment screens will
appear in succession, make changes as
appropriate. Finish Screen Click the Finish
button to create your new template. Or click the
back button to make changes.
Page 29
30
Templates
Patient Encounter Module
Delete Template
Delete a template To delete a template, Click
the Delete Template radio button, then press the
next button. Click the Finish button to delete
template.
Page 30
31
Templates
Patient Encounter Module
Export and Import Template
To Export a template Click the Export Template
radio button, then press the next button Select
the template you wish to export, click the next
button. Choose the appropriate drive and
subdirectory you wish to export the template
to. Select the template you wish to export,
click the next button.
To Import a template Click the Import Template
radio button, then press the next button Choose
the appropriate drive and subdirectory you wish
to import the template from. Select the template
you wish to import, click the next
button. Remember. You can only import templates
than have been created with GEMS PEM and exported
using the Export Template function. Note
Templates are stored internally, that is, within
the GEMS PEM system and cannot be opened or
copied without using the Template pull-down menu
within the GEMS PEM program.
Page 31
32
Walk Thru
Patient Encounter Module
Demographics and DD 2766 Information
1 - Enter the patient's SSAN in the SSAN block
and hit return, If the patient is already in the
database the patients' demographic information
will appear in the appropriate blocks and
sections of the patient information page. 2a -
Or type in the first letters of the patient's
last name in the last name block and hit enter,
this will bring up the Patient List pop-up
menu. 2b - Select the appropriate patient by
clicking on the patient once and click the exit
button to close the patient list box. Note, if
the patient is not in the database you can click
the new patient button and enter the patient's
demographic data into the database from the
Patient Information Page. 3 - Verify the
patient's information, 4 - Click the Outpatient
Visit button on the right side of the page, this
will activate the Outpatient Visit Page.
Page 32
33
Walk Thru
Patient Encounter Module
Complaints, Vitals, Symptoms, and Exam
5 - Enter the chief complaint the patient has by
typing it in the chief complaint box OR click the
pull down menu button on the right side of the
chief complaint box, a list of common complaints
will appear, select the complaint that matches
your patients remarks by clicking on it once. 6
- Enter the duration of the complaint into the
duration boxes just under the chief complaint
box. The note icon next to the duration boxes
allows you to provide additional information if
necessary, this info will be included in the
SF600 SOAP note. 6a - If the patient has more
than one complaint, 6b - Select or enter the
first complaint, enter the appropriate duration
information into the duration boxes, then click
the save file icon next to the complaint list
box, this will save the complaint and allow you
to add more complaints to this patients
visit. 6c - If more than one complaint is
recorded the complaint list will allow you or
another provider to scroll through the complaints
in the order they were recorded. Note By
double clicking in the complaint list you will
activate a complaint history pop-up window, this
displays the history of the complaints this
patient has been seen for. 7 - Enter the
patients vital signs information into the vital
signs section, if you record more than one set of
vitals during a single visit, use the save file
icon to record more than one set of vitals during
the visit.
Page 33
34
Walk Thru
Patient Encounter Module
Complaints, Vitals, Symptoms, and Exam Cont.
8 - Visit Type. Select the type of visit, the
choices are initial , follow-up, Flight Medicine,
etc. 9 - Treatment location. This is the
deployed location or treatment facility. 10 -
Symptom. The left side of the page hosts the
Symptom section, this consists of a symptom tree
loosely organized by major systems (branches)
plus injury classifications to include
contamination. Click on the check box next to
the branch to expand the branch and select the
appropriate symptoms. To select the symptom,
click on the check box next to the symptom, this
will in-turn expand the symptom branch to provide
for a negative (pertinent negative) result and/or
a note attached to each symptom-this note will be
added to SOAP note on the SF 600. Note The
check box below the Symptom section allows you to
filter out all symptoms not checked. In other
words, to show only the symptoms selected. 11 -
Physical Exam. The Physical Exam tree and Image
(The picture of the body) are a simple and quick
method to select an exam on a particular body
part or system. There are over 1500 different
physical exam choices, clicking on the body part
of the image filters out all the other choices
and presents only the physical exam appropriate
for that body part or system. Those choices are
located in the physical exam list located in the
middle column of the Visit and Examination page.
Click the check box next to the exam selection,
this will select and expand that branch to
provide a note attached to each exam
selection-this note will be added to SOAP note on
the SF 600. Note The check box below the
Physical Exam Section allows you to filter out
all exams not checked. In other words, to show
only the exams selected. 12 - Click on the
Diag-Treat button on the right side of the page.
This activates the Diagnosis and Treatment page.
Page 34
35
Walk Thru
Patient Encounter Module
Diagnosis, Treatment, and Disposition
13 - Diagnosis and Treatment. To select a
diagnosis from the Diagnosis Tree on the left
side of the page, click the check-box next to the
major system, this will expand the branch to
reveal the applicable ICD 9 codes and common
nomenclature. To select the diagnosis click on
the check box next to the diagnosis, this will
expand the branch expand that branch to provide a
note attached to each diagnosis-this note will be
added to SOAP note on the SF 600. 14 -
Treatment. To select a treatment regimen from the
Treatment Tree on the right side of the page,
click the check-box next to the major system or
injury type, this will expand the branch to
reveal the most common treatments. To select the
treatment click on the check box next to the
treatment, this will expand the branch expand
that branch to provide a note attached to each
treatment-this note will be added to SOAP note on
the SF 600. 15 - Medications. Click on the Rx
icon to activate the Formulary Search page. This
page allows you to perform a type-down search for
a medication. Type in a word or partial word in
the top text box, the list will update with
either a medication that starts with or contains
the letters or words you typed in the text box.
You can specify the search by clicking the Begin
with or Contain buttons. Select the medication
by clicking the check box next to the medication.
You can change the dose and amount by typing in
the appropriate info in the boxes provided. You
can view the entire medication history by double
clicking the Medications List box next to the Rx
icon. 16 - Disposition. Click on the arrow icon
next to the Disposition list box activate a pick
list of the most common dispositions, in addition
you can enter new dispositions not commonly
listed. You can order tests by clicking on the
Orders button. Additionally, you can record
DNIF, days of quarters, limited duty days,
hospitalized and PRP suspension. Triage
categories are also available similar to the
triage system in the Crisis Mode. 17 - If you
haven't saved this visit, please do so now by
clicking on the SAVE button on the right side of
the page. To print a hard copy of the visit on
the SF 600, press the SF 600 button.
Page 35
36
Overview
Theater Epidemiological Module
Theater Epidemiological Module (TEM)
Concept. GEMS TEM enables force protection
through expeditionary population health
management using automated aggregation and
analysis of patient and environmental data. The
TEM provides the maximum amount of flexibility
when evaluating information. TEM 2.5 information
is broken down into 3 layers the AOR or Area Of
Responsibility the Treatment Location, and the
Data Source. The definitions of these levels are
dependent upon the user. The definition of each
level changes according to your place in the
chain of command. For example, if you are
assigned to a deployed MTF you might define the
base as an AOR, the MTF as a Treatment location,
and each of the clinics within the MTF as data
sources. The most common definitions of the
levels are as follows
NEW ITEM All data imported into the TEM is
automatically placed in the default AOR called
"My AOR". This AOR cannot be deleted and serves
as a starting point for your analysis. You can
create your own AOR's and assign specific MTF's
and data sources to meet your particular mission
needs.
Tem Setup The TEM is directly linked to the PEM
therefore you MUST setup the PEM correctly. Using
the setup button on the PEM main page click the
Location Tab, then devise a name for your
location. This name will be used to identify your
location globally, so a name such as "acute
care" is not appropriate. A good name would be
49mdg ER, 49 mdg FSO, etc Remember, once you
have changed any item in the PEM setup page you
MUST exit and restart the application for the
changes to take affect.
If you do not correctly identify your treatment
locations within your PEM workstations the TEM
will not be able to analyze the data correctly,
to quote " garbage in-garbage out".
Page 36
37
First Time Use
Theater Epidemiological Module
First time startup of the TEM Use the TEM Setup
pull down menu to create an account for
yourself, you will NOT be able to activate the
watch board using the pem admin account. Select
the Security/User accounts option to activate the
Add Users screen. Once you have created your
account, exit the application and restart the
TEM.
Add User You MUST give the user permission to
gain access to the appropriate functions of the
TEM. A supervisor can import data, create new
queries, and create reports. A PEM admin can do
all of the above and add new users.
Now you need to close the TEM and log in as the
user you created.
Page 37
38
Importing Data From the PEM
Theater Epidemiological Module
Importing data from the PEM part 1. Activate the
PEM, use the pull down menu to Export Encounters
and choose Export All Visits or Export Visits
Between Dates (choose the time period you want to
include). The default location for the export
file is C\gems\database\export but you can
change the export location to meet your needs
such as the A\ drive. Close the PEM after you
have accomplished this.
Importing data from the PEM part 2. Activate the
TEM, use the pull down menu to Import Encounters
and choose the location you saved the PEM export
file to. Select the file and click the Import
button-- a progress popup box will show you the
progression of the data being imported into the
TEM. Once the process is complete the Import
Complete popup will appear to let you know the
import was accomplished. Click OK
Page 38
39
Setup AOR
Theater Epidemiological Module
You are almost ready to look at your data but
first you need to provide a little more
information on your AOR and location so the
reports and analysis will have relevance or make
sense. Click the Setup AOR/Locations button. The
Setup AOR and Treatment Location Information
screen will appear, click the AOR Population tab
(don't worry about the map right now we will
discuss that issue later.
From here you will provide the number of
personnel (and what type) assigned to your AOR,
you can obtain the numbers from your local PERSCO
personnel. Make sure you click on the "From"
box this will assign the population a specific
date to allow your analysis to adapt the queries
when you add or subtract personnel in the future
(most locations are in constant flux--thus
knowing how many personnel are or were located at
a specific location and at what time is very
important). After you have provided the numbers,
click the disk icon to save the population
numbers with a specific date. Click the Close box.
Page 39
40
First Look at Your Data
Theater Epidemiological Module
Now you are ready to take your first look at your
data. Click the Query Results button A popup
box will appear to remind you the Query Results
need to be refreshed, click the Yes button. The
Chart Update Status screen will appear, this
provides you feedback on the queries being
generated--when this process is complete the
Watchboard will appear.
The Watch board Here is your first look at your
data on the watch board. The upper right side of
the screen shows the graphs. Click on one of the
queries to change the graph. Congratulations you
have successfully set up the TEM. You can now
begin analyzing data from your PEM. Good
Hunting.!
Page 40
41
TEM Activation Checklist
Theater Epidemiological Module
- TEM Activation Checklist
- Activate the PEM (Ensure the PEM has a unique
name assigned) - Activate the TEM login as pem admin
password pemuser2.5 - Use the TEM Setup pull down menu to create an
account for yourself, you will NOT be able to
activate the watch board using the pem admin
account. Once you have created your account exit
the application and restart. - Activate the PEM, use the pull down menu to
Export Encounters and choose Export All Visits or
Export Visits Between Dates (choose the time
period you want to include). Close the PEM. - Activate the TEM, use the pull down menu to
Import Encounters and choose the location you
saved the PEM export file to. Select the file
and click the Import button. - Click the Setup AOR/Locations button. The Setup
AOR and Treatment Location Information screen
will appear, click the AOR Population. Provide
the numbers of personnel (and what type) assigned
to your AOR. Make sure you click on the From
box, this will assign the population a specific
date to allow your analysis to adapt the queries
when you add or subtract personnel in the future.
Click the Close box. - Click the Query Results button A popup box will
appear to remind you the Query Results need to be
refreshed, click the Yes button. - The Watch board The upper right side of the
screen is the shows the graphs. Click on one of
the queries to change the graph. Congratulations
you have successfully set up the TEM. You can now
begin analyzing data from your PEM.
Page 41
42
Change Map
Theater Epidemiological Module
Change Map Press the Change Map button, a pop up
window will appear, use the browse button to find
the map that you want, a set of general info maps
have been provided. Once you have selected the
map click the Save New Map button, then click the
Close button. The Map will appear and you will be
ready to place your MTF Location marker(s) where
you want on your map
Adding Your Own Maps All images must be in
windows bitmap format or have a ".bmp"
extension--in other words .jpgs or .gifs will not
work. Image size is also important. The minimum
image size should be at least 320 pixels by 320
pixels. If the image is larger (such as 640x480)
the TEM will compress the file to 320x320 format.
The inverse is also true if you load an image
with a size of 180x200, the TEM will enlarge the
image to 320x320 this could result in the file
being blocky or "pixelated". It is also a good
idea to place the images in the "c\gems\maps"
directory, in case you need to use the file for a
new or different AOR.
Page 42
43
Location Markers Adding a New AOR
Theater Epidemiological Module
Location Markers. Now that you have changed your
map you will notice a green dot on the map, when
you place your mouse cursor over the dot the name
of your location will appear. If you want to move
the marker to a different location on the
map--click and hold the left mouse button and
drag the marker to the desired location.
Adding a NEW AOR Click the Add New AOR button at
the bottom left side of the screen, this brings
up the Add a New AOR request box. Type a unique
name for your new AOR in the text box under
NewAOR Name, then click the Create New AOR
button. The Setup AOR and Treatment Location
Information screen will be updated with your new
AOR. Now you need to add a treatment location(s)
to your AOR.
Page43
44
Adding Treatment Locations
Theater Epidemiological Module
Adding a Treatment Location Click the Add
Location button. This brings up the Select
Treatment Locations to add to the AOR request
box.
Click the Add New button. This brings up the Add
a New Treatment Location request box. Type a
unique name for your new treatment location in
the text box under New Treatment Location Name,
choose a Facility Type from the pick list
provided. Click the Create New Treatment Location
button, then click the close button on the Select
Treatment Locations to add to the AOR request
box. The Setup AOR and Treatment Location
Information screen will be updated with your new
Treatment Location. Next, you will need to add
data sources.
Page 44
45
Adding Data Sources To a Treatment Location
Theater Epidemiological Module
Adding Data Sources to a Treatment Location On
the left side of the screen you will see your new
AOR, if you click the little symbol on the left
side of the AOR name the new location your
created will appear below the AOR. Click the
location name--it will reveal the Treatment
Location information. You can edit the Contact
Information (be sure to click the save button
after making any changes to the Contact
Information box. Click the Population Tab, update
the population numbers as required, be sure to
provide a date in the From box and click the
disk icon to save the data. Click the Data Source
Tab, here you can see what data sources are
associated with your treatment location(s). Click
the Add Data Source button.
Page 45
46
Adding Data Sources
Theater Epidemiological Module
Adding Data Sources to a Treatment Location
Click the Add Data Source button. The Select
Data Sources to associate with Treatment Location
request box will appear, select the data sources
(imported from the PEM) and click the Select
button. The Data Sources Tab will update with
the data sources you added to your treatment
location. You are finished with adding a new AOR,
Treatment Location and data sources to your TEM.
Page 46
47
The WatchBoard
Theater Epidemiological Module
The Watch board The watch board provides vital
information in a practical graphic display.
Activate the surveillance reports by clicking
the query name. The graph in the upper portion of
the screen will change with each selection or
change of query/location.
The upper left portion of the watch board has the
AOR map. You can change AOR's any time, be sure
the click the Refresh Data button after doing so.
Below the map is the Location Information. The
lower half of the watch board displays the list
of "Situation and Awareness" Surveillance
queries, if you choose to create your own queries
they will appear there as well.
Page 47
48
Set Surveillance Set Alarms
Theater Epidemiological Module
Set Surveillance The Surveillance Report section
uses an advanced wizard to help you build
surveillance reports. Follow the on-screen
instructions.
Set Alarms The Set Alarms section uses an
advanced wizard to help you set your alarm
levels. Follow the on-screen instructions.
Page 48
49
Reports Import and Export
Theater Epidemiological Module
To create a standard (printable) report 1.
Select the Reports pull down menu from the TEM
main screen. Use the pick lists to customize the
report. 2. Select the AOR, then select the
Treatment Location. 3. You can select scope or
time-frame of the report by setting the From and
To dates. 4. Select the report you need by using
the pull down menu. 5. You can choose All
Providers (default) or select individual
providers that apply to the report. 6. You can
choose All Units (default) or select individual
Units that apply to the report. 7. Click the
Create Report button to Preview the report, there
you can elect to print/print multiple copies or
just view the report.
Import/Export Import Encounters This is how you
get information in the TEM from other sources
such as the the PEM or another TEM. Export
Encounters This allows you to export encounters
for a specific time period or All encounters from
the entire database. Export All visits is also
the common way to export data for transfer to
other agencies for analysis. Export Visits for
an individual This allows you to export visits
for a specific patient. Commonly used to create a
"electronic medical record" to be used to update
a GEMS computer at another location.. NDRS
Export This feature is to allow TEM data to
export to the US Navy's NDRS system.
Page 49
50
Part 1
Palm/PDA Module
Part I Hard Reset each Palm and Reset Palm
Desktop Software 1. Hold down the power button
on the front panel of the Palm While holding down
the power button, push the reset button on the
back of the Palm. Wait for the Palm Computing
logo to appear, then release the power
button. You have successfully done the reset if
you get a message asking if you want to erase all
data. Select YES (usually the up button) You
can usually unscrew the top off the stylus for a
tool to push the button with. A paperclip will
also work. This will reset the PalmOS to its
factory settings. 2. On the laptop, launch the
Palm Desktop Software Start?Programs?Palm
Desktop?Palm Desktop 3. In Palm Desktop open up
the user list Tools?Users This will open up the
following window
4. Select each user one at a time and click
Delete You will get the following message
5. Click Yes 6. When you are done, click OK and
exit the Palm Desktop.
Page 50
51
Part 2
Palm/PDA Module
7. If the Hotsync Manager is on, stop and restart
it.
Right-Click the in the tray and click
Exit. Start?Programs?Palm Desktop?HotSync Manager
Part II Associate Each Palm with its own
UserName for the OS 1. Place the first palm in
the hotsync cradle and push the hotsync button on
the cradle. The computer is going to think this
is a first-time communication and introduce
itself to the palm and ask for a username with
the following screen
2. Click New
I would like you to use the following naming
convention Palm1, Palm2, Palm3, 3. So, for the
first Palm you hotsync, type in Palm1 and click
OK. You will then see the Users List box again
and it should contain the username you just
added.
Page 51
52
Part 3
Palm/PDA Module
4. Make sure the newly added username is selected
and click OK I highly recommend that you label
the Palms with their UserName. Masking tape and
marker, something. Trust me on this. If your
batteries die or the charge runs down, you will
be happy you did this. (I will get to this
situation later) 5. Once the hotsync is
complete, move on to the next palm (Palm2) and
repeat steps 1-4 of Part II Part III
Installing GEMS onto the Palm If you labeled the
Palms, this will make your job much easier ? 1.
Start the PEM as an administrator or
supervisor. 2. Goto Install PDA PalmPDA?Install
PEM 3. Follow the instructions on the screen
and click OK. Stop the hotsync Manager and put
one of the Palms in the cradle. Make sure you
know which Palm is in the cradle Palm1,
Palm2,or (if you didnt label them, take the
palm out of the cradle and click the open HotSync
on the Palm. The UserName is at the top)
Page 52
53
Part 3 Cont.
Palm/PDA Module
4. The following screen asks for the UserName for
the Palm
Use the drop-down list to find the username that
matches the Palm in the cradle. 5. Click
Install 6. Press the hotsync button on the
cradle and away you go. 7. When Hotsync is
complete, Stop and restart the HotSync Manager
. 8. Open up the Gems Hotsync PalmPDA?Hotsync
Palm 9. Check the box marked Download Provider
List
10. Click HotSync PDA Data Follow the
instructions on screen. 11. Repeat Steps 1-10
of Part III for the remaining Palms Note It is
absolutely imperative that you match the UserName
for the Palm with the UserName you select in step
4.
Page 53
54
Global Expeditionary Medical System
Version 2.5
Installation Guide and Training Manual
GEMS Setup Page 1 PEM Training Manual Page
7 TEM Training Manual Page 36 Palm/PDA
Training Manual Page 50
55
Global Expeditionary Medical System Version
2.5 Installation Guide and Training Manuals
Recommended
CrystalGraphics Presentations


