
And - PowerPoint PPT Presentation
Title:
And
Description:
But it also will gives less information about where exactly an object is when one is detected. ... Think about new uses, not shown in these s and tell me ... – PowerPoint PPT presentation
Number of Views:29
Avg rating:3.0/5.0
Title: And
1
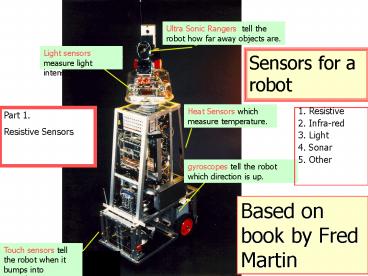
Ultra Sonic Rangers tell the robot how far away
objects are.
- And
Light sensors measure light intensity.
Sensors for a robot
Heat Sensors which measure temperature.
1. Resistive 2. Infra-red 3. Light 4. Sonar 5.
Other
Part 1. Resistive Sensors
gyroscopes tell the robot which direction is up.
Based on book by Fred Martin
Touch sensors tell the robot when it bumps into
something.
2
The simplest possible use of sensors
- The diagram serves to illustrate the general case
of sensing a specific phenomenon. - In this case it is the presence or absence of
light. - The sensor in this case is a photo-resistor.
- When sufficient light strikes it, its internal
resistance is reduced to several hundred Ohms. - When no light strikes it its resistance is
typically several million Ohms.
light
Remember Breitenbergs Vehicles?
Look to Radio-Shack stores
3
6. Sensors
- In this chapter we will do
- Tactile sensors / switches
- Shaft encoders
- A/D converters
- Infrared position sensitive devices (PSD)
- Digital cameras
4
Sensors
- General Remarks
- There are millions of different sensor types
- You have to select the right one for your
application and budget and read the specs - Note some sensors require input from the CPU as
well - E.g. activation/deactivation, triggering data
transfer, etc. - Our scope here is more on interfacing sensors
than on understanding the sensors themselves
5
Sensors
- Typical Sensor Outputs
- Binary signal (0 or 1)
- Analog signal (e.g. 0..5V)
- Timing signal (e.g. PWM)
- Serial link (RS232 or USB)
- Parallel link
- Examples
- ?? Tactile sensor
- ?? Inclinometer
- ?? Gyroscope
- ?? GPS Module
- ?? Digital Camera
6
What Is a Sensor?
- Anything that detects the state of the
environment. - For instance, we already used sensors in the
Braitenberg vehicles. - Are the following, sensors?
- Positioning devices
- Encoders
- Vision
- Mine detectors (detector vs. sensor)
The material presented in our textbook and here
relates to HandyBoard, but the same principles
are true for Robix, Lynxmotion, Lego, etc. Read
the manuals.
7
What can a robot do without sensing?
- Simple Sensors
- Can be used without much processing
- Still require electronics (and connectors)
- The basic electronics laws to know
- Ohm's law
- combining resistance
- dividing voltage
Review from ECE 201
8
What you (and the robot) can do without sensors?
- Close your eyes. Plug your ears. Hold your nose.
Tie your hands behind your back. - Shut your mouth. Tie your shoelaces together.
Spin yourself around a few times. - Now walk. How does it feel? That's exactly what
your robot feels nothing - without sensors. - You have been given many types of sensors that
can be used in a variety of ways to give your
robot information about the world around it. - We will explain each of the sensors you can find
in the lab, how it works, what it's good for, and
how to build it.
9
Biological Analogs
- All of the sensors we describe in this and next
parts exist in biological systems - Touch/contact sensors with much more precision
and complexity in all species (spiders?) - Polarized light sensors in insects and birds
- Bend/resistance receptors in muscles
- and many more...
10
You have to understand sensors
- Before we can teach you what sensors do, we need
to make one point very clear - Sensors are not magical boxes.
- All information you get from sensors must be
decoded by you, the human builder and programmer. - Sensors convert information about the environment
into a form that can be used by the computer. - The sensors that are on the robot can be related
to sensors found in humans.
11
You have to understand sensors
- These sensors convert information about the
environment into neural code that your brain can
understand - Touch sensors embedded in your skin,
- visual sensors in your retina,
- and hair cells in your ears
- Your brain needs to understand the neural code
before you can react. - Since you will be programming the robot, you will
need to understand the output of the sensors
before you can program your robot to react to
different stimuli. - Learn about sensors in animals and think how to
use this knowledge in your projects.
12
Some types of Sensors
- Ladar (laser distance and ranging)
- Time of flight
- Phase shift
- Sonar
- Radar
- Infra-red
- Light sensing
- Heat sensing
- Touch sensing
13
Sensors and their use
- Topics to be discussed
- What are sensors?
- Types of sensors (many examples)
- Sensor complexity
- Signals -gt symbols
- Levels of processing
- Poor and good design of perception
- Biological perception and lessons
- Sensor fusion
Im Mr. Sensitivity. . .
Not every quarter
14
Gas Sensor
Gyro
Accelerometer
Metal Detector
Pendulum Resistive Tilt Sensors
Piezo Bend Sensor
Gieger-Muller Radiation Sensor
Pyroelectric Detector
UV Detector
Resistive Bend Sensors
CDS Cell Resistive Light Sensor
Digital Infrared Ranging
Pressure Switch
Miniature Polaroid Sensor
Limit Switch
Touch Switch
Mechanical Tilt Sensors
IR Sensor w/lens
IR Pin Diode
Thyristor
Magnetic Sensor
Polaroid Sensor Board
Hall Effect Magnetic Field Sensors
Magnetic Reed Switch
IR Reflection Sensor
IR Amplifier Sensor
IRDA Transceiver
IR Modulator Receiver
Radio Shack Remote Receiver
Solar Cell
Lite-On IR Remote Receiver
Compass
Compass
Piezo Ultrasonic Transducers
15
What are the types of Sensors?
- Active
- send signal into environment and measure
interaction of signal w/ environment - e.g. radar, sonar
- Passive
- record signals already present in environment
- e.g. video cameras
- GPS
In our lab we used infrared, light (photodiodes,
phototransistors), compass, volt and
amperometers, ions, pH, magnetic, temperature,
voice, sound, camera, sonars and of course all
resistance based micro-switches and pads..
- In past, most often we used sensing using the
following - Touch
- Active Light
- Passive Light
- There are many more ways
- (sound, heat, magnetic field, smell...)
16
Passive versus Active Sensors
- All of the sensors that will be presented in this
part are passive - in that the stimulus, i.e., the physical
property, they were measuring, comes from the
environment. - In contrast, active sensors provide their own
signal/stimulus (and thus typically require extra
energy), and use its interaction with the
environment as the property to be measured. - Active sensors include
- reflectance and break-beam infra-red (IR)
sensors, - ultrasound sensors,
- laser range finders,
- and others.
- They will be presented in next parts of this set
of lectures.
17
How to Choose a Sensor?
- There are four main factors to consider in
choosing a sensor. - Cost
- sensors can be expensive
- you can buy cheap sensors but often without good
documentation - knowing main principles and experimentation is
useful when you purchase such sensors (usually
military old sensors) - Environment
- there are many sensors that work well and
predictably inside, but that choke and die
outdoors. - Range
- Most sensors work best over a certain range of
distances. - If something comes too close, they bottom out,
and if something is too far, they cannot detect
it. - Choose a sensor that will detect obstacles in the
range you need. - Field of View
- depending upon what you are doing, you may want
sensors that have a wider cone of detection. - A wider field of view will cause more objects
to be detected per sensor - But it also will gives less information about
where exactly an object is when one is detected.
Tell our stories about sensors in lab as examples
18
Types of Sensors according to their purpose in a
robot
- Exteroceptive deal with external world
- where is something ?
- how does is look ? (camera, laser range-finder)
- Proprioceptive deal with self
- where are my hands ? (encoders, stretch
receptors) - am I balanced ? (gyroscopes)
No experience yet
- Interoceptive
- what is my thirst level ? (biochemical)
- what is my battery charge ? (voltmeter)
19
Try to understand sensors practically
- Take time to play with each of the sensors you
find in the lab, especially in Lego, Lynxmotion
and Robix kits. - Figure out how they work.
- Look at the range of values they return.
- Check under what conditions they give those
values. - Look to code of previous students related to
sensors. - The time you spend here will greatly ease your
integration of hardware and software later. - The better you understand your sensors, the
easier it will be for you to write intelligible
control software that will make your robot appear
intelligent. - So as you read about the sensors, you should
assemble a bunch of sensors as shown in Webpages
of previous classes.
20
There can be no feedback without sensors!
Remember this!!
- Sensors provide feedback to your program about
the environment. - Feedback is important in any controlled
situation. - So far, we were discussing mostly open-loop, or
timed programs that simply follow a pattern - but have no real knowledge of the world.
- Sensors can provide the feedback necessary to let
a robot make decisions about how to act in its
environment. - They will make these programs smarter.
- The feedback mechanism is very important in an
environment that is continually changing.
21
There can be no feedback without sensors
- During the rounds of the contest, the objects on
the playing field will be changing their location
(i.e., the other robot moves, the drawbridge
closes, or you bump into a block). Robot soccer,
robot theatre - We strongly encourage you to use closed-loop
feedback design when planning and implementing
your strategy. - There will be a smaller chance of random errors
completely messing up your game if you use
sensors wisely. - In addition to Braunl
- Read Chapter 6 of Martin about sensors.
- Read Chapter 8 of Martin for more information on
the control problems you may encounter.
22
Electric Sensorsdigital
23
Example of Sensor Interfacing
Handy Boards Sensor Input Banks
- Each sensor ports provides three signals to the
sensor - 5v power - middle row
- Ground - lower row
- Sensor signal line - upper row
- Not all sensors require 5v power, e.g., switches
and photocells may be wired between sensor signal
and ground lines
- Handy Board has two banks for sensors
- Digital inputs, numbered 15 to 7 on the left
- Analog inputs, numbered 6 to 0 on the right
24
Location of Digital and Analog Ports on the
HandyBoard
- The digital ports on the main board are labeled
from 0-7. - There are also four analog ports on the main
board, but when you use the expansion board, the
analog ports get remapped to the connectors on
the right side of the expansion board. - The ports are all arranged in the same format.
- The innermost row of pins are the signals,
followed by a space, then microprocessor power,
and finally on the outer side is the ground.
This slide is of no interest this year. Reed
documentation of your robot
25
Analog versus Digital Sensors
- In all our robotics kits the sensors are digital
or analog. - For instance, in HandyBoard, analog sensors can
be plugged into the analog sensor ports, which
return values between 0 and 255. - Digital sensors can be plugged into either the
digital ports or the analog ports, but will
always return either 0 or 1. - ANALOG 0 lt x lt 255
- DIGITAL 0 or 1
- Each type of sensor has its own unique uses.
- Think about new uses, not shown in these slides
and tell me your ideas. May be we will use them.
26
Figure 5.1 Generic Digital Sensor Schematics.
27
Digital Sensors
- Digital inputs all have pull-up resistors
connected to them as shown in Figure 5.1. - Digital switches are wired such that the sensor
is wired across the signal pin and ground. - This means that when the digital sensors is
closed, the signal is grounded or LOW. - When the switch is open, the signal pin outputs
5V, or HIGH. - This value is INVERTED by software, so reading
the digital port with the switch open returns 0,
while reading the digital port with the switch
closed returns 1.
- With nothing plugged in, the value of a digital
port should be 0. - Digital sensors can be used in the analog ports
on the Controller board (such as 6.270 board) as
well - This relieves any restrictions the small number
of digital inputs may cause.
28
Digital Sensors used in Analog Parts of the
HandyBoard
- In this board, for instance, the typical analog
values for digital sensors are - somewhat above 250 for an open switch,
- and less than 20 for a closed switch.
- When using the IC command, digital(port) where
port is an analog port number (i.e., greater than
7) - the sensor value is compared to a threshold
value, - and the command returns
- a 0 if the analog value is above the threshold
- or a 1 if the analog value is below it (remember
the inversion of the actual signal that digital
does?). - This threshold's default value is 127, but it can
be changed - (See the section on IC commands for information
on this).
29
Digital Sensors used in Analog Ports
- A good way to get digital information from an
analog sensor is to plug the analog sensor into a
analog port and call it with the digital(port)
command. - For example, a reflectance sensor would return
- a 0 for black or
- a 1 for white
- if read with the digital command - provided the
threshold is properly set. - This can reduce some of the programming
complexity by abstracting away the thresholding. - You should however experiment with the sensors to
determine - the range of thresholds you get
- and under what conditions these thresholds are
valid.
30
Analog sensors in digital ports?
- It is not recommended to plug analog sensors into
digital ports. - This is because the digital ports threshold to
conventional logic levels which cannot be
adjusted to suit each analog sensor. - The valid analog readings may fall into the
invalid range for digital logic. - Read in book about some mountings and uses for
some digital sensors in the 6.270 kit.
31
Switch Sensors
- Switches are perhaps the simplest sensors of all.
- They work without processing, at the electronics
(circuit) level. - Their general underlying principle is that of an
open vs. closed circuit. - If a switch is open, no current can flow
- if it is closed, current can flow and be
detected. - This simple principle can (and is) used in a wide
variety of ways.
Think about all possible uses of switch sensors
in robot arms, mobile robots and robot-animals of
various kinds
32
Switch Sensors
- Switch sensors can be used in a variety of ways -
recall which were already discussed and shown in
lab. - You have seen many kinds of switches already
- button switches,
- mouse switches,
- key board keys,
- phone keys, etc.
- Go to Shops (like Wacky Willy or Tek Country) and
you will find plenty of cheap industrial switches
useful for your robot project
Various Switches
One dollar switch
33
What are the ways that Switch Sensors can be
used?
- Contact (touch) Sensing
- detect when the sensor has made physical contact
with another object - triggers when a robot grabs an object
- contact of whiskers
- a robots body runs into a wall,
- a robots gripper closes around a cube
- Limit Sensing
- triggers when a gripper is as open as it can be
- a limit sensor detects when a mechanism has
moved to the end of its range of travel,
signaling that the motor should be turned off - Shaft Encoding
- an axle may be fitted with a contact switch that
clicks once per revolution. - Software counts the clicks and determines the
amount and speed of the axles rotation. - e.g., triggers for each turn, allowing for
counting rotations
Various Switches
1. Bumpers 2. Limit in robot arms 3. Shaft
encoders
34
Use of Dip Switches on Robots
- There are four dip switches on the Expansion
Board 6.270. - They can be used to select user program options
during testing. - One dip switch will be used in the starting code
for the contest to determine the side your robot
starts on and at which frequencies it transmits
and receives the modulated IR. - They can also be useful for outside control of
program parameters, like enabling certain
functions or selecting programs to run. - While these switches are connected to the analog
port, they are really digital switches.
35
Analog Sensors and Thresholding
- Analog sensors, such as photo-resistors, can tell
you - how far the sensor has bent,
- or how much light is hitting the sensor.
- They answer questions with more detail.
- Analog sensors, however can be converted to
digital sensors using thresholding. - Instead of asking the question How much is the
sensor bent? you can ask the question Is the
sensor bent more than half way? - The threshold can be determined by playing around
with the specific sensor.
36
How to interface a Digital Sensor to Handy Board?
Digital Inputs
Similar to Robix
- Nine digital sensor ports connect to circuitry
on the HB that interprets each sensors Vsens
voltage as a digital true/false - Vsens gt 2.5 v, signal is logic one
- Vsens lt 2.5 v, signal is logic zero
- To connect switch to digital input circuit
- Wire between the sensor signal line and ground
Vsens
37
Sensor Interfacing to Digital Inputs
- normally open switch
- Switch is released it is open, so there is no
connection between the Vsens sensor line and
ground. The 47KW pull-up resistor on the HB then
provides the default value of 5v or logic one to
the sensor input circuitry. - Switch is pressed it connects the Vsens sensor
line to ground, the zero volt level. Then the
sensor input circuitry detects a logic zero
reading. - Switch reading is inverted in software digital()
38
Mostly using micro-switches
- Touch sensors
39
Figure 5.2 Microswitch Assemblies
Normally closed
Normally open
40
Double Pull Micro-Switches
- The two micro switches are double pull.
- This means they can be wired so that when not
depressed they - return a one
- or return a zero.
- The only major difference is how you think about
the device in your code. - Reading a sensor can be thought of as asking a
question. - Here, the question could be, Are you open?" or
Are you closed?" - If you wire the switch normally open, the answers
are yes and no, respectively, - where they would be no and yes for a switch wired
normally closed, - all for the same situation where the switch is
not depressed.
41
Normally open and Normally closed switch
- Depending on how you wire a switch, this switch
can be - normally open
- or normally closed.
- This would of course depend on
- your robot's electronics,
- mechanics,
- and its task.
- The simplest yet extremely useful sensor for a
robot is a "bump switch" - it tells when it's bumped into something, so
robot can back up and turn away. - You'll find that even for such a simple idea,
there are many different ways of implementation.
42
Switch Sensor Construction
Microswitch Normally Open Configuration
Pushbutton Switch Wiring Diagram
Microswitch Normally Closed Configuration
43
Possible arrangements for touch switches
- Touch switches should be wired in a normally open
configuration - In such cases the signal line is brought to
ground only when the switch is depressed. - In some cases, a slight advantage may result from
one of these arrangements, because there may be a
difference between the position where the open
side makes contact and the closed side breaks
contact. - When this is the case, the choice of normally
open or normally closed will affect how sensitive
the switch is to outside forces. - This can allow you to make a very touchy sensing
device or help block out noise. - The small black switches with the white lever arm
respond to a shorter arm movement when wired
normally open - They require a little more movement to cause a
transition in the normally closed configuration.
Normally open
Normally closed
44
Switch Sensors
Switch Sensor Applications
These are not standard touch sensors in Lego.
You can add them inexpensively buying in
standard hardware store rather than through Lego.
Left- and Right-Hand Switch Construction
Design for a Simple Touch Bumper
45
Micro-Switches as object detectors
- The standard kit includes three types of small
switches - two micro switches
- and a small push button.
- These make great object detectors,
- so long as you are only interested in answering
the question, - Am I touching something right now? with a
yes or no. - This is often enough for responding to
- contact with a wall
- or the other robot
- or for actuator position sensing.
- Using a switch for actuator position sensing
(called a limit" switch) can be a good way to
protect drive mechanisms - which would self destruct when over driven.
46
Other uses of Micro-Switches in our robots
- Actuator position sensing
- This could be handy for limiting the motion of
- hinged joints or
- linear actuators
- This is done by requiring that a switch be open
(or closed, depending upon the situation) before
running the motor and monitoring it while things
are moving. - They could also be used for extended user
interface for testing and development purposes.
47
Bouncing and Debouncing of microswitches
- Bouncing is a problem found in many switches.
- At the point where the switch goes from open to
close or vice versa, the output from the switch
is very glitchy. - The switch may output several transitions.
- Bounciness occurs especially when the switch is
used in a sensitive mode. - One way to debounce the switch is to add a delay
between samples of the digital input. - If the sampling is sparse enough, the bouncing
section of the data will not be collected.
Discuss debouncing using NAND latches and recall
asynchronous state machines from ECE 271
48
Touch Sensors other than microswitches
- Whiskers, bumpers etc.
- mechanical contact leads to
- closing/opening of a switch
- change in resistance of some element
- change in capacitance of some element
- change in spring tension
- ...
49
What are three types of sensing with touch?
- Normally done to avoid collisions
- Avoiding is a lot better than Detecting
- There are basically 3 forms
- Bumper Switch
- Whisker
- Pressure Pad
50
Bumper Switch
- Mounted on the chassis of the robot
- When plunger depressed collision is about to
occur - Characteristics
- small surface area
- low cost low sensitivity
51
Use of Touch Sensor as Bumper
52
Bumper Example 1
53
Two other Bumper Design Examples
Example 3
Example 2
- Design for Bi-Directional Touch Bumper
- can detect pressure from front or behind
- movement in either direction pushes levered arm
away from contact sensor - rubber bands pull arm back onto switch when
pressure is released
- Bumper Design
- rotational and sliding pivot points allow the
bumper to react to pressure from any forward
direction
54
Touch Sensors bumper skirt
- When the robot runs into a wall the bumper skirt
hits a micro switch - which lets the robot controller know that the
robot is up against a wall.
55
Whiskers
- Extends sensing like a cat extends its sensing
through its whiskers - Care should be taken in determining things like
- length
- weight
- shape
Cat whiskers measure space. If a whisker touches
the cat knows that it will not be able to go
through an opening as the whiskers define the
size of entrance it is capable of moving through.
Things like suspended ceiling wire, coffee sticks
or tooth picks can all act as whiskers. They
should not interfere with the actual sensing
element.
56
Binary Sensors
57
6.2. Encoder
58
Encoder
- Incremental encoder
- usually requires 2 sensors to determine speed and
direction - see motor control
- Technology
- magnet hall sensors (incremental)
- optical sensors with black/white segments
(incremental)
59
Encoder
- Encoder signal (2 lines) are connected to
microcontroller like 2 binary sensors (digital
input lines) - Microcontrollers usually have special internal
registers for pulse counting - ? This is done in parallel to normal calculations
- Does not slow down the cpu
60
6.5 Digital Sensors
- Digital sensors are
- usually more complex than analog sensors
- often more accurate than analog sensors
- sometimes are analog sensors with built-in A/D
converters
61
Digital Sensors
- Example Sharp GP2D02
- Available as digital or analog version
- (GP2D05)
- Versatile optical distance
- measurement sensor
- (requires reflective surfaces)
- Uses infrared LED and light detector
- Often called PSD (position sensitive
- device)
- Measurement range 6cm - 80cm
- Accuracy about 1cm
62
Digital Sensors
63
Digital Sensors
64
Digital Sensors
65
Digital Sensors
66
6.6 PWM Sensors
- We have already seen PWM for
- Velocity control for DC motors
- Position specification for servos
- Now we see PWM for
- Sensor data
- Examples
- Accelerometer
- Gyroscope
- Inclinometer
67
PWM Sensors
68
Todays Laboratory
- The purpose of this lab is to expose your team to
some of the sensors that you might use in your
robot design. - Learn the basic operating principles of
micro-switches and photo sensors (CdS cells). - Write and run a program to control the speed and
direction of an erector set motor using a
microswitch and a CdS cell. - Learn how to test the motor ports, analog ports,
and digital ports of your Handy Board.
69
Procedure
- Connect the Handy Board to the computer using the
interface board, phone cable, and serial cable
provided. - Run Interactive C on your computer.
- Follow the instructions to download pcode to your
handy board. - Select the file Handy_Board_1.2.icd when
prompted.
70
Procedure
- Determine if your Handy Board is working
correctly by loading and running the program
"hbtest.c". - This program will allow you to check the motor
ports, analog ports, digital ports, and the
control knob. - Run the following subroutines (one at a time) by
typing them at the bottom of the Interaction
Window. - testmotors ( )
- testdigitals ( )
- testanalogs ( )
71
DC Motor
- Connect the motor to one of the motor ports.
72
DC Motor
- Write a program using the motor (int m, int p)
command to turn the motor on and off, and to
reverse its direction. - Be sure that the motor has stopped before
reversing its direction - Use printf statements to show the status of the
motor on the LCD screen.
73
Microswitch
- Solder a microswitch to a two-wire ribbon cable.
- Trim a male header strip (use four pins only) and
solder it to the other end of the ribbon cable
(See figures on section 6 of the Handy Board
Technical Reference. )
74
Microswitch
- Connect the microswitch to a digital port.
- Write a program that allows the motor to run
while the microswitch is "not pressed" (switch
open). - The motor should stop whenever the microswitch is
"pressed" (switch closed). - Use printf statements to show the status of both
the motor and the microswitch on the LCD screen.
75
CdS (Cadmium Sulfide) Cell
- Plug a CdS cell directly to an analog port of the
handyboard. - Write a command to print the output of the CdS
cell on the LCD screen.
76
System to Sense and Control
- Connect the DC motor, the microswitch, and the
CdS cell to the Handy Board - Write a program that will continuously change the
speed and direction of the motor based on the
output of the CdS cell. - Use the start button on the Handyboard to run the
motor at a maximum power level of 100 in one
direction. - As you cover the CdS cell with your hand, the
motor will slow down, stop, reverse its direction
of rotation, and run at a power level of 100. - The motor should stop whenever the microswitch is
pressed (switch closed) or when the stop button
is pressed.
77
System to Sense and Control
- NOTE Make sure that each team member can operate
the Handyboard including setup, initialization,
connection of devices, operating the devices in
command mode, writing code in IC, and operating
the devices under program control.
78
Individual lab reports
- Four pages maximum (including cover page,
sketches, and attachments). - Cover page title, name, section, team , date,
and professor. - Description of the lab procedure, problems
encountered, and how problems were solved. - Include a sketch of the controller, motor,
microswitch, and CdS cell connected. Use labels
to indicate the ports used. - Include copies of the programs used for parts 5
and 6.
79
Some sources
- John T. Demel
- Students from previous 479
80
Questions for students
- Present analog and digital robot sensors.
- Analog sensors based on measuring current or
voltage. Examples and their use in a mobile
robot. - Role of sensors in feedback control of a robot.
Examples. - Analog sensors and digital sensors in analog and
digital ports of the processor. Give examples. - List all uses of microswitches in a robot.
- List all uses of Cadmium Sulfide Cells in a
mobile robot. - Encoders.
- PWM sensors.
- Describe a sensor system for a soccer team of
robots.