
OBLIQUE VIEWS - PowerPoint PPT Presentation
1 / 15
Title:
OBLIQUE VIEWS
Description:
Oblique drawings provide a quick way to sketch an object and represent the three ... can be transferred directly to the appropriate face in the oblique drawing. ... – PowerPoint PPT presentation
Number of Views:161
Avg rating:3.0/5.0
Title: OBLIQUE VIEWS
1
OBLIQUE VIEWS
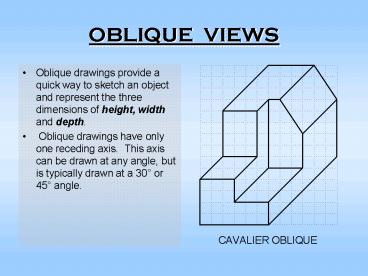
- Oblique drawings provide a quick way to sketch an
object and represent the three dimensions of
height, width and depth. - Oblique drawings have only one receding axis.
This axis can be drawn at any angle, but is
typically drawn at a 30 or 45 angle.
2
Cavalier Oblique
- Cavalier oblique drawings transfer the depth
measurement from the orthographic projection
directly to the receding axis in the oblique
drawing. - For an illustration, begin with the orthographic
views of the object.
3
Cavalier Oblique Step 1
- Step 1 - The overall rectangular shape is drawn
with the depth measurement placed along the
receding axis.
4
Cavalier Oblique Step 2
- Step 2 - The rectangle or notch on the right
hand side is drawn to show where the corner has
been removed.
5
Cavalier Oblique Step 3
- Step 3 - The rectangular notch on the upper left
front corner is drawn.
6
Cavalier Oblique Step 4
- Step 4 - The inclined surface on the upper right
rear edge is located by marking the corners of
the inclined surface and then connecting those
corners to generate the angle.
7
Cavalier Oblique Completed
- As you construct the oblique drawling, notice
that surfaces that are parallel in the
orthographic view remain parallel when
transferred to the oblique drawing
8
Cabinet Oblique
- A cabinet oblique drawing is constructed similar
to a cavalier oblique drawing except the
distances transferred along the receding axis are
reduced by half. - This reduces the exaggerated (or long) look of
oblique drawings where the depth measurement is
significantly greater in proportion to the height
and width.
9
Comparison ofCavalier and Cabinet Obliques
10
Curved Surfaces
- When the curved edges of cylindrical features and
holes appear circular in the front face of the
object, the radii and diameters can be
transferred directly to the appropriate face in
the oblique drawing.
11
Curved Surfaces Step 1
- Step 1 - Begin the oblique drawing with light
construction lines for the rectangular base plate
and rear vertical plate.
12
Curved Surfaces Step 2
- Step 2 - The two circles representing the curved
top of the vertical rear plate are drawn in both
the front face and rear face.
13
Curved Surfaces Step 3
- Step 3 - The light diagonal line that goes from
the center of the circle to the upper left corner
in each face defines the point of tangency for
the line that represents the edge of the curved
surface on the upper left side.
14
Curved Surfaces Step 4
- Step 4 - Since the circles representing the hole
do not overlap in the cavalier oblique, you will
not see the edge of the rear hole. Only the
circle representing the front edge of the hole is
drawn with a visible line.
15
Comparison ofCavalier and Cabinet Obliques