
HOW TO CREATE MAILING LABELS PowerPoint PPT Presentation
1 / 24
Title: HOW TO CREATE MAILING LABELS
1
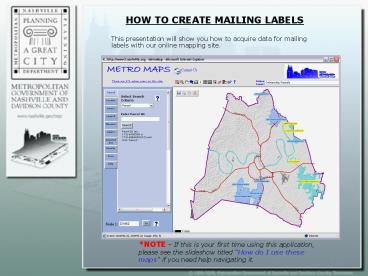
HOW TO CREATE MAILING LABELS
This presentation will show you how to acquire
data for mailing labels with our online mapping
site.
NOTE If this is your first time using this
application, please see the slideshow titled How
do I use these maps if you need help navigating
it.
2
HOW TO CREATE MAILING LABELS
You will still need a program to create you
labels such as Microsoft Access or Excel.
NOTE If this is your first time using this
application, please see the slideshow titled How
do I use these maps if you need help navigating
it.
3
HOW TO CREATE MAILING LABELS
Lets begin by zooming into an area wed like to
use.
4
For example, East Nashville near LP Field.
5
Lets zoom in further.
6
Click on Select.
7
On this panel, you can create mailing labels by
the owners address, or by the actual property
address.
8
Selecting Owner will sort your labels by who
actually owns and pays the taxes on the property.
9
Selecting Property will sort your labels by the
physical address of the property.
10
Notice how these are different. The owner of 600
Woodland St doesnt live there, but still owns
the property.
11
Lets begin creating our labels by clicking on
Select by Shape.
12
Draw a box around the area shown below.
13
Draw a box around the area shown below.
14
Draw a box around the area shown below.
15
Draw a box around the area shown below.
16
Next, click on Create Owner Mailing List.
17
Choose how you want to view your data, either
Text or Excel
18
For this example, well choose Excel.
19
Click Open to view your data.
20
(No Transcript)
21
Click file to use the pull down and save your
data.
22
This is what it would look like if we chose text.
23
You can also select by line or point.
24
We hope that this tutorial has helped you, and if
you have suggestions, questions, or comments,
feel free to contact us at internetmaps_at_nashvill
e.gov (615)-862-7190
Recommended
