
Light Quality in Daylit Spaces - PowerPoint PPT Presentation
1 / 20
Title:
Light Quality in Daylit Spaces
Description:
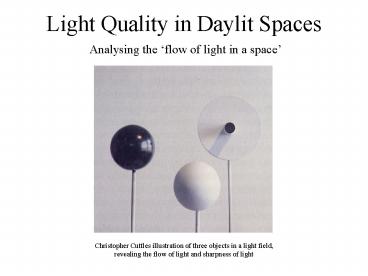
Christopher Cuttles illustration of three objects in a light field, revealing ... The glossy black sphere reveals the highlight pattern ... – PowerPoint PPT presentation
Number of Views:62
Avg rating:3.0/5.0
Title: Light Quality in Daylit Spaces
1
Light Quality in Daylit Spaces
- Analysing the flow of light in a space
Christopher Cuttles illustration of three objects
in a light field, revealing the flow of light and
sharpness of light
2
The task
- ? Place the light flow meter in a major daylit
- Space.
- ? Render a view of the 3 objects in the daylit
- space and save as a .pic image.
- ? Render all 6 R-Trace objects and save the data
- Produced.
- ? Save the files onto you website and your hand
in folders
3
The light flow meterChristopher Cuttles Light
Flow Meter
- The peg on a disc reveals the shadow pattern
- The glossy black sphere reveals the highlight
pattern - The mat white sphere reveals the shading pattern
4
The light flow meter
- The light flow meter will reveal sharpness and
flow of light in a space. - By using this analysis it is possible to get a
better understanding of how light flows in a
space, and design a lighting solution to suit the
needs of the client.
5
The scale of shadows
- What the tool is trying to produce
6
The 3 objects
- The 3 objects have been modeled in Autodesk VIZ.
- The 3 objects are named shading and highlight
sphere, and shadow gnomon. - They are simple objects which you will need to
import into your model. These may need scaling
depending on your model.
7
The 3 objects
- The objects can be found on the R Drive.
- You will need to add materials to the objects.
- You will need to add the calculation grids in
using the light studio helper in VIZ
8
The materials
- There are 3 materials which you will need to
make, white matt for the white matt sphere and
the peg on a disc - And a black shiny material for the balck shiny
sphere - Both of these materials will be light studio
materials
9
Material
- White matt Use plastic, with 50 reflection
factor, 0 specularity, and 0 roughness - Black shiny Use metal, with 1 reflection
factor, 1 specularity, and 0 roughness
10
The R-Trace grid
- You will need to place 6 R-Trace objects into the
scene. - These are found under helpers, and picking light
studio will bring up the R-Trace object to place
in the scene.
11
(No Transcript)
12
R-Trace grid
- Place a object by dragging in the plan view
directly over the shading sphere, move the object
directly at the top of the sphere still facing
upwards, try and get it as square as possible. - Once the first object has been placed you will
then need to change the pivot point for the
object, this is done through the hierarchy menu.
By clicking affect pivot point only and using the
move tool, move the pivot directly down to the
centre of the white matt sphere.
13
(No Transcript)
14
The R-Trace grids
- Once the pivot has been moved then you can
rotate/copy the grid around the sphere as
instances. - Hold shift and rotate the sphere 90 degrees in
one direction, once you let go of your mouse
button the option to copy the object will come
up. - Make 3 copies and click ok.
- Once the first four grids are in place rotate two
more grids around to fill the two gaps to produce
6 grids which are on all sides of the sphere. - Then select one of the grids and modify it so
that the grid size is 1x1, and the points are
2x2, this will make the grids very small, if they
are the same size as the sphere then make the
grid size .02 x .02, this will depend on the unit
setup you have used in viz.
15
(No Transcript)
16
(No Transcript)
17
The R-Trace output
- Once the model is ready you will then need to
produce the output from the 6 grids. This is done
through the render dialogue box for Light Studio.
Under the render drop down box which will show
expert or simple you need to choose rtrace, and
make sure the illuminance check box is ticked. - Then you will need to select each rtrace object
and render each in turn. - Once rendered save each grid as .txt files
18
Check this box
19
The .pic image
- Place a camera in the scene which is focused on
the 3 objects, the objects need to be visible in
the render. - Once the camera is positioned and the materials
added to the scene then render the camera view
using expert (rpict), medium settings, and make
sure illuminance is NOT checked. - Once rendered save the image as a .pic file by
typing .pic after the file name.
20
Summary
- ? Place the light flow meter in a major daylit
Space. Apply materials to the objects. And Place
the R-Trace grids around the white matt sphere. - ? Render a view of the 3 objects in the daylit
- space and save as a .pic image.
- ? Render all 6 R-Trace grids and save the data
- Produced.
- ? Save the files onto your website and your hand
in folders
Recommended
CrystalGraphics Presentations


