
OnePoint Perspective - PowerPoint PPT Presentation
1 / 11
Title:
OnePoint Perspective
Description:
Isometric Projection. Isometric drawing is another way of presenting designs/drawings in three ... Designs are always drawn at 30 degrees in isometric projection. ... – PowerPoint PPT presentation
Number of Views:198
Avg rating:3.0/5.0
Title: OnePoint Perspective
1
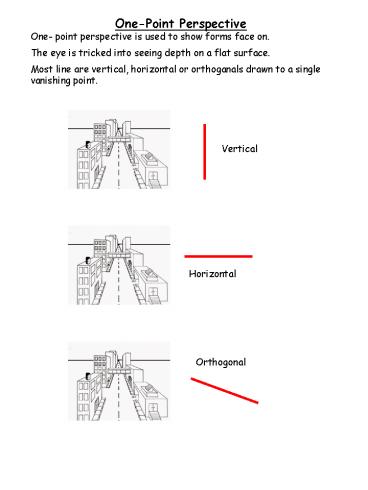
One-Point Perspective One- point
perspective is used to show forms face on. The
eye is tricked into seeing depth on a flat
surface. Most line are vertical, horizontal or
orthoganals drawn to a single vanishing point.
2
It's easy to draw simple forms in one-point
perspective. Here's how! 1. Turn
your paper horizontal ("landscape" orientation)
2. Draw a border round the page, 1cm from each
edge. Draw a title block 3cm from the bottom of
the page. In he title block write your name, the
title One-point Perspective and the date.
Divide the drawing area into 4 equal sections
3. In the top left hand section, draw a
horizontal line 2cm down from top of the border.
This is your horizon line.
3
4. Draw a dot in the middle of your horizon line.
This is your vanishing point.
5. Now draw a square or rectangle in the right or
left bottom area of your page.
6. Now connect three corners of your rectangle or
square to the vanishing point. These are
orthogonals.
4
7. Draw a horizontal line between the top two
orthogonals where you want your form to end.
8. Draw a vertical line down from the horizontal
line to complete the side.
9. Rub out the remaining orthogonals.
Now you have a 3-D form in one-point perspective
5
10. Add details and experiment
6
Two-Point Perspective Two-point
perspective is useful to show an angle rather
than face-on. Most lines are vertical or
orthogonals drawn to two different vanishing
points. 1. Turn your paper horizontal
("landscape" orientation)
2. Draw a border round the page, 1cm from each
edge. Draw a title block 3cm from the bottom of
the page. In he title block write your name, the
title Two-point Perspective and the date.
Divide the drawing area into 4 equal sections
3. In the top left hand section, draw a
horizontal line 2cm down from top of the page.
This is your horizon line.
7
4. Draw two dots on your horizon line near the
edges of the paper. These are your vanishing
points.
5. Draw a vertical line that is the "front edge"
of your form.
6. Connect the two ends of your "front edge" line
to each vanishing point. These are called
orthogonals.
Draw lightly so you can rub them out
Remember In two-point perspective most lines
are either vertical or orthongonals. There are
rarely horizontal lines in two-point
perspective.
8
7. Draw two vertical lines between the
orthogonals where you want the back edges of
your form.
8. Now join the back, top corners to the opposite
vanishing point to complete the top of the form.
9. Erase the extra orthogonals. Now you have a
form drawn in two-point perspective!
9
10. Now add details and experiment
10
Isometric Projection
Isometric drawing is another way of presenting
designs/drawings in three dimensions. The example
above has been drawn with a 30 degree set square.
Designs are always drawn at 30 degrees in
isometric projection.
On the grid paper provided, draw a vertical line
6 squares high . At the bottom of the vertical
line, draw a line 6 squares long along the 30
degree line to the left. Repeat this to the
right .
11
At the end of each 30 degree line, draw a
vertical line 6 squares high.
Complete the top of the cube by projecting the
lines as shown below.
Recommended
CrystalGraphics Presentations


