
Stellar wallet development - PowerPoint PPT Presentation
Title:
Stellar wallet development
Description:
Stellar wallet development - – PowerPoint PPT presentation
Number of Views:51
Title: Stellar wallet development
1
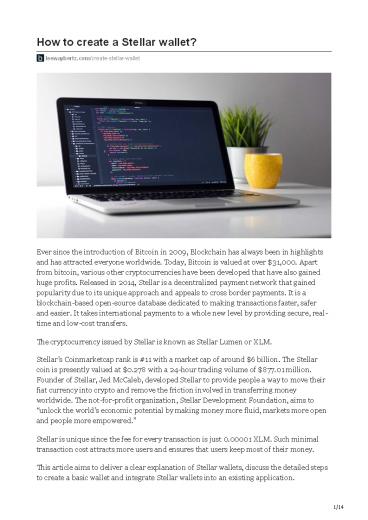
How to create a Stellar wallet?
leewayhertz.com/create-stellar-wallet
Ever since the introduction of Bitcoin in 2009,
Blockchain has always been in highlights and has
attracted everyone worldwide. Today, Bitcoin is
valued at over 31,000. Apart from bitcoin,
various other cryptocurrencies have been
developed that have also gained huge profits.
Released in 2014, Stellar is a decentralized
payment network that gained popularity due to its
unique approach and appeals to cross border
payments. It is a blockchain-based open-source
database dedicated to making transactions faster,
safer and easier. It takes international payments
to a whole new level by providing secure, real-
time and low-cost transfers. The cryptocurrency
issued by Stellar is known as Stellar Lumen or
XLM. Stellars Coinmarketcap rank is 11 with a
market cap of around 6 billion. The Stellar coin
is presently valued at 0.278 with a 24-hour
trading volume of 877.01 million. Founder of
Stellar, Jed McCaleb, developed Stellar to
provide people a way to move their fiat currency
into crypto and remove the friction involved in
transferring money worldwide. The not-for-profit
organization, Stellar Development Foundation,
aims to unlock the worlds economic potential by
making money more fluid, markets more open and
people more empowered. Stellar is unique since
the fee for every transaction is just 0.00001
XLM. Such minimal transaction cost attracts more
users and ensures that users keep most of their
money. This article aims to deliver a clear
explanation of Stellar wallets, discuss the
detailed steps to create a basic wallet and
integrate Stellar wallets into an existing
application.
2
Whats a Stellar wallet and what does it hold? A
stellar wallet is an application component built
to handle basic functionalities like account
creation, key storage, queries and transaction
signing to the Stellar database. Unlike
real-world wallets, Stellar wallets do not hold
digital cash, at least not directly. Stellar
wallets are used to sign and submit the
transactions and view the Stellar ledgers past
and current state. The ledger stores data,
including offers to buy and sell, accounts and
balances shared by all nodes that make up a
network. Wallet stores caches or references to
the Stellar database, but the actual data is
stored on the blockchain. The key takeaway here
is that the Stellar wallet, rather than holding
or storing something, is an interface or
interactive layer on top of Stellar. Therefore,
Stellar wallets discussion revolves around
accessing and surfacing data in the network
rather than storing something on our
end. Wallets operate on the client-side deal
with users secret keys, giving direct access to
the users accounts. Therefore, for the wallets
security, it is necessary to flow all the web
traffic over strong TLS methods. Moreover, key
management is an inevitable part of security.
Before moving on to the creation of wallets,
first, we discuss some basics of key management
in a Stellar wallet. How to manage keys? The
first step for any app is to sort out user
onboarding. Since secret keys control the access
of the users account, deciding how to handle
keys and how to append the Stellar account to a
user object becomes the priority. An important
question might occur to your mind here who will
own the account? The answer involves three
possibilities The service provider is the
owner, stores the secret keys and represents the
usage rights to the user. It is a custodial
service. The user is the owner, will have
self-custody of their account credentials and
delegate transaction signing. It is a
non-custodial service. A blend of both via
multi-sig. This method helps maintain
non-custodial status while still allowing for
account recovery. While going with the first or
third approach, excessive carefulness is required
to store and take control of the users secret
keys. It is easy to get wrong and reach a
devastating situation. Although, developers can
choose any of the options depending on their
requirements. Here, our focus is to present to
you how to build a non-custodial service. Our
goal is to take you to a place where user can
create, store and access Stellar account using
intuitive encryption method. Well use a
toolchain called StencilJS. It provides the best
of modern frontend frameworks and pares
everything back to small, fast and completely
standard-based web components that work on every
browser. It provides an easy way to create web
applications and allows
3
you to see all the ins and outs of creating a
Stellar wallet from start to end. Project
Setup To set up the project, open the terminal
and initialize a new project.
1
npm init stencil
A prompt will appear to choose the type of
project. Choose components as we are dealing with
modular components, not the entire application.
Now run
1
npm run generate
This step will initialize a component generation
script. Enter stellar-wallet.
1 2 3 4
npm run generate gt stellar-wallet
generate gt stencil generate stencil generate
stellar-wallet
The following files have been generated
1 2
- src/components/wallet/wallet.tsx
- src/components/wallet/wallet.css
Now, for styling, were using SCSS rather than CSS
1
npm i -D _at_stencil/postcss _at_stencil/sass
autoprefixer _at_types/autoprefixer
rollup-plugin-node-polyfills
After the style packages have installed, go to
stencil.config.ts and modify it to this
4
- import Config from "_at_stencil/core"
- import sass from "_at_stencil/sass"
- import postcss from "_at_stencil/postcss"
- import autoprefixer from "autoprefixer"
- import nodePolyfills from "rollup-plugin-node-poly
fills" export const config Config - namespace "stellar-wallet",
- outputTargets
- 08
- type "dist",
- esmLoaderPath "../loader",
- 11 ,
- 12
- 13 type "docs-readme",
- ,
- 14
- type "www",
- serviceWorker null, // disable service workers
- 17 ,
- 18 ,
5
Non-custodial wallets do not need to communicate
with servers or databases, and every action is
performed locally on the users device. The basic
user flow is expected to work as Create account
UI modal popup asking for pincode enter pincode
app encrypts a new secret Stellar keypair with
pincode save encrypted key to local storage. For
every page reload, public key is fetched to
allow the user to login into the account. For any
protected action like CopySecret, the modal
will popup again and ask for the original
pincode. Create Popup Modal For the popup modal,
the browsers prompt functionality will be
implemented with our new component. First,
generate a new component
1
npm run generate
- Name it as stellar-prompt. Open
src/components/prompt/ and change the .css file
to - css. In that style file write this
- _at_import "../../global/style.scss"
- host
- display block
- font-family font-family
- font-size 15px
- .prompt-wrapper
- position absolute
- top 0
- left 0
- bottom 0
- right 0
- display
- flex
- align-items center justify-content center
- align-content center
- min-height 100vh
6
- 36
- 37
- .select-wrapper
- position relative
- display inline-flex select
- border-color blue
- padding 0 10px
- min-width 100px
- 44
- after,
- before
- font-size 12px
- position absolute right 10px
- color blue
- 50
- after
- content top calc(50 - 5px) transform
translate(0, -50) - rotate(90deg) before content
- top calc(50 5px)
001 002 003 004 005 006
import Component, Prop, Element, Watch, h,
State from "_at_stencil/core" import defer as
loDefer from lodash-es" export interface
Prompter show boolean message? string
placeholder? string
7
- options? Array
- resolve? Function
- reject? Function
- 010
- _at_Component(
- tag "stellar-prompt",
- styleUrl "prompt.scss",
- shadow true,
- 014 )
- export class Prompt
- _at_Element() private element HTMLElement
- _at_Prop( mutable true ) prompter Prompter
- _at_State() private input string
- _at_Watch("prompter")
- watchHandler(newValue Prompter, oldValue
Prompter) - if (newValue.show oldValue.show) return
- if (newValue.show)
- this.input null
- if (newValue.options)
8
- div class"prompt"
- this.prompter.message ? pgtthis.prompter.mess
age null - this.prompter.options ? (
- div class"select-wrapper"
- select onInput(e) ampgt this.update(e)
- " "
- this.prompter.options.map((option) (
- option
- valueoption.codeoption.issuer
- selectedthis.input option.codeoption.
issuer - option.code
- /option
- 074 ))
- 075 /select
- /div
- 076 ) (
- ltinput
- type"text"
- placeholderthis.prompter.placeholder
1
npm i -D lodash-es
Create Stellar Account Class
9
1 2 3 4
interface StellarAccount publicKey string
keystore string
- StellarAccount is a class that includes the
public key. Set up account state with
StellarAccount class and prompter state with
Prompter class. - _at_Component(
- tag 'stellar-wallet',
- styleUrl 'wallet.scss',
- shadow true
- 05 )
- export class Wallet
- _at_State() account StellarAccount
- _at_State() prompter Prompter show false
- _at_State() error any null
- 09 ...
- 10
- After this step, the assignment of imported
events and methods needs to be done. - import handleError from "_at_services/error"
- import get from "_at_services/storage"
- export default async function componentWillLoad()
1 2
mkdir -p src/services touch src/services/error,st
orage.ts
error.ts will hold the following
10
1 2 3 4
import get as loGet from "lodash-es" export
function handleError(err any) return
loGet(err, "response.data", loGet(err, "message",
err))
- It is a simple error handler used while
processing API requests. - Set up key storage
- Modify storage.ts as
- import Plugins from "_at_capacitor/core"
- const Storage Plugins
- export async function set(key string, value
any) Promise - await Storage.set(
- key, value,
- 06 )
- 07
- export async function get(key string) Promise
- const item await Storage.get( key )
- return item.value
- 11
- export async function remove(key string)
Promise - await Storage.remove( key )
1 2 3 4 5 6 7
Install dependencies npm i -D _at_capacitor/core
_at_capacitor/cli Initialize Capacitor npx cap
init ? App name Stellar Wallet ? App Package ID
(in Java package format, no dashes)
com.wallet.stellar ? Which npm client would you
like to use? npm
Initializing Capacitor project in /Users/tylervand
erhoeven/Desktop/Web/Clients/Stellar/stellar-demow
allet in 1.91ms Your Capacitor project is ready
to launch.
1 2 3 4
Add platforms using "npx cap add" npx cap add
android npx cap add ios npx cap add electron
Set up event handling On ./events/render.tsx file
10/14
11
- import h from _at_stencil/core
- export default function render()
- return
- 04 ,
- this.account ? (
- ltdiv class"account-key"gt
- this.account.publicKey
- ltbutton class"small" type"button"gt
this.copyAddress(e) - Copy Address
- lt/buttongt
- ltbutton class"small" type"button"gt
this.copySecret(e) - Copy Secret
- lt/buttongt
- lt/divgt
- 14 ,
- 15
- 16 ) (
- ltbutton type"button"gt this.createAccount(e)
12
- In ./methods/createAccount.ts file
- import sjcl from _at_tinyanvil/sjcl
- import Keypair from stellar-sdk
- import handleError from _at_services/error
- import set from _at_services/storage
- export default async function createAccount(e
Event) - try
- e.preventDefault()
- const pincode_1 await this.setPrompt(Enter a
keystore - pincode)
- const pincode_2 await this.setPrompt(Enter
keystore pincode - again)
- if (!pincode_1 !pincode_2 pincode_1 !
pincode_2) - throw Invalid pincode this.error null
- const keypair Keypair.random()
- this.account
- publicKey keypair.publicKey(),
- keystore sjcl.encrypt(pincode_1,
keypair.secret(), - adata JSON.stringify(
1 2 3 4 5 6 7
In ./methods/copyAddress.ts import copy from
copy-to-clipboard export default async
function copyAddress(e Event)
e.preventDefault() copy(this.account.publicKey)
npm i -D copy-to-clipboard
Copy Secret
13
- In ./methods/copySecret.ts
- import sjcl from _at_tinyanvil/sjcl
- import copy from copy-to-clipboard
- import handleError from _at_services/error
- export default async function copySecret(e
Event) - try e.preventDefault()
- const pincode await this.setPrompt(Enter your
keystore - pincode)
- if (!pincode) return
- this.error null
- const secret sjcl.decrypt(pincode,
this.account.keystore) - copy(secret)
- catch (err)
- this.error handleError(err)
- 14
- 15
14
- The last method in wallet.ts file is
./methods/setPrompt.ts. - export default function setPrompt(
- message string,
- placeholder? string,
- options? Array,
- ) Promise
- this.prompter
- this.prompter,
- show true,
- message,
- placeholder,
- options,
- 12
- return new Promise((resolve, reject) gt
this.prompter.resolve resolve - this.prompter.reject reject
- 15 )
- 16
- 17
- 18
Recommended
CrystalGraphics Presentations


